Table of Contents
This practical guide walks through how to play Retro Games on Raspberry Pi. It organizes the required steps, settings, and checks so you can complete the task with fewer mistakes.
The number of virtual reality games is increasing rapidly. Mobile games are also increasingly popular. Chatting via Discord and streaming to Twitch or YouTube continue to be popular entertainment activities. Experts predicted all of this many years ago.
But who could have predicted the rise of retro games? Who would have guessed that a credit card-sized PC would become instrumental in the rise of retro gaming, right?
The Raspberry Pi is incredibly versatile - like a desktop computer, but a lot lighter - and can emulate a large collection of gaming platforms. If you're interested in building a retro gaming console with a Raspberry Pi, here's what you need to know.
Can Raspberry Pi Run Retro Games?
The answer is yes. All you need is to install the necessary emulators on your Raspberry Pi and then you can start playing retro games right away. While installing and using emulators is legal, downloading games you don't get is not.
Choose the Right Retro Gaming Distribution
The main options for retro gaming distributions on the Raspberry Pi are:
- RetroPie
- Batocera
- Lakka
- Recalbox
Retropie is the best known option, but at the time of writing, the Retropie image is not compatible with the Raspberry Pi 5. For this reason, the article will use Batocera in this tutorial.
Note : For old Raspberry Pi, you can configure Retroarch on Raspberry Pi to have the best gaming setup.
All of these distributions use almost the same emulation system, with EmulationStation as the frontend and libretro as the backend. So the choice mainly depends on personal preference.
In the next section, the article walks you through the process of setting up Batocera on Raspberry Pi and starting to play retro games. If you decide to use a distribution other than Batocera, you can still follow the instructions as the process is largely the same regardless of which distribution you choose.
As a side note, the above distributions will also work on any Raspberry Pi alternative.
Install Batocera on Raspberry Pi
To set up Batocera on Raspberry Pi, you first need to download the Batocera image for Raspberry Pi. Next, download and install Raspberry Pi Imager for the operating system (available for Windows, macOS, and Linux). This is the tool that will be used to write the Batocera image to the microSD card.
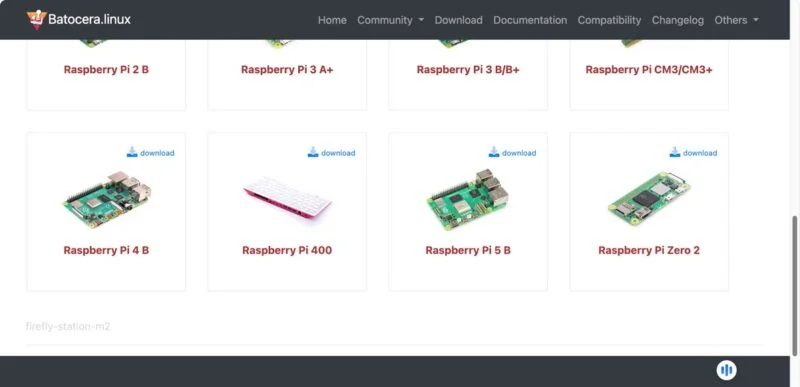
Connect the microSD card to the computer's USB port. If you want to store ROM and BIOS files on the same microSD card as the operating system, make sure it has enough capacity. Recommended storage capacity is 128GB or more. It's also possible to store ROM and BIOS files on a separate storage device, such as a USB or external hard drive, so it won't be a problem if a large microSD card isn't available right now.
Warning : The SD card will be completely erased, so make sure there is no important content on it.
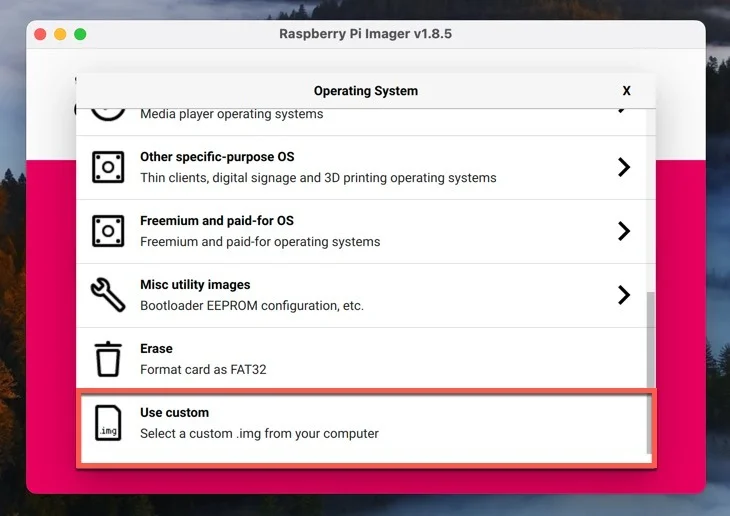
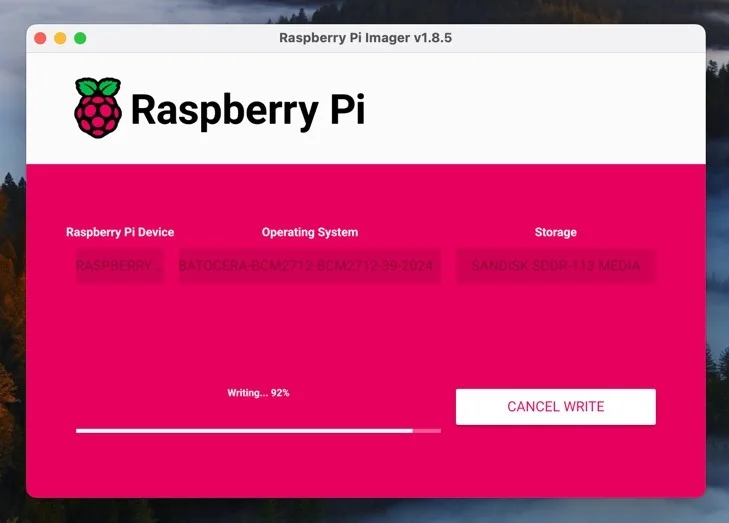
Once the microSD card is connected, you can launch the Raspberry Pi Imager tool and select your Raspberry Pi model. then choose the Choose OS Button and scroll down until you see the Use custom. img Option. select it and select the downloaded Batocera image file.
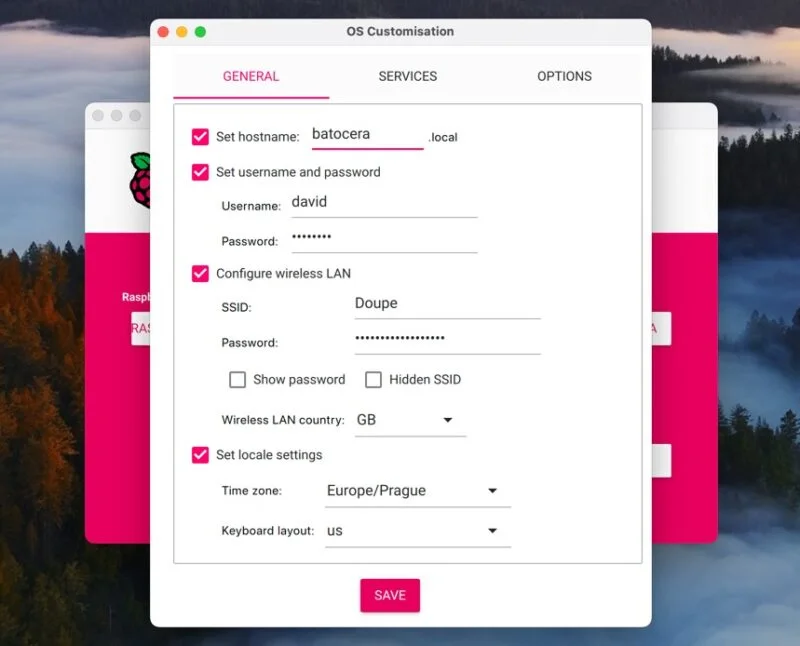
Finally, select the SD card and select Next . You will be given the option to customize your operating system settings. You should because doing it now will be easier than later. select The Edit Settings Button and configure the server name (can use 'batocera'), username and password, wireless LAN settings and local settings in the General Tab. In the Services Tab, SSH can be enabled for remote access. then choose Save And confirm your decision to apply the operating system customization settings.
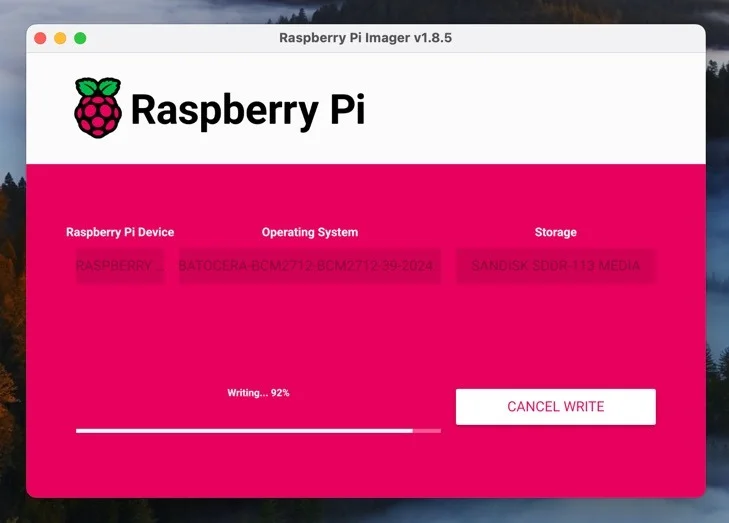
Now, just wait for the image to be written to the SD card. It may take a few minutes. Once the image has been recorded, insert the SD card into the Raspberry Pi and connect it to the monitor, keyboard and mouse. Power on the Raspberry Pi and wait for Batocera to boot.
Add ROM and BIOS File
Batocera is up and running. Now it's time to add your favorite retro games! They come in a file format called ROM. Additionally, some console emulators may require specific BIOS files to function properly.
The most convenient option is to store ROM and BIOS files on a Batocera microSD card. Just copy the ROM and BIOS files directly using one of the following methods:
- Batocera file Manager : Access it by pressing F1 On the home screen. It can then be used to copy ROM and BIOS files from any external storage device connected to the Raspberry Pi to the ROM and/or bios folders. (use ALT + F4 To exit the file manager once completed).
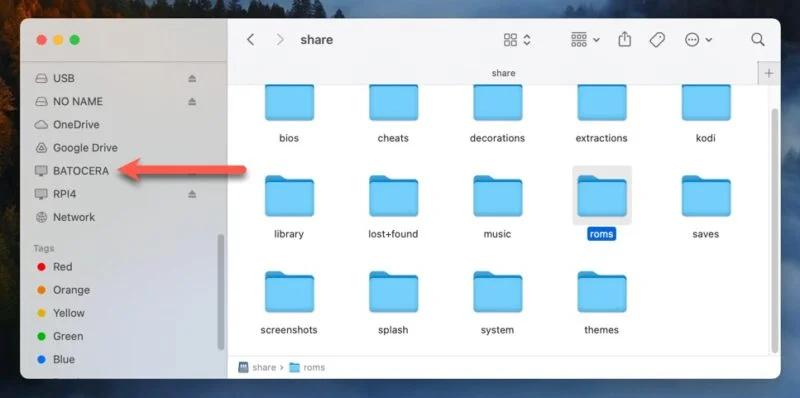
- Batocera network sharing : Additionally, Batocera network sharing is possible, which will be available as soon as Batocera starts. Network shares show all important user folders, including roms and bios.
- Direct file transfer : It is also possible to connect the Batocera microSD card to a computer with a file system capable of reading EXT4 (most modern Linux machines can read it). Then, copy the ROM and BIOS files directly to the card.
For example, I chose the second option, copying my ROM and BIOS files over the network. The process went smoothly and Batocera recognized the NES collection immediately.
If you want to use an external storage device, Batocera needs to be configured to use it. Open the main menu (spacebar if using a keyboard) and navigate to SYSTEM SETTINGS → STORAGE DEVICE . There, select the storage device you want to use (it must have a compatible file system such as FAT32, exFAT or EXT4).
Batocera will automatically create the necessary folder structure on the selected drive after reboot. Once the folder structure is created, you can remove the drive, copy files to it, and reconnect it to Batocera.
For Batocera to actually recognize newly added games, the game list must be updated by going to GAME SETTINGS → UPDATE GAMELISTS In the main menu.

While you're at it, you should also download cover art for your ROM files. Do that using the Scraper tool in the main menu. In most cases, the default settings will work fine (some sources may ask for credentials), so just launch the tool and select Scrape Now .

Note: TheUPDATE GAMELISTS Option needs to be reused after collecting data.
Connect the Controller to Bluetooth or Wired
To enjoy a more realistic retro gaming experience, you may want to use a controller or gamepad. Luckily, Batocera supports all popular controllers by default and requires no configuration. Simply put the controller into pairing mode and open CONTROLLER & BLUETOOTH SETTINGS → PAIR BLUETOOTH PADS AUTOMATICALLY . If that doesn't work, use the PAIR A BLUETOOTH DEVICE MANUALLY Option instead.

The controller's buttons will automatically be mapped correctly. If not, you can remap them by going to CONTROLLER & BLUETOOTH SETTINGS → CONTROLLER MAPPING .
Start Playing the Game
Once you've added your ROM and configured your controller, you're ready to start playing retro games on your Raspberry Pi using Batocera. But why stop there when you can turn any PC into a retro gaming machine with Batocera Linux? If you have some old PC hardware left over, you can reuse it in a unique and awesome way.
FAQ
What do I need before I play Retro Games on Raspberry Pi?
Prepare the required device, software, account access, and any files mentioned in the steps. Back up important data before changing system settings.
Why does the process look different on my device?
Menus and options can vary by operating system, app version, device model, or region. Use the closest matching setting and check the official documentation when needed.
What should I do if a step does not work?
Restart the app or device, confirm permissions and connectivity, update the software, and repeat the step carefully. Avoid unofficial downloads or tools.
Related Articles
 What You Need to Know About Retro Gaming on Raspberry Pi12 minutes read
 How to Turn the TV Into a Retro Gaming System with the Raspberry11 minutes read
 Is Retro Gaming Dead? What Do You Know About Retro Gaming?10 minutes read
 Play Retro PC Games on iPhone: Step-by-Step Guide6 minutes read
 How to Play Retro Games of Internet Archive on Kodi9 minutes read
 How to Transform Raspberry Pi into SNES Classic9 minutes read
Reader Comments 0
Sign in with email or Google to join the discussion.