Deploy Data Protection Manager 2007 (Part 3)
In the previous sections we saw how to install DPM 2007, create basic items such as installing an agent (agent) to configure the disk, using the DPM 2007 Administrator Console. In this section we will continue the discussion about Windows File S protection
 Deploy Data Protection Manager 2007 (Part 1)
 Deploy Data Protection Manager 2007 (Part 2)
Anderson Patricio
In the previous sections we saw how to install DPM 2007, create basic items such as installing an agent (agent) to configure the disk, using the DPM 2007 Administrator Console. In this section, we will continue the Windows File Server protection to demonstrate how to create Protection Group in DPM 2007.
First, let's see which Microsoft product is protected by DPM 2007 and then create a Protection Group.
What does DPM protect?
DPM protects some Microsoft products. Table 1 below will list products that can be protected and items inside the product can be restored.
Microsoft products Protected items Items that can restore Exchange Server 2003 SP2 Exchange Server 2007 Storage group Storage group, Database, or Mailbox SQL Server 2000 SP4
SQL Server 2005 SP1 or higher Database Database Microsoft Office SharePoint Server 2007
Windows SharePoint Services 3.0 Farm Farm, Database, Site, File or Windows Server 2003 list
Windows Storage Server 2003 Volume, Share and Folders Volume, share, Folder or File Microsoft Virtual Server 2005 R2 SP1 Virtual Server host or Virtual Server machines Virtual Server host or Virtual Server machines Protected servers running Windows 2003 and XP System state System state Windows XP SP2
Windows Vista File dataFile data
Table 1
DPM also protects the cluster environment of applications (File Server, Exchange and SQL). To restore the entire DPM machine, we have an additional tool called DPM System Recovery Tool, which will allow you to recover servers; it is not included in DPM 2007 DVD, but you can find it on a separate disk.
Create Protection Group
DPM Protection is based on Protection Group ; The protection group will define a protection retention range, the frequency of synchronization will appear, how many restore points will be provided, where protection will be kept, etc. Understand how to create Protection Group and options Its is an important issue to be able to protect your network with DPM.
When creating a Protection Group we do not need to know where the application files are located in the file system. If you select an SQL or Exchange database, DPM will collect (focus) the information from the product and it will automatically find the location of the file being located. To create a Protection Group to protect two shared folders, follow the steps below:
1. Open Data Protection Manager 2007 Console.
2. Click on the Protection area
3. In Toolbox Actions, click Create Protection Group
4. Welcome to the New Protection Group Wizard page : There are some introductions to the process that will be used by DPM to protect the selected computers, click Next .
5. On the Select Group Member page, you will see all servers installed with DPM Agent. We can choose some items at the same time. In the picture below, it is possible to protect certain items such as Exchange Server Cluster, Shares, Volumes, System State and even SQL. DPM is an application software, which means that we do not need to specify the path of the Exchange, SQL database and log files, but just select the component (SQL databases or Exchange Databases).
In this tutorial, we'll check two boxes (Share01, Share02) and will display in the Select members area (Figure 1).

Figure 1: Select some items of servers that have DPM Agent installed
We still have two Selected members in the frame: Excluded Folders and Excluded file types .
Excluded File types : can exclude file extensions, extensions will not be protected. To do so, simply click on the Exclude Files link : and type in the required extensions as shown in Figure 2.
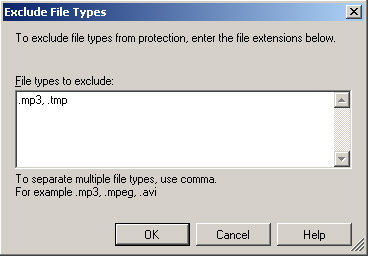
Figure 2: Exclude .mp3 and .tmp extensions
Exclude Folders : When a folder has several subdirectories within it, we can cancel the selection of unprotected subdirectories. This option will display all the subfolders that have been unchecked. In the example below, the Inetpub folder has been selected and the AdminScripts subfolder has been unchecked (Figure 3).
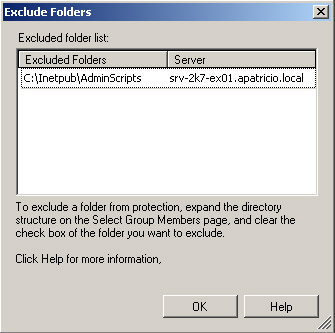
Figure 3: All folders are not protected
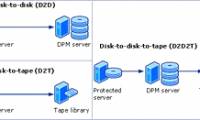
6. On the Select Data Protection Method page, you can define the Protection Group name and define what method to use in this protection group: Disk (short-term protection), Tape (long-term protection) or both. Only the available options will be displayed, in this article a Tape library is not installed so the Tape protection option is disabled (Figure 4).

Figure 4: Definition of the Protection Group name and the method to be used
7. In the Specify Short-Term Goals page , will define the Disk Based protection plan for the data and the selected servers. Options that we can define are how many days of use, synchronization frequency and how often a restore point will be created. Here you need to understand the Synchronization Process and Recovery Point .
Synchronization process (Synchronization process)
DPM maintains a copy of the protected server data synchronously. All information is stored in the DPM Storage Pool or in an optional drive. The synchronization process depends on the data we are working with, for example, below:
-
File data : DPM agent uses volume filter and Operating system change journal to check which file has been changed, created or deleted from the last synchronization session.
-
Application data : The DPM Agent uses the VSS Application writer to identify which disk blocks have been changed. These changes will be applied to DPM version. If the application supports write backup, a restore point will be created for each sync (Exchange and SQL)
In a nutshell, all changes that occur in the Protected Servers will be converted to DPM Server to keep the replica updated according to a certain rule.
Recovery points (Recovery points)
Here perhaps we need to find out what is called a restore point. A restore point can be considered the latest (closest) point of protection data (calculated over time) by DPM Server. We use restore points to restore data. With file servers, restore points allow administrators and users to recover data, with applications (such as Exchange and SQL) we can recover data from restore points as well. as synchronized.
In Figure 5, we can see how the frequency of a file recovery will appear, the sequence of data copies and the frequency of data to be synchronized.
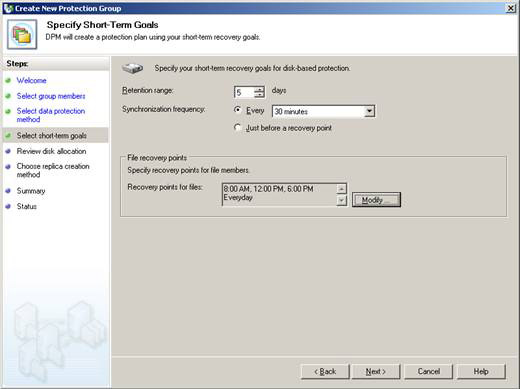
Figure 5: Specify short-term goals
By clicking on the Modify button, we can define when and when to create restore points. We must plan for these restore points carefully. If there is a high number of restore points per day, the storage range will be reduced because we cannot have more than 64 restore points for file data.Note : This 64 limit will not apply to applications. We must run restore points at least once a week.
8. Review Disk Allocation page . We can define the space for Replica and Recovery Volumes, a graphical observation of the current state of the Storage Pool will be displayed (Figure 06). We can click the Modify button to change the edition size; DPM uses the server's current edition information to calculate the correct size.
Important : We cannot shrink the size of the Disk Poll after definition; must re-create Protection Group, in other words we can increase the current size without touching Protection Group.

Figure 6: Defining available disk space for the new Protection Group
Currently, there is an Exchange calculator (Data Protection Manager 2007 Storage Calculator), but in the future, spreadsheets will be provided for other products (SQL, SharePoint, Virtual Server, .)
9. On the Choose Replica Creation Method page , we can define how and when the original copy of the selected data will be created. The original copy can be done completely manually, immediately or at a scheduled time (see Figure 7).

Figure 7: Defining the original copy to be executed
10. Summary page. A list of all settings will be displayed here. Information will correspond to company requirements. In Figure 8 we can easily see that protected shared folders will be kept for up to 5 days, data synchronization will appear every 30 minutes, and data recovery can be performed 3 times each. day. To create the Protection Group with the defined settings by clicking Create Group .

Figure 8: Summary of all the information that will be used to create the Protection Group
11. Status page. The last page displays the tasks that have been performed to create the Protection Group that will appear, then click Close .
Now we can open Disk Administrator and see the two new editions in the DPM Storage Pool disks, which will be responsible for keeping the data of the shared folders in the Protection Group.
Check the Protection task area
After creating the Protection Group, we can see information about the selected Protection Group in a detailed pane. We can also modify the Protection Group through Actions Toolbox, which is where you can change the disk, perform the proper checks and create restore points, see Figure 9.

Figure 9: Additional information and current state of Protection Group
Conclude
In this article, I have shown you how to create a protection group in DPM 2007. In the next part of this series, we will continue the recovery of shared folders. We have protected in this article.
 Deploy Data Protection Manager 2007 (Part 4)
Was this article helpful?
Your feedback helps us improve.
Related Articles
 Deploy Data Protection Manager 2007 (Part 1)8 minutes read
 Deploy Data Protection Manager 2007 (Part 4)8 minutes read
 Deploy Data Protection Manager 2007 (Part 2)11 minutes read
 10 simple ways to protect data and accounts6 minutes read
 Use the Virtual Machine Manager to quickly deploy Hyper-V7 minutes read
 Some common data security measures12 minutes read
Reader Comments 0
Sign in with email or Google to join the discussion.