Built-in device control security guide (Last part)
Review an overview of device control options in Windows Vista.
In the previous article, we listed you some general options that we can use to protect devices in previous versions of Windows Vista. With Windows Vista we will have new tools that allow for greater security.
In this next article, I will show you an overview of the options for device control in Windows Vista and show you how to avoid the most likely pitfalls.
Security needs to be proactive and should not be distracted
When it comes to security, you must try to make security measurements whenever possible. That means protecting your systems against known and even unknown threats. You may have asked yourself how the security structure can work, the starting and ending points when trying to protect against unknown things? The keyword here is at least privilege and white list. To protect your system against known and unknown attacks can not be completely wrong; In any case, it may be possible to limit certain failures when it occurs. To do that, you must make sure you don't neglect your system. In other words, you should make sure that the test finds that one of the components of the system is compromised and handled promptly and the damage will be limited to the smallest extent and scope. So you have to design a solid protection system. One of the principles you should use when designing such solutions is to have 'depth security', names that you may have heard a lot before. This principle is clearly described in Figure 1.

Figure 1 : Security classified according to 'depth security'
The idea behind 'in-depth security' is to design solutions that include many independent security layers, all of which have a duty to protect your resources. In order for an unauthorized user to increase the access level to the resource you are trying to protect, he must destroy the existing defense classes on the floors including the human class, the unspecified class. In Figure 1. This principle will help your system to be safe in case it has been attacked by several layers. With these principles, let's take a look at some examples of how security measures can be taken for device control in Windows Vista.
Device Installation Control (Control device settings)
Windows Vista has been loaded with various security features, compared to the 'predecessors' we introduced in part 1 of the article. One of those features is Device Installation Control, which provides you with an essential way to control whether a device's user is allowed to install on the computer and install it. set like. Microsoft has written step by step on how to get users to get started with this feature, but in this article, we will introduce you to some more examples on how to apply. they are before the principles involved in the use of minimum and white lists. Before introducing you need to know some of the following:
- The devices must not be installed on the machine before you want to control them.
- With the above advice, you should use an isolated computer, which will be used to retrieve device classes and their IDs to use it for limiting or whitelisting.
- Note that device control in Vista is based on electronic devices. This means that all users on these controlled computers will be affected. Another solution is to create another device restriction of the GPO and filter the scope of the GPO according to the security group member. However, if you want to control the device to the right people, you still need 3rd party solutions.
Example 1 : Device control has minimal privileges
In this example, we will show you how to prevent users from installing hardware devices on a Vista computer.
We use the Group Policy Management Console, so from Vista you must log in with a domain account to modify Group Policies.
At the Start command window Search you type GPMC.MSC and press Enter
1, Go to Computer Configuration > Administrative Templates > System > Device Installation > Device Installation Restrictions
2, Configure the following settings (as shown in Figure 2)
- Allow administrators to override policy installation device (Allow administrators to override the device installation mechanism ): You choose Disabled
- Hiển thị một thông báo không hợp lệ khi cài đặt việc xác định bởi chế độ ( Display an optional notification when settings are blocked by policy ): Select Enabled and insert your message.
- Hiển thị một thông báo không hợp lệ khi cài đặt việc xác định bởi chế độ ( Display an optional message when the setting is prevented by policy ( additional title) ): Select Enabled and insert your message
- Bao cấp cài đặt của thiết bị không được xác định bởi các thiết lập phần khác ( Prevent the installation of unwanted devices with other policy settings): Select Enabled
Note : Some settings above may have the default 'Not configured' setting. This is the security policy in Vista has made default. However, we recommend that you configure these settings specifically for better clarity.
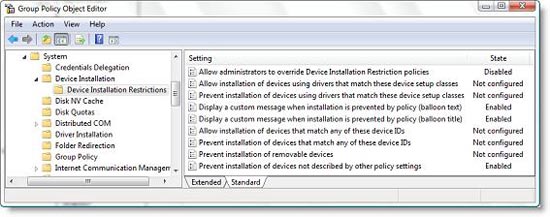
Figure 2 : Prevent anyone from installing new hardware.
3, After applying the GPO, we will check how these settings work, Figure 3, 4 and 5 show you this clearly.

Figure 3 : A USB device you want to install on your computer

Figure 4 : Mechanism to restrict the device that is working with the message you inserted
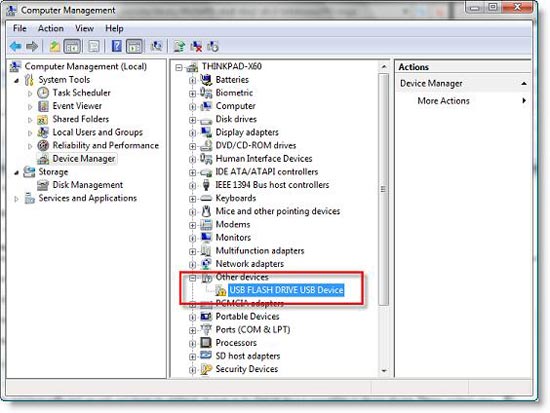
Figure 5 : In Device Manager you can see the USB has not been installed
Example 2 : Control the device with a white list
In this example we will show you how to prevent users from installing hardware devices except those listed on the white list. Before doing so, you should know some things about device classes and IDs (hardware IDs). Figures 6 and 7 show you the device classes and IDs from the Device Manager window.
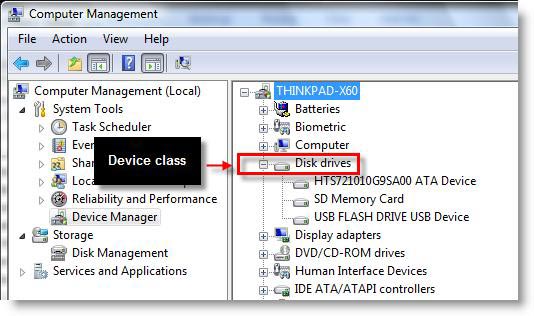
Figure 6 : Viewing device classes
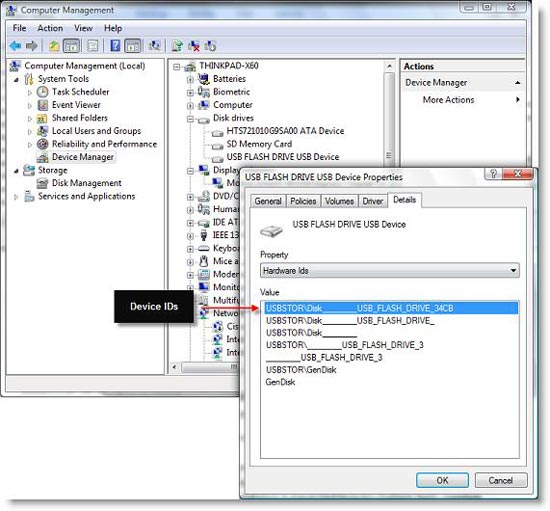
Figure 7 : View their ID
With this example, we will show you how to use the device-based device restriction feature.
You can collect both device classes and IDs that you want to restrict or allow using the GUI in Device Manager, the method that people feel most friendly or can be more comfortable with and using the command line . In this article, we will show you how to use a pretty convenient command line tool from Microsoft called DevCon, you can find it here.
Copy the command line utility to the Vista reference machine and open the command line as an administrator. We won't cover all of the command-line options here, but simply introduce how to use DevCon in the example.
1, At the command line you type the command as shown in Figure 8:
devcon classes
This command will display all device classes available on the computer you use to read this ID and class.
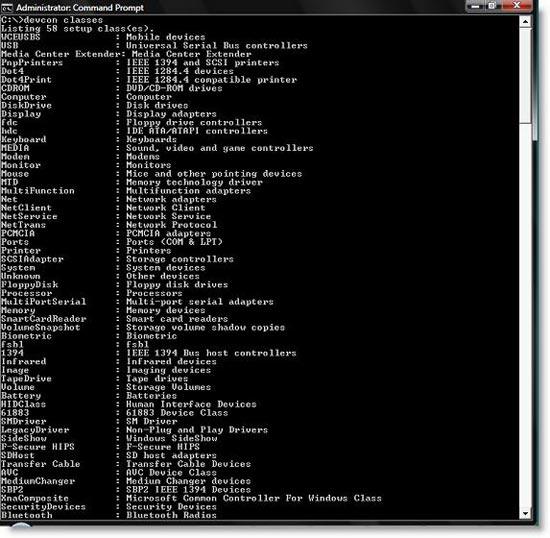
Figure 8 : Complete list of device classes on the computer used to retrieve the ID
2, In the example, we do for a 4GB USB (ie only this USB has the right to install into your protected system), so we need the device ID from this device. reference reference, typing as shown in Figure 9:
devcon hwids usb *
Notice some things for this command line example. The second parameter ' usb ' appears because we used the previous DevCon command. Adding 'asterix' will display all USB devices installed on the reference computer. Position the hardware ID as shown in Figure 9 and copy this ID before continuing to the next step.
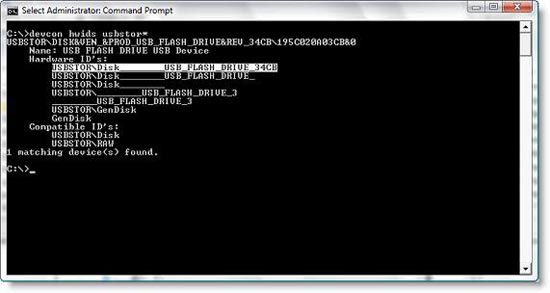
Figure 9 : How to specify a specific hardware ID from the command window
Note : You need to know which hardware ID will copy. When working with whitelists, you always copy the top hardware ID for a specific device. If you implement a blacklist, you must consider using the hardware IDs below. In short, these device IDs are different from the ID you wish it could work with your system.
Again, we will use the Group Policy Management Console, so from Vista you must log in to the domain account that allows you to change Group Policies.
At the Start command window Search you type GPMC.MSC then press Enter
3, Go to Computer Configuration > Administrative Templates > System > Device Installation > Device Installation Restrictions
4, Configure the settings below
- Cho phép các viên được chuyển đổi qua thiết lập thiết bị thiết lập (Allow administrator to override device setting policy): Select Enabled
- Hiển thị một thông báo không hợp lệ khi cài đặt việc xác định bởi chế độ: Select Enabled and insert the text you need to display
- Hiển thị một thông báo không hợp lệ khi cài đặt việc xác định bởi chế độ: Select Enabled and insert the text you need to display
- Đang đặt cài đặt của các thiết bị tương ứng nào của các thiết bị này ( Allow to install the appropriate device with the appropriate ID ): Select Enable and click Show . as shown in Figure 10
- Click Add . and add the hardware ID from step 2
- Bao cấp cài đặt các thiết bị không được xác định bởi thiết lập các phần khác ( Don't install devices not listed in the list ): Enabled
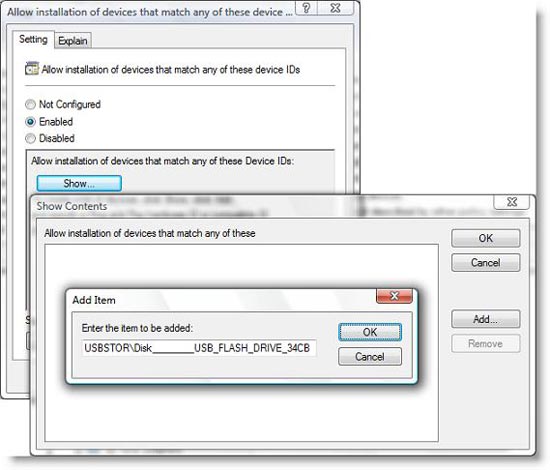
Figure 10 : Add a hardware ID for the device to whitelist
5, Check your settings for devices named or not on the white list.
Conclude
Although it is not a perfect method, this limited part of Vista's installation is indeed an ideal feature and it is actually more useful than what we have seen in Part 1 especially for wireless communication devices. Identifying wireless communication devices used by an unauthorized user is an important issue. By using Vista's Device Installation Restriction feature, you can easily do that. Taking full advantage of this feature, you can safely protect your clients.
 Wireless security: Say NO to WEP and YES to WPA
 How to hide the entire file system
 Default denies all applications (part 1)
 Data encryption with Windows XP Professional
 Secure ASP.NET
 How to set a password for Wireless