The security 'standalone' for iPhone. How many methods do you know?
Although Apple has always wanted to make the iPhone the most secure device in the world, however, you still cannot be 100% sure that the iPhone you own will be safe. The best thing you can do to reduce the risk of attack is to increase the security of your iPhone. Please refer to the security methods below.
1. Set strong password for iPhone
When installing iPhone, users will be prompted to enter a 6-digit password to protect the phone. First, decide to use strong passwords . Then go to Settings> Touch ID & Passcode and enter the current password. Then, click Passcode Options and select Custom Alphanumeric Code . Enter the new password, verify and touch Done .
- How to check password strength
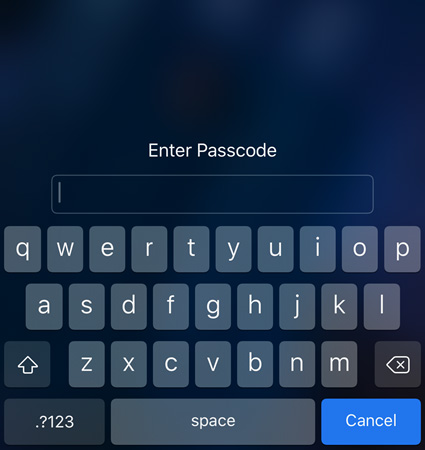
The next time you unlock the phone, enter a new password to unlock it. Even if you turn on the Touch ID or Face ID, you also need to enter the password when the phone restarts.
2. Turn on Backup for iCloud:

This is a good idea, in many ways, even for yourself, and when your account falls into someone else's hands, you may be lucky to know what they are doing, where with your device ( eg You have turned on the location, turned on self-uploading photos, the selfie . and so you know ). Go to Settings > iCloud > Backup > iCloud Backup .
3. Turn on phone search feature (Find My iPhone):
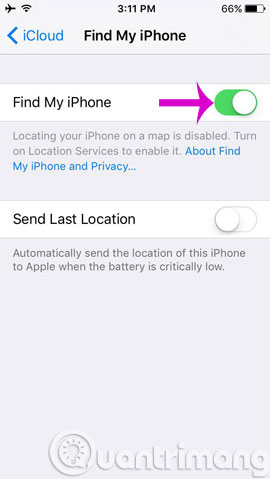
It's bad to lose your phone, but if you turn it on, the possibility of finding your phone is still there. Many people are lucky enough to find the phone when the thief still uses your phone, still turn on 3G and Wi-Fi connection, from where you can still hunt down your phone.Go to Settings > iCloud > Find My iPhone and turn on Find My iPhone to On See the Find My iPhone details in this article!
4. Data encryption:
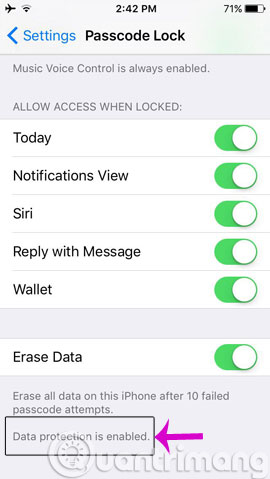
This is also an important step that many users often do not choose. Encryption helps you secure better information, especially bank account information, VIP contact numbers, private photos . The activation is done as follows Settings > Passcode , dragging down the line Data protection is enabled to recognize that the data is encrypted and protected.
5. Turn on the data wipe feature after 10 incorrect attempts to enter Passcode:
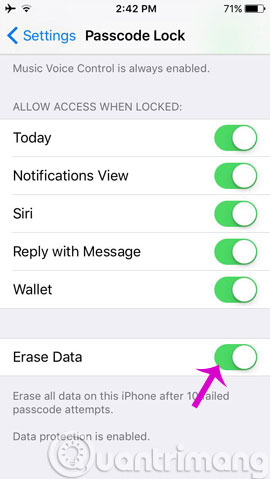
The thief will try the seemingly familiar cluster of numbers to access the internal data. If you don't enable this feature, the thief will have the whole day, even the month, to try importing. When activating this feature, after 10 times of entering the wrong password, all your data is still confidential, not falling into the wrong hands.Go to Settings > Passcode , scroll down to select Erase Data to On .
6. Disable the Control Center function:
Just enable Airplane mode via Control Center right on the lock screen, a hacker or even a knowledgeable iOS user can access your iPhone or disable it freely. encrypt the code on the device without worrying about being detected. Because, after activating airplane mode, you cannot track your device using the Find My iPhone feature .
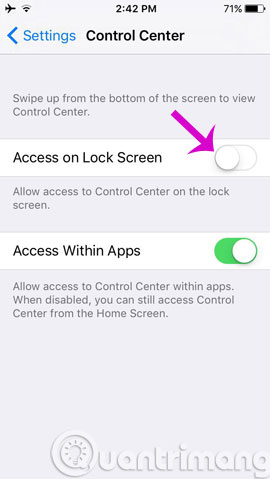
Therefore, to disable Control Center on the lock screen, go to Settings > Control Center , then slide the activation bar to Off mode of the Access on Lock Screen section .
7. Jailbreak:
The advice given here is not to use jailbreak mode, or should not jailbreak the device. The jailbreaking of iPhone devices is similar to opening root for Android phones, it will help you to interfere more deeply into the system, can install more applications, games . but also increase the ability hacked by hackers through jailbreak software you install on iPhone. Or simpler to understand, the system will automatically activate services such as webcam, recording microphone, GPS . but you do not know if jailbreak.
8. What to do when your iPhone has adware - adware?
Yes, in an age when advertising is everywhere, just like one click will make you hate. The phenomenon is that the browser on the iPhone will automatically switch to a strange website or popup, invite you to buy discounted goods, announce the prize, have a friend, unread email . I'm not sure if you have Any gift or not, but one thing is that such notices are often unsafe. So if the iPhone, your iPad suddenly has such a phenomenon, how to handle?
- Go to Settings> Safari.
- Go to Advanced> JavaScript> Turn it off.
- Go to Block cookies> select "Only allow from the website I visit".
- Back out once, press the "Clear History and Site Data" button , thus clearing all cookies.
- Turn on JavaScript again, then go to the website as usual
9. Absolutely do not click on any strange links, links, urls!
Do you want to lose 500 million while you're sleeping? Naturally someone sends you a huge sum of money that is very simple, "STANDING LIFE", "SENIOR PEOPLE" . uh? All emails, messages . which have an invitation like:
- Click here to .
- Your computer has been infected with virus abcxyz, click here to .
- Here is the amount sent to you in the bank account abcxyz, click to see more .
- .
10. Turn off the access function from the kiosk screen
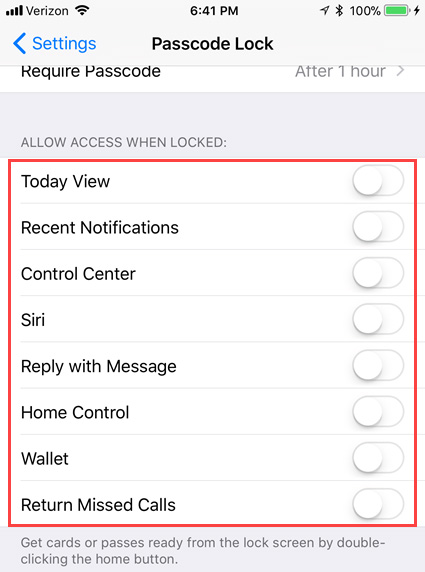
Applying a strong password to the iPhone will not prevent data from being disclosed if it appears on the lock screen. Email, messages and information in other applications may contain sensitive data that may be displayed on the lock screen when receiving notifications. Other features on the lock screen can also display information you don't want people to see.
If you do not want any information to be displayed on the lock screen except for the time and date, users can disable the following lock screen features:
- Recent announcements
- Control Center
- Siri
- Reply to a message (reply to a message from the lock screen only on Touch ID devices)
- Home Control (control of automation equipment)
- Wallet (disable Apple payment)
- Recall missed calls
Access Settings> Touch ID & Passcode and enter the password. On the Passcode Lock screen, turn off all features that you do not want to access on the lock screen.
11. Hide content in the screen on the lock screen
If you do not want to turn off lock screen notifications completely, you can prevent the application from displaying content in the lock screen notification.
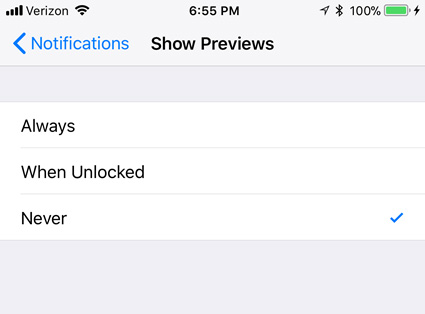
Go to Settings> Notifications> Show Previews . By default, Always content is displayed in the lock screen notification. Choose to display the content When Unlocked ( when unlocked ) or Never ( Never ) .
12. Disable Siri on lock screen and "Hey Siri"
Siri is a convenient feature of the iPhone and is accessible when the phone is open or locked. However, it may reveal some information that users want to keep secret. In addition, Siri can communicate with anyone.
Users do not need to turn off Siri completely, but it is safer to disable it on the lock screen or prevent Hey Siri from activating voice.
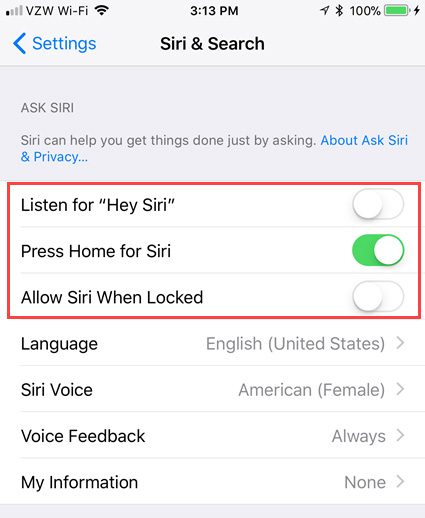
In iOS 11, go to Settings> Siri & Search . To turn off Siri on the lock screen, turn off the Allow Siri option when Locked (the slider will turn white). If you do not want Siri to respond to the Hey Siri command, turn off the Listen for "Hey Siri" function .
Note: The Allow Siri When Locked option is also available in the Siri option in the Allow Access When Locked section on the Touch ID & Passcode settings screen as described above. Turn off either option, the other feature will automatically turn off. If you decide to completely disable Siri, disable both Listen for 'Hey Siri' options and Press Home for Siri .
13. Revoke application access rights
This iPhone security method may affect the functionality of the application. Many applications require access to features and data such as location, contacts, messages and photos.
In some applications, the data or features they require access is important and sometimes important for the application to perform its main function. For example, an email application like Mail, Spark or Airmail needs access to the contacts to help send out email addresses more quickly and conveniently.
However, there are many applications that require access to data and features that do not affect its main function. For such applications, users should refuse to grant access to that information.
Go to Settings> Privacy to see the listed data features and applications. Touching the feature wants to block access for certain applications.
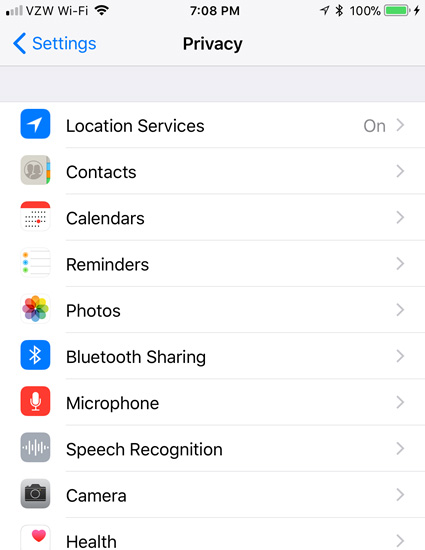
To deny feature access for these applications, tap the slide button to turn white.
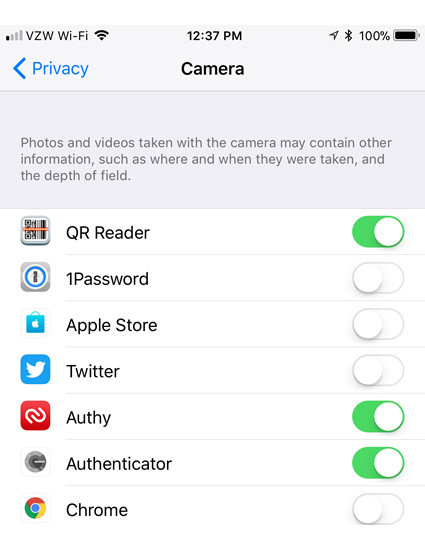
Note: If an application's functionality stops working after disabling, return to the same menu and reactivate the changes made.
14. Limit which applications have access to the location
Location services allow you to select applications that have access to your location and share your location with family and friends. To access location services, go to Settings> Privacy> Location Services .
If you want to disable location services completely, click the Location Services slider button to switch to white. Note that some applications, like Apple Maps, depend on location services to work correctly. Other applications may have limited functionality without using location services.
Although location services may deplete iPhone batteries faster, modern chips with Apple's sync processor have made great strides in energy efficiency since development. GPS declaration.
To stop sharing location with family and friends, click Share My Location then turn off Share My Location on the next screen.
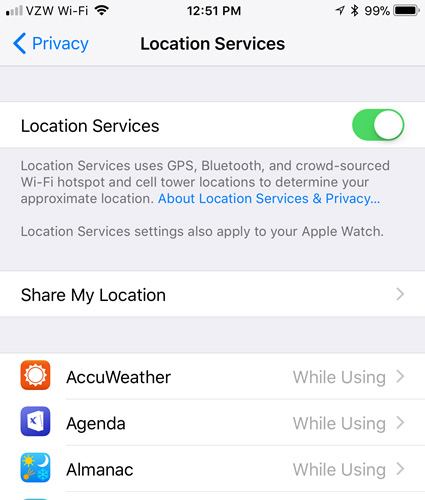
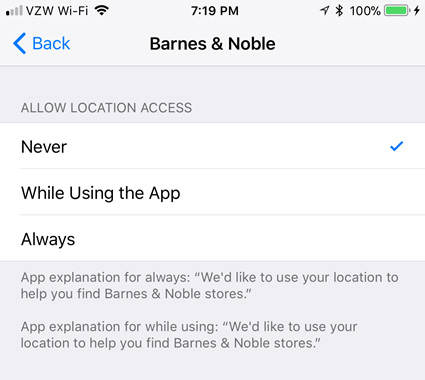
To prevent the application from using the location, scroll through the list on the Location Services screen and tap the application you want to disable. Next, click Never to never allow the application to use your location.
If you do not want to completely disable location services in an application, click While Using the App . Some applications only have the Never and Always options available, you should select the Never option for non-critical applications.
15. Encrypt backups
When backing up iPhone to iCloud, the information is automatically encrypted when it is sent over the Internet and stored in encrypted format when stored on the server. iCloud uses minimum 128-bit AES encryption and never provides any encryption keys for third parties.
- Things to know about backing up your iPhone and iPad
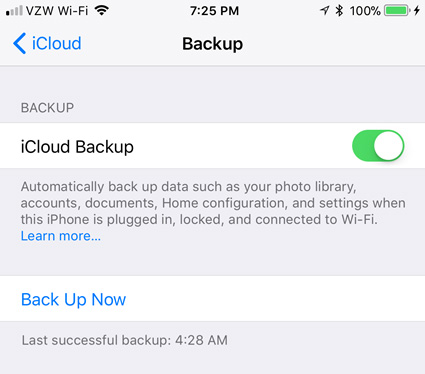
To access iCloud Backup in iOS 11, go to Settings> [your name ]> iCloud> iCloud Backup and make sure iCloud Backup is turned on (the slider button must be green). To start backing up your phone immediately, click Back Up Now .
When iCloud Backup is turned on , iPhone will be backed up to iCloud automatically every day. To do this, make sure your phone is connected to a power source, Wifi network and a locked phone screen.
If backing up iPhone with iTunes , users must turn on encryption for backups. When connecting iPhone to computer, go to device in iTunes, select This computer and select Encrypt iPhone backup box. If you have never encrypted an iTunes backup, you need to set a password for the backup.
- How to backup data on iPhone or iPad
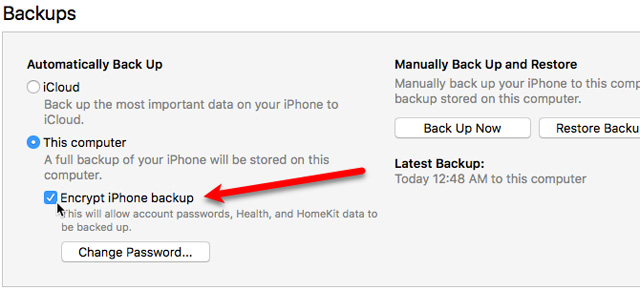
Encrypted backups go far beyond simple security. When encrypting backups, most of the password data and Wifi networks are also stored with that backup.
16. Protect notes in Notes application
If storing personal and sensitive information in Notes , there is a way to encrypt notes by setting up a private key for it. Now with iOS 11 note taking easier than ever, just swipe left on a note in the list, click the lock icon and enter the password. Password must be different from Apple ID and other codes on the device.
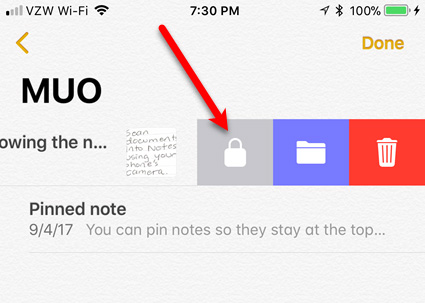
The key is added to the note, but it was originally unlocked. Click Lock Now at the bottom of the screen to lock any unlocked notes.
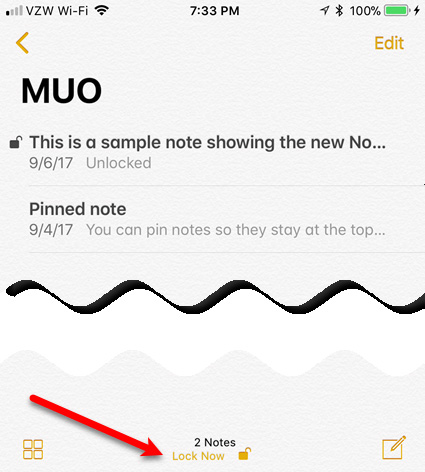
Locking and unlocking are done for all notes at once. So open a note by opening it and entering the password, which will also unlock all other locked notes.
17. Use two- factor authentication
An important way to protect data is to add two-factor authentication to your Apple ID account containing personal information including credit card information. With two-factor authentication, users need passwords and physical devices or fingerprints.
When setting up two-factor authentication, register one or more trusted devices to receive a six-digit verification code. Then, when you log into your Apple ID, iCloud account or make purchases on iTunes, iBooks or App Store from a new device, you need to verify your identity with both a password and a six-letter verification code. number.
To turn on two-factor authentication for Apple ID, go to Settings> [your name]> Password & Security . Touch Turn on Two-Factor Authentication and then click Continue . Follow the on-screen instructions to set up two-factor authentication for your Apple ID account.
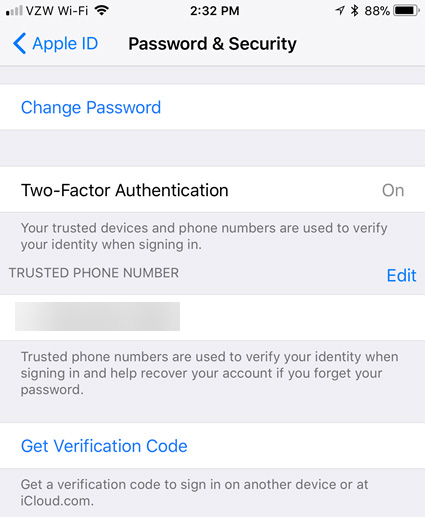
Users can also turn on two-factor authentication using a browser on a computer. Visit Appleid.apple.com and log in with your Apple ID username and password. In the Security section on the main screen, tap Edit on the right. Click Turn on Two-Step Authentication and follow the instructions to install.

Note: When logging into iCloud.com in the browser, you can trust the browser. However, it is safer to not trust it and enter the verification code each time.
Other services like Google, Dropbox, Facebook and Twitter provide two-factor authentication and you should use it in all your accounts.
18. Use password manager
In this online world, we have too many passwords to remember. You should not use the same password for multiple accounts. How can I remember all those passwords? Very simply use the password manager. There are many password management applications on the network, some are only for iOS devices and others that allow you to access passwords on a variety of devices.
Many password management applications allow you to store multiple passwords, such as security notes, email accounts, credit cards and bank account information, software licenses and even attachments. attached personal documents.
The iPhone has a built-in password manager called iCloud Keychain . This is a safe way to sync all passwords and other sensitive data on all Apple devices.
To turn on iCloud Keychain, go to Settings> [your name ]> iCloud> iCloud Keychain . Then, touch the iCloud Keychain slider button.
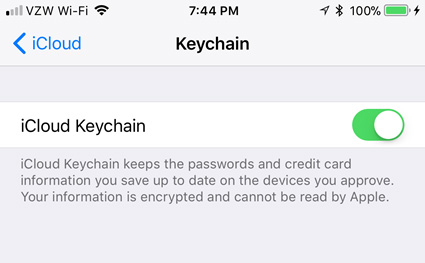
iCloud Keychain is not a full-featured password manager. If you want to be more secure and have access to additional features, you can use third-party password manager like 1Password, LastPass, Dashlane, MiniKeePass or DataVault.
19. Use the private web site
Each major browser has a number of private browsing features, including iPhone browsers. When using private browsing mode, the browser will not remember the website visited, search history or AutoFil information.
To access private browsing mode in Safari, tap the tab icon in the lower right corner of the screen and then click Private on the lower left corner. To return to normal browsing mode, click the tab icon and then select Private .
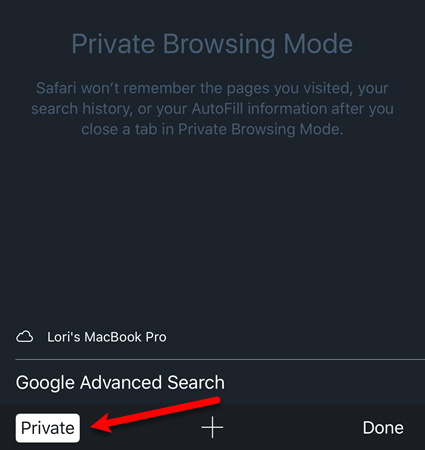
Note that private browsing is not a sure way to stay safe. Other browsers like Chrome and Firefox all have private browsing mode.
20. Clear browsing data
When not using private browsing, browsing data like Cookies and web history are stored on the phone. However, this data may be deleted. When deleting browsing data, users will have to log back into the site, but it will keep the sensitive information secure.
To delete browsing data in Safari, go to Settings> Safari> Clear History and Website Data . Then, touch Clear History and Data on the dialog box that pops up.
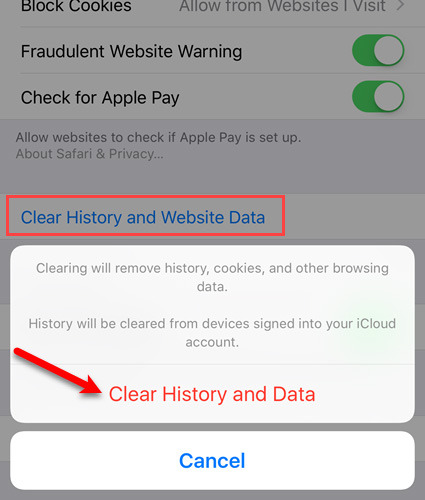
Browsing data may also be deleted in other browsers used on iPhones such as Chrome, Firefox and Opera Mini.
21. Block Cookies and not track
Cookies are small files that websites access to computers, which can contain information, phone (or computer) and user preferences. This information can be useful but also annoying when displaying relevant content like ads.
Removing Cookies will cause some inconvenience when having to log back into the site, but it is safe for sensitive information.
To block all Cookies in Safari on iOS 11, go to Settings> Safari . Scroll down to the Privacy & Security section and turn on the option Block All Cookies . You can also prevent websites from following you by enabling the Ask Websites Not To Track Me option .
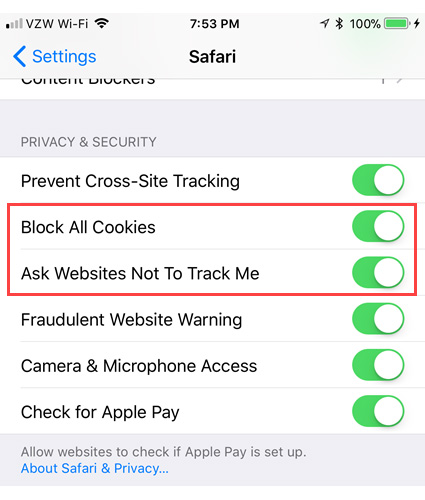
If you do not want to block Cookies, be sure to delete them regularly. These options do not appear to be available in Chrome or Firefox for iOS.
22. Disable the AutoFill option in the browser
The AutoFill feature in browsers is very convenient, but it's not safe. If someone uses your phone, they can automatically log in on the same site that uses AutoFill.
To turn off AutoFill in Safari on iOS 11, go to Settings> Safari . In the General section, touch AutoFill . For maximum security, turn off all options on this page. It is not convenient to log in to the site manually, but it is worth it to protect your sensitive information.
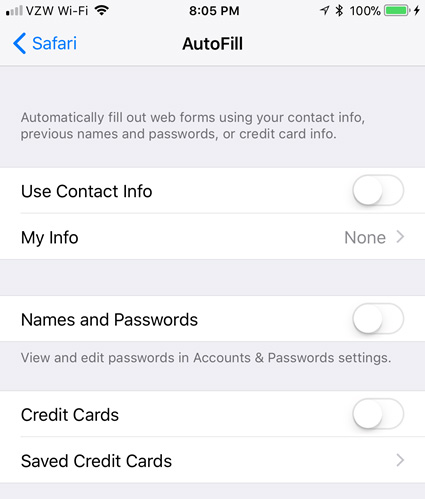
Users can turn off AutoFill option in Chrome, Save Logins like AutoFill in Firefox.
23. Disable auto syncing with iCloud
By default, data on iPhone is synchronized with iCloud account like messages, notes, contacts, documents and photos. If you added two-factor authentication to your Apple ID account, it would be safer.
However, if you want the information to not be synchronized with iCloud or if you do not want to synchronize certain types, users can disable synchronization with iCloud on iPhone. Without many iOS devices and only information in some apps, you can also disable iCloud synchronization for those apps.
To disable synchronization with iCloud on iOS 11, go to Settings> [your name] > iCloud . Apple applications are listed at the top of the list on iCloud screen. To prevent an Apple application from syncing with iCloud, click the slide button for that application.
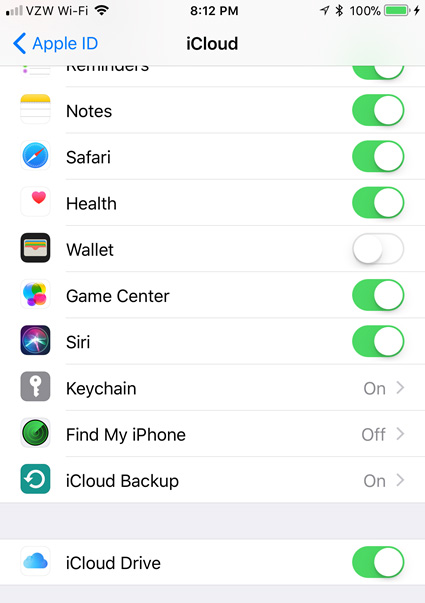
The iCloud Drive option under iCloud Backup will turn off or turn on iCloud sync for all other third-party applications that store documents and data on iCloud. If you enable this feature, you will see a list of third-party applications installed on your phone. You can turn off iCloud synchronization for each app by clicking the slide button for each application.
24. Stop automatically connecting to known Wifi networks
By default, the phone will automatically connect to a known Wifi network. This may be useful, but it is not always safe. If someone has set up a fake wireless network with the same name as a trusted public access point, the iPhone can connect to that network and the phisher can steal your data.
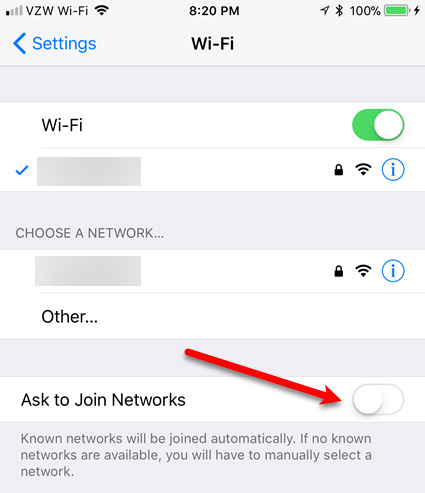
It is safer to connect manually with each network the phone finds. To prevent the phone from automatically connecting to a known Wifi network, go to Settings> Wi-Fi , tap the Ask to Join Networks slider button.
25. Using virtual private network (VPN)
Another option to keep data safe when using iPhone in public (or even at home) is to use a virtual private network (VPN) . A VPN encrypts all incoming and outgoing Internet traffic preventing data theft and analysis.

There are many VPN service providers, some are better than other VPN service providers. TipsMake.com has compiled a list of the best free VPN Apps that iOS users should not ignore. Find the VPN service you like with iOS apps, install, activate and start surfing safer.
These are just a few ways to secure iPhone. Use care when accessing websites or using sensitive data. Users should also ensure Apple Watch if available. It also has access to sensitive data from iPhones such as email, messages, contacts, and even Apple Wallet data for Apple Pay.
- How to protect your iCloud account from being stolen
- 10 ways to protect yourself on the Internet
- Quickly secure YouTube accounts
Good luck!