Table of Contents
This updated guide examines Authentication: Secure Asp. Net and organizes the essential facts, background, and practical takeaways in clear American English.
In this chapter, we will discuss some methods to help ensure safety for ASP. NET applications. To emphasize the central content of the chapter, we will not discuss network security, server security and ASP. NET infrastructure security. Saying that does not mean that the topics are not important. On the contrary, if you do not configure appropriate security support for the server and network infrastructure, what is trying to do to ensure the security of ASP. NET applications through the. NET Framework tools provided. will become useless. However, within the limits of a chapter, we only go into the security of ASP. NET application programs.
The importance of security has no word at all. Failure to invest the appropriate time and resources for this task can lead to undesirable outcomes such as data loss, misplaced application or application execution and reduced sales. collect profits of businesses, making businesses lose credibility with customers. It is also important to consider security issues right from the start of building applications.
Ensuring safety in application access or resource access of the application focuses on two processes: authentication (authorization) and authorization . We will be interested in the three authentication methods provided by the ASP. NET runtime: Windows, Form and Passport . As for licensing, we will discuss mainly about two mechanisms: using the URL path and using the access control list ACL .
9.1.Appraisal methods
Authentication is the process of identifying the requested person or program. It does not assign resource access (the function of the licensing mechanism) but checks the known identifier to decide whether to accept this request or not. Simply put, the assessment answers the question: 'Who are you?'
In the classic ASP application, there are two main authentication methods: one is IIS-based to authenticate users under a Windows account, then use the NT access control lists (ACLs) to complete the process. expertise; The second is to provide a specific type of authentication, compare to match user credentials stored on the server (possibly in Microsoft Active Directory). Each method has its own limitations. The safest model of Windows, Integrated Security authentication, requires all users to use Internet Explorer and not work with too many proxy servers. Private auditing requires building and testing a large amount of work on your own.
ASP. NET provides three authentication mechanisms:
Verify Windows Provide similar functionality to IIS authentication in classic ASP, but there are also some important differences. Windows authentication works with the built-in IIS authentication and uses the identity provided by IIS authentication to perform the authentication process.
Forms appraisal Mainly used for own authentication mechanism. Forms authentication supports a generic login page, providing many options for storing credentials, from databases with XML format, configuration files, and a number of help methods for managing authentication activities. determined. This authentication mechanism is mostly used for Internet-related cases.
Passport appraisal Allows ASP. NET developers to use advanced techniques in Microsoft's Passport application login solution.
The authentication mechanism for ASP. NET is usually configured at the machine level, using the file machine.config or application level, using the web.config file. We can configure authentication settings using elements with its attributes and child elements.
Authentication settings are not allowed to be configured below the application level. That is, if you want to apply the authentication policy to a sub-directory of an application, we need to configure it as an application in IIS. Authorization settings do not have this limitation.
9.1.1.Verify Windows
As mentioned earlier, Windows authentication has the same functionality as IIS authentication in classic ASP. Verify IIS uses user account information stored on the local server or Domain Controller and injects the user identity into the ASP. NET runtime to use for authentication. The main reason for choosing Windows authentication is because it needs the lowest amount of deployment code. Of the three ASP. NET authentication mechanisms provided, only Windows authentication requires configuring IIS for authentication settings in the machine.config or web.config file.
Like IIS authentication in ASP, Windows authentication is primarily used in the following cases:
- All clients use Internet Explorer 4.0 or higher and do not have too many proxy servers, mostly popular in Intranet networks, which are not common in Internet applications.
- Security requirements in the application are low, requiring only Basic or Digest IIS authentication (both have limitations that are less secure than unified security).
- Security requirements do not allow anonymous users to access the entire application.
Windows authentication is primarily used in conjunction with impersonation (ie a specific security context). We can restrict resource access by using the NTFS Access Control List (NTFS ACL) or assigning database access to each user's Windows account when logging into the database..
Windows authentication works on the principle of using the user's security context removed from IIS. The first step in configuring an application to use Windows authentication is to change IIS configuration settings so that it meets one of the non-anonymous authentication methods. We can do the following:
- Open Internet Services Manager .
- In the left pane, point down to the virtual website or root directory you want to configure.
- Right-click the folder you want to configure and select Properties to display the properties dialog box.
- Click theDirectory Securitytab, then theEditbutton under 'Anonymous access and authentication control'.
- Uncheck the 'Anonymous access' checkbox and select one or more authentication mechanisms (Basic, Digest, Integrated Windows).
- ClickOKto close the authentication method dialog box, then click OK again to close the Properties dialog box. Now we are qualified to configure the ASP. NET application.
There are three levels of Windows authentication: Basic, Digest and Integrated. In which Windows Basic authentication is the most basic level. It allows the use of Windows accounts in more cases but username and password information is sent in plain text. This is an extremely dangerous point, especially when the application does not use Secure Sockets Layer (SSL) encryption to protect communication activities. Selecting Basic level usually has more risks than other levels.
Similarly, the Digest level requires that the password must be stored in plain text on the Domain Controller, which contains the accounts. When using Digest authentication, we must be careful about network attacks on Domain Controllers and must be physically secure before unauthorized intrusion groups can access to steal password information.
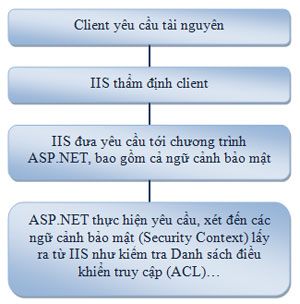 Figure 9.1: Windows authentication process
As shown in the diagram, the Windows authentication process sequence starts when the client sends a request to the server. IIS will verify the information on the client, then bring the request to the ASP. NET runtime, including the security context, ASP. NET uses security context, examines elements such as ACL. and meet the client's requirements.
In order for ASP. NET to use the security context provided by IIS, the ASP. NET application must be configured for Windows authentication. This configuration is done by adding the element to the web.config file of the application and setting the mode attribute to Windows, which can be written as follows:
Since the element does not require any child elements for the Windows model, we can use a single tag with a closing sign '/' instead of a full closing tag.
9.1.1.1 Impersonation
Impersonation is the practice of source code running in the security context of a specific account. In ASP. NET, impersonation is used to allow application code to be executed in a specific security context of an authenticated user.
By default, the ASP. NET executable program runs in the context of a special account called ASPNET. This account has very few privileges. So the resource requests protected by the Access Control List (ACL) (such as the file in the file system) will fail, unless the ASPNET account is explicitly granted privileges. This mechanism makes ASP. NET applications more secure.
When assigning explicit privileges to an ASPNET account, the account will have a high priority, allowing multiple types of requests to be successfully executed without using impersonation . For example, the default SQL Server allows access to any user in the local administrator group to run the executable ASP. NET as SYSTEM, making it possible to connect to a database. Whether the local SQL Server uses a trusted connection without using impersonation.
Running the system as SYSTEM can solve some privilege issues but not a good idea. Because it provides more privileges than is necessary for most ASP. NET applications. At that time, any vulnerabilities can appear in IIS or the ASP. NET runtime can provide system-level access to those who exploit them, whether legal or unauthorized. Running the ASP. NET executable using an ASPNET account significantly reduces threats such as a vulnerability exploit.
(This setting is controlled by the username attribute of the element in machine.config) .
In most cases of Windows authentication, impersonation is used to allow the ASP. NET runtime to respond to a request (taking into account security context) for an authenticated user. In classic ASP, impersonation is used by default. We can enable impersonation in ASP. NET by adding the element to the web.config file of the application, the impersonate attribute must be set to True , as the code below:
After impersonation is allowed, we can use NTFS ACL (NTFS access control list) to verify the account for resource access requests.
9.1.2 Forms authentication
Forms authentication is considered the most useful method of the three ASP. NET methods provided. It provides a very flexible infrastructure for user-defined security contexts. When an application is configured to use Forms authentication, requests for protected resources are redirected to a specific login page, except for the request with an authentication token included in a cookie.
9.1.2.1. Login (Log in)
On the login page, the website developer will write a code to verify the authentication information entered by the user to see if it matches the backup information in the server storage area. This storage area can be a relational database such as SQL Sever, an XML file, Microsoft Active Directory or any other storage location we choose. If the user information sent matches the information stored on the server, the runtime will call the RedirectFromLoginPage method of the FormsAuthentication helper to send back to the site user they requested with a temporary cookie or a cookie. long-term authentication token on the user's machine. Once the user has been authenticated, they have access to other areas of the application without logging in again.
To better illustrate the process of Form authentication, let's take an example.
The example uses the following files:
web.config Configuration file, used to enable Forms authentication mechanism and describe the desired access limit.
Login.aspx The application's login page, which receives the user's credentials and, if that information is valid, redirects the user to the requested URL.
Register.aspx Application registration page. Allow unregistered users to choose authentication information to access the application.
Logout.aspx Wipe out all Form authentication cookies, actually taking users out of the secure area of the application.
Users.xml XML file, containing authentication information of registered users. Passwords are stored as SHA1 hash function strings.
To use Form authentication, the application must be configured with the web.config file as shown in Figure 9-1, located at the root of the application.
Example 9-1: Web.config file for Form authentication
The element in Listing 9-1 configures applications that use Forms authentication. Its children,, provide some basic security elements: a name for cookie authentication Forms (. ASPNETIAN), protection type (encryption, validation, all or nothing) for cookies evaluation, cookie time round (for example here is 60 seconds, default is 30 seconds) and a login page for users who are not authenticated. Note that in the example we use Login.aspx file, so by default we will ignore this attribute.
(In version v1.1 of the. NET Framework, two new properties of the element added are RequireSsl and SlidingExpiration).
The element, tied to the files subdirectory by using tags, denies access to any anonymous users.
With the appropriate configuration, if the user does not have an authentication cookie, the request to any file in the files subdirectory (thought to be controlled by ASP. NET) will also take the user to the login page. But what happens when the file type you want to protect is not controlled by ASP. NET by default? Then, we can perform the following steps to add the file type to the IIS configuration for the application:
- Open theInternet Services Managerand locate the file you want to configure.
- Right-click on the file's icon and selectProperties.
- In thePropertiesdialog box, select theDirectorytab (orHome Directory) and click theConfigurationbutton.
- On theApp Mappings tab, click theAddbutton.
- In theAdd / Edit Application Extension Mappingdialog box, click theBrowsebutton and create the path to the folder location aspnet_isapi.dll . Usually this location has the form % windir% Microsoft. NETFramework% version% , where % version% is the. NET Framework version. Maybe we will need to change the Files attribute of type from drop-down to *.dll. Then click to select the file and click Open.
- Now enter the file extension name (such as .zip ) or enter. * To attach all supported file types in ASP. NET.
- ClickOKto save the changes and close each dialog box.
- Repeat steps if you want to add another type of file.
Note: Using the . * Character to map all file types contained in ASP. NET is a quick and easy way to protect all of these file types in applications that use Forms authentication. However, we should not use this technique if the application contains many files, like classic ASP pages controlled by another ISAPI application. Because. * Will give priority and make these file types not work as expected.
After all file types have been included in the ASP. NET driver, any requests given to one of those file types in the subfolder will cause the user to be redirected to the Login.aspx file. If they do not yet have a Forms authentication cookie for this application. The code for Login.aspx is illustrated in Listing 9-2 below:
Example 9-2. Login.aspx
<% @ Page Language = "VB"%><% @ Import Namespace = "System.Data"%><% @ Import Namespace = "System.Web.Security"%>Login Page Email: Password: Persist Authentication Cookie?
The tag section of Login.aspx is quite easy to understand, including textboxes to enter the e-mail address (username and password). There is also a checkbox that allows users to continue using the authentication cookie (so they won't need to log back in from their machine).
To make the code a bit easier to read, in the example there is an @ Import directive for both System. Data and System. Web. Security namespaces. Therefore, we can access the members within them without using the namespace prefix.
In the Login_Click event handler, you declare a local DataSet variable and include it in the cache of the ASP. NET or Users.xml file containing the credentials of the registered user. If the dataset is retrieved from the XML file, we can insert it into the cache to retrieve later (except to have to read the file if it changes anything).
Calling Cache. Insert sets a file dependency on the Users.xml file. If the file changes, the cached dataset will be taken out and the new data will be added to the file in the next log-in request. This allows us to exploit the advanced features of executing caching, but still ensure processing with new data.
After we have a dataset containing all the current users, we need to make sure the user-entered email is in a table, using the Select method of the DataTable:
If LoginDS. Tables (0). Select ("Email = '" & _ Email.text & "'"). Length> 0 Then
If the e-mail exists, we have a DataRow containing the authentication information associated with that user. It is then possible to compare the password according to the hash function in the dataset with a copy of it entered by the user, which is the output of the HashPasswordForStoringInConfigFile method in the FormsAuthentication class (using the HashPasswordForStoringInConfigFile method ie you have never saved it). Store a real password, enabling the application to be less compromised). If the two passwords match, we will redirect the user back to the page they requested by calling the RedirectFromLoginPage function of the FormsAuthentication class. RedirectFromLoginPage will automatically bring the user back to the page described by the ReturnUrl query string parameter. This parameter is automatically added to the end when the user is returned to the Login.aspx file. RedirectFromLoginPage also sets a. ASNETIAN cookie containing Forms authentication token. The following code snippet illustrates this process:
Dim LoginRow () As DataRow = LoginDS. Tables (0). Select ("Email = '" _ & Email.text & "'") If LoginRow (0). Item ("Password"). ToString = _ FormsAuthentication. HashPasswordForStoringInConfigFile (_ Password. Text, "SHA1") Then FormsAuthentication. RedirectFromLoginPage (Email. Text, _ Persist. Checked) Else Message. Text = "Incorrect Password!" End If
If the e-mail address exists but the password is incorrect, we will set the Text property of the Message Label control to notify the user. If the e-mail address does not exist, we will create a message containing a link to the registration page for users to register themselves. The link must include a query string parameter named page that Register.aspx uses to convert the user back to Login.aspx with the ReturnUrl query string parameter. The registration part is controlled by the Register.aspx page, as illustrated in Figure 9-3.
Example 9-3. Register.aspx
<% @ Page Language = "VB"%><% @ Import Namespace = "System.Data"%><% @ Import Namespace = "System.Web.Security"%>Registration Page Email: Desired Password: Confirm Password:
The tag section of Register.aspx is similar to Login.aspx , except that there is one more textbox (to verify the password) and three validation controls:
- A CompareValidator control to determine if the value in the Password and PasswordConfirm boxes matches.
- A RequiredFieldValidator control to confirm that the user has entered the e-mail address, so we have no value for null e-mail in the XML file.
- A RequiredFieldValidator control to ensure that the user has entered a password to not have a null password value in the XML file.
If you want to ensure that additional e-mail is valid, we can use the RegularExpressionValidator function.
In the Register_Click event handler, it first checks to make sure the site is valid to help the processor avoid wasting time working with invalid data. If the user's browser supports DHTML, the site will not even be uploaded until the valid control requirements are met.
If the site is valid, a local DataSet variable will be declared and allocated memory space on the Users.xml file. Then check whether the e-mail address the user has entered exists on the file. If not, the Text attribute of the ASP. NET Label control will be used to ask the user to enter another e-mail address.
If the e-mail does not exist, a new DataRow will be created, containing the user's selected e-mail address along with the hash of the password, adding new rows to the dataset and writing the dataset back to the XML file (such as the wallet example below). This technique does not control polymerization, so if someone changes the contents of the XML file while it is being read or written to, the changes will be overwritten.
Dim NewUser As DataRow NewUser = LoginDS. Tables (0). NewRow () NewUser ("Email") = Email. Text NewUser ("Password") = _ FormsAuthentication. HashPasswordForStoringInConfigFile (_ Password. Text, "SHA1") LoginDS. Tables (0). Rows. Add (NewUser) LoginDS. WriteXml (Server. MapPath ("Users.xml"))
Note: To successfully write the file Users.xml, the account under the running ASP. NET runtime must access the file.
After writing the new user's information in Users.xml , we will bring the user to the description page in the query string parameter:
Response. Redirect (Request. QueryString ("Page"))
9.1.2.2. Exit (Log-out)
Sometimes we have to work with sensitive information in the application from public machines. In such cases, we need to provide users with some way to log out to prevent others from accessing private information or accessing application resources through their accounts. In authentication Forms this is quite simple. We can call the static method SignOut of the FormsAuthentication class as shown in Listing 9-4. The user will then be redirected to the Logout.aspx file to complete the log-out process. We can also create a user control that contains a button that, when clicked, will call the SignOut method and add user controls to all protected pages of the application.
Example 9-4. Logout.aspx
<% @ Page Language = "VB"%><% @ Import Namespace = "System.Web.Security"%>Logout Page
Listing 9-5 shows the contents of the Users.xml file.
Example 9-5. Users.xml
andrew@aspnetian.com 816010E041FA485C6E2383C649343D3A0CAD4D25
9.1.3.Passport appraisal
Passport authentication allows a user to have a unique password while being able to log in (e-mail addresses are attached to their Passport account) to multiple applications or websites. This simplifies the user login process and reduces administrative work when maintaining user accounts.
To use Passport authentication in ASP. NET we must download and install the Passport SDK.
After installing the SDK Passport, we need to configure according to the corresponding structure. Finally, configure the ASP. NET application to use Passport authentication, like the code below:
The redirectUrl element and attribute are optional and are used to describe an internal URL to redirect if a user requests a login without using their Passport account. If ignored, users who log in without using a Passport account will be redirected to the login page on a Passport login server.
9.2.Licensing (Authorization)
Licensing is the process of determining whether the user has been identified in the authentication process that is allowed to access the resource they are requesting or do any other action (eg update the database The database is then accessed.) Quá trình thẩm định trả lời cho câu hỏi: 'Bạn là ai?', còn quá trình cấp phép trả lời cho câu hỏi: 'Bạn có được phép làm điều đó hay không?'.
Cấp phép trong ASP. NET có ba hình thức: cấp phép sử dụng Danh sách điều khiển truy cập (ACL), cấp phép sử dụng đưòng dẫn URL và cấp phép programmatic.
9.2.1. Cấp phép ACL
Danh sách điều khiển truy cập (ACL) được dùng trong Windows NT, Windows 2000, Windows XP và Windows Sever 2003 để kiểm soát truy cập tài nguyên hệ thống như các tệp, thư mục trong hệ thống file NTFS. Bạn có thể gán một số tài nguyên nhất định vào ACL cho tài khoản người dùng hoặc một nhóm người dùng Windows để cho phép họ truy cập tài nguyên hoặc xác định kiểu truy cập (đọc, ghi, thay đổi…) được phép dùng.
Thẩm định ACL chủ yếu được dùng với thẩm định Windows trong ASP. NET. IIS sử dụng nhân dạng người dùng đã qua thẩm định để thực hiện các kiểm tra ACL và cũng có thể đưa ra các yêu cầu về tài nguyên được bảo vệ bởi ACL. bằng cách dùng ngữ cảnh bảo mật của người dùng, nếu impersonation được cho phép.
Để bảo vệ một file dùng ACL, kích phải chuột lên file trong Windows Explorer và chọn Properties. Tiếp theo, bấm chọn thẻ Security để xem người dùng, nhóm người dùng và đặc quyền hiện thời có trên file. Sử dụng các nút Add và Remove để thêm hoặc bớt tài khoản người dùng, nhóm người dùng và đánh dấu hoặc bỏ dấu ở các ô trong phần Permissions để thay đổi đặc quyền cho người dùng.
(Trong Windows XP, thẻ Security có thể không xuất hiện trên hộp thoại Properties của file hay folder nếu chức năng Simple File Sharing được bật. Để xem liệu thành phần này có đang được bật hay không, vào Tools > Folder Options trong Windows Explorer. Sau đó chọn thẻ View, vào phần Advanced Settings, bỏ dấu chọn trong ô "Use simple file sharing (recommended)" đi là được).
Một trong những việc cần làm đầu tiên trong là loại bỏ nhóm Everyone ra khỏi thư mục, do nhóm này cho phép bất kỳ ai truy cập máy tính cũng có thể truy cập file này.
Khi loại bỏ một số tài khoản đặc biệt (như SYSTEM) khỏi các danh sách ACL chúng ta cần thận trọng. Một số file hệ điều hành đòi hỏi phải có tài khoản SYSTEM mới được phép truy cập để thực hiện các chức năng của hệ điều hành. Vì thế loại bỏ những đặc quyền này có thể là nguyên nhân gây ra nhiều vấn đề nghiêm trọng. thậm chí dẫn đến không khởi động được hệ điều hành.
9.2.2. Cấp phép URL
Chế độ cấp phép URL sử dụng các yếu tố và của phần tử cấu hình để kiểm soát truy cập file, thư mục bên trong ứng dụng, giống như trong ví dụ ở thẩm định Forms. Truy cập có thể được cho phép hoặc bị từ chối dựa trên tên người dùng (username), vai trò (role) và phương thức HTTP dùng để yêu cầu tài nguyên. Do đó, lấy ví dụ, nếu cho phép người dùng Marcie truy cập tất cả tài nguyên trong ứng dụng theo tất cả phương thức yêu cầu của HTTP, nhưng cấm người dùng Charles thực hiện yêu cầu POST, chúng ta sẽ phải thêm phần vào sau file web.config ở mức gốc của ứng dụng (hoặc có thể thêm phần vào file web.config trong một thư mục con để ghi đè hoặc thêm các thiết lập):
Như trên hình 9-1, chúng ta có thể dùng thẻ với thuộc tính path cho điều khiển truy cập của một file hay folder cụ thể:
Do thẻ trong file web.config đòi hỏi cặp thẻ riêng của nó nên thẻ luôn xuất hiện bên trong các thẻ và nhưng bên ngoài các thẻ và. Chúng ta có thể định nghĩa ít hay nhiều thẻ khác nhau tuỳ ý. Mỗi thể có thể chứa những giới hạn cấp phép URL riêng.
Để mô tả miền thay cho các tài khoản hay nhóm cục bộ, chúng ta có thể sử dụng định dạng domainname userorgroupname khi mô tả tên trong và. Có hai ký tự đặc biệt: '*' cho phép tất cả người dùng, '?' là chỉ những người dùng nặc danh (không qua thẩm định). Cuối cùng, có thể mô tả nhiều người dùng hoặc nhóm người dùng cùng một lúc trong và bằng dấu phẩy.
9.2.3 Cấp phép Programmatic (programmatic authorization)
Chúng ta có thể thực hiện các kiểm tra programmatic tại thời gian chạy bằng cách xác định xem liệu người dùng có được phép thực hiện một hành động nào đó hay không. Công cụ chủ yếu để thực hiện điều này là phương thức IsInRole, được định nghĩa bởi giao diện IPrincipalvà có thể truy cập từ thuộc tính User của lớp Page. Cũng như với cấp phép ACL, phương thức này hữu ích nhất khi dùng với cơ chế thẩm định Windows và khi muốn kiểm tra xem liệu liệu người dùng đã qua thẩm định thuộc nhóm Windows nào, như nhóm manager (quản lý) chẳng hạn. Chúng ta có thể lấy ví dụ minh hoạ cho việc sử dụng IsInRole như bên dưới:
If Page. User. IsInRole("Managers") Then 'perform some action restricted to managers Else Message. Text = "You must be a manager to perform this action" End If
Bạn đọc thân mến, có thể thấy rõ bảo mật ứng dụng trong ASP. NET tập trung làm rõ hai vấn đề thẩm định ( authentication ) và cấp phép ( authorization ). Song ngoài hai khái niệm chính này chúng ta cũng cần biết đến một số yếu tố đáng quan tâm khác mà có dịp chúng tôi sẽ tiếp tục chuyển tới các bạn vào một ngày gần nhất. Hy vọng các bạn đã có được một tài liệu tham khảo hữu ích từ phần bài dịch này của tác giả. Trong quá trình dịch không thể tránh khỏi một số sai sót, mong các bạn góp ý để giúp tác giả sửa chữa nhằm phục vụ bạn đọc một tác phẩm hay hơn và chính xác hơn.
FAQ
What is Authentication: Secure Asp. Net about?
It provides a structured overview of authentication, explains the main context, and highlights practical takeaways for readers.
Why does this topic matter?
Understanding the main concepts helps readers evaluate the issue, avoid common mistakes, and make better-informed decisions.
How should readers use this information?
Use the guidance as a practical starting point, confirm details that may have changed, and follow current product, safety, or security recommendations.
Related Articles
 Review F-secure Sense Routers: Effective, Affordable Protection7 minutes read
 How to Fix 'Your Wi-Fi Network Isn't Secure' Error on Windows5 minutes read
 What Is Secure Erase?5 minutes read
 Secure Folders with Secure Folders Software3 minutes read
 5 Reasons Web3 Is Less Secure Than Web 2.07 minutes read
 How to Fix Errors Can't Establish Secure Connection on Safari7 minutes read
Reader Comments 0
Sign in with email or Google to join the discussion.