Apache 2.0 with SSL / TLS protocol: Step by step instructions (continued Part I)
Before running Apache for the first time, we also need to provide the initial configuration and join some sample web content. At the very least, we need to follow these steps (as Root):
Review the beginning of Part I
Configure SSL / TLS
Before running Apache for the first time, we also need to provide the initial configuration and join some sample web content. At the very least, we need to follow these steps (as Root):
1. Create some sample web content that will be met via SSL / TLS :
umask 022 mkdir /www echo " Test works." > /www/index.html chown -R root:sys /www
2. Replace the default Apache configuration file (usually found in /usr/local/apache2/conf/httpd.conf ) with a new one, using the following content (optimizing security and performance ):
# ================================================= # Basic settings # ================================================= User apache Group apache ServerAdmin webmaster@www.seccure.lab ServerName www.seccure.lab UseCanonicalName Off ServerSignature Off HostnameLookups Off ServerTokens Prod ServerRoot "/usr/local/apache2" DocumentRoot "/www" PidFile /usr/local/apache2/logs/httpd.pid ScoreBoardFile /usr/local/apache2/logs/httpd.scoreboard DirectoryIndex index.html # ================================================= # HTTP and performance settings # ================================================= Timeout 300 KeepAlive On MaxKeepAliveRequests 100 KeepAliveTimeout 30 MinSpareServers 5 MaxSpareServers 10 StartServers 5 MaxClients 150 MaxRequestsPerChild 0 # ================================================= # Access control # ================================================= Options None AllowOverride None Order deny,allow Deny from all Order allow,deny Allow from all # ================================================= # MIME encoding # ================================================= TypesConfig /usr/local/apache2/conf/mime.types DefaultType text/plain AddEncoding x-compress .Z AddEncoding x-gzip .gz .tgz AddType application/x-compress .Z AddType application/x-gzip .gz .tgz AddType application/x-tar .tgz AddType application/x-x509-ca-cert .crt AddType application/x-pkcs7-crl .crl # ================================================= # Logs # ================================================= LogLevel warn LogFormat "%h %l %u %t "%r" %>s %b "%{Referer}i" "%{User-Agent}i"" combined LogFormat "%h %l %u %t "%r" %>s %b" common LogFormat "%{Referer}i -> %U" referer LogFormat "%{User-agent}i" agent ErrorLog /usr/local/apache2/logs/error_log CustomLog /usr/local/apache2/logs/access_log combined CustomLog logs/ssl_request_log "%t %h %{HTTPS}x %{SSL_PROTOCOL}x %{SSL_CIPHER}x %{SSL_CIPHER_USEKEYSIZE}x %{SSL_CLIENT_VERIFY}x "%r" %b" # ================================================= # SSL/TLS settings # ================================================= Listen 0.0.0.0:443 SSLEngine on SSLOptions +StrictRequire SSLRequireSSL SSLProtocol -all +TLSv1 +SSLv3 SSLCipherSuite HIGH:MEDIUM:!aNULL:+SHA1:+MD5:+HIGH:+MEDIUM SSLMutex file:/usr/local/apache2/logs/ssl_mutex SSLRandomSeed startup file:/dev/urandom 1024 SSLRandomSeed connect file:/dev/urandom 1024 SSLSessionCache shm:/usr/local/apache2/logs/ssl_cache_shm SSLSessionCacheTimeout 600 SSLPassPhraseDialog builtin SSLCertificateFile /usr/local/apache2/conf/ssl.crt/server.crt SSLCertificateKeyFile /usr/local/apache2/conf/ssl.key/server.key SSLVerifyClient none SSLProxyEngine off AddType application/x-x509-ca-cert .crt AddType application/x-pkcs7-crl .crl SetEnvIf User-Agent ".*MSIE.*" nokeepalive ssl-unclean-shutdown downgrade-1.0 force-response-1.0
3. Note: You should change some values in the above configuration file. Such as the name of the web server, the e-mail address of the administrator. etc .
4. Re-structure the web server's private key directory , certificates, and certificate revocation list (CRLs).
umask 022 mkdir /usr/local/apache2/conf/ssl.key mkdir /usr/local/apache2/conf/ssl.crt mkdir /usr/local/apache2/conf/ssl.crl
5. Create a ' self-signed ' service (it will only be used for testing purposes - your real certificates should come from an appropriate CA like Verisign ):
openssl req -new -x509 -days 30 -keyout /usr/local/apache2/conf/ssl.key/server.key -out /usr/local/apache2/conf/ssl.crt/server.crt -subj '/CN=Test-Only Certificate'
Check the installation
At this point, we can start Apache supporting SSL / TLS as follows:
/usr/local/apache2/bin/apachectl startssl Apache/2.0.52 mod_ssl/2.0.52 (Pass Phrase Dialog) Some of your private key files are encrypted for security reasons. In order to read them you have to provide us with the pass phrases. Server 127.0.0.1:443 (RSA) Enter pass phrase:************* Ok: Pass Phrase Dialog successful.
After the server starts, we can try to connect to it by pointing to the web browser with a URL that looks like this: https: //name.of.the.web.server (in their case I am https: //www.seccure.lab )
In a few minutes, we will see a warning saying there is a problem with verifying the web server validation we want to access. The illustration in Figure 3 is an example from MS Internet Explorer 6.0.

The appearance of the above warning properly perfectly! We should receive this warning for two reasons:
-
The web browser does not know the Certificate Authority , provided by the web server certificate (and cannot know, because we are using a selfsigned certificate ).
-
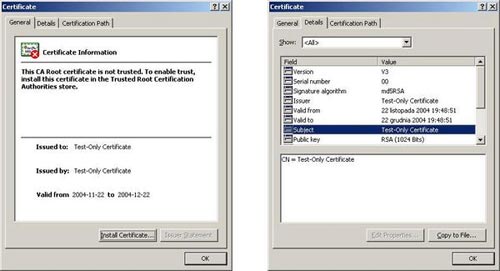
CN ( Common Name ) - The generic name given by the unconnected certificate of the website name - at the time it is a read -only certificate ( Text-only Certificate) , and it will be the full domain name of the web server ( eg: www.seccure.lab )
After executing with Internet Explorer, we should see the following web content, as shown in Figure 4:

Figure 4. Website template work of SSL.
One thing to note, there's a golden key at the end of the web browser. That means the SSL connection has been successfully established. The 128-bit value indicates that the symmetric key is used to encrypt the transaction with a 128-bit length. And it is strong enough (at least at this time) to protect network traffic from unauthorized intrusion.
If we double-click the lock icon, we will see the properties of the website certificate, as shown in Figure 5 :
Disentangle
If for some reason we can't access the website, there's a useful diagnostic function ' s_client ', located in the OpenSSL library. It can be used to troubleshoot SSL / TLS connections. The following example shows how to use this function:
/usr/bin/openssl s_client -connect localhost:443 CONNECTED(00000003) depth=0 /CN=Test-Only Certificate verify error:num=18:self signed certificate verify return:1 depth=0 /CN=Test-Only Certificate verify return:1 --- Certificate chain 0 s:/CN=Test-Only Certificate i:/CN=Test-Only Certificate --- Server certificate -----BEGIN CERTIFICATE----- MIICLzCCAZigAwIBAgIBADANBgkqhkiG9w0BAQQFADAgMR4wHAYDVQQDExVUZXN0 LU9ubHkgQ2VydGlmaWNhdGUwHhcNMDQxMTIyMTg0ODUxWhcNMDQxMjIyMTg0ODUx WjAgMR4wHAYDVQQDExVUZXN0LU9ubHkgQ2VydGlmaWNhdGUwgZ8wDQYJKoZIhvcN AQEBBQADgY0AMIGJAoGBAMEttnihJ7JpksdToPi5ZVGcssUbHn/G+4G43OiLhP0i KvYuqNxBkSqqM1AanR0BFVEtVCSuq8KS9LLRdQLJ/B1UTMOGz1Pb14WGsVJS+38D LdLEFaCyfkjNKnUgeKMyzsdhZ52pF9febB+d8cLmvXFve28sTIxLCUK7l4rjT3Xl AgMBAAGjeTB3MB0GA1UdDgQWBBQ50isUEV6uFPZ0L4RbRm41+i1CpTBIBgNVHSME QTA/gBQ50isUEV6uFPZ0L4RbRm41+i1CpaEkpCIwIDEeMBwGA1UEAxMVVGVzdC1P bmx5IENlcnRpZmljYXRlggEAMAwGA1UdEwQFMAMBAf8wDQYJKoZIhvcNAQEEBQAD gYEAThyofbK3hg8AJXbAUD6w6+mz6dwsBmcTWLvYtLQUh86B0zWnVxzSLDmwgdUB NxfJ7yfo0PkqNnjHfvnb5W07GcfGgLx5/U3iUROObYlwKlr6tQzMoysNQ/YtN3pp 52sGsqaOOWpYlAGOaM8j57Nv/eXogQnDRT0txXqoVEbunmM= -----END CERTIFICATE----- subject=/CN=Test-Only Certificate issuer=/CN=Test-Only Certificate --- No client certificate CA names sent --- SSL handshake has read 1143 bytes and written 362 bytes --- New, TLSv1/SSLv3, Cipher is DHE-RSA-AES256-SHA Server public key is 1024 bit SSL-Session: Protocol : SSLv3 Cipher : DHE-RSA-AES256-SHA Session-ID: 56EA68A5750511917CC42A1B134A8F218C27C9C0241C35C53977A2A8BBB9986A Session-ID-ctx: Master-Key: 303B60D625B020280F5F346AB00F8A61A7C4BEA707DFA0ED8D2F52371F8C4F08 7FB6EFFC02CE3B48F912D2C8929DB5BE Key-Arg : None Start Time: 1101164382 Timeout : 300 (sec) Verify return code: 18 (self signed certificate) --- GET / HTTP/1.0 HTTP/1.1 200 OK Date: Mon, 22 Nov 2004 22:59:56 GMT Server: Apache Last-Modified: Mon, 22 Nov 2004 17:24:56 GMT ETag: "5c911-46-229c0a00" Accept-Ranges: bytes Content-Length: 70 Connection: close Content-Type: text/html Test works. closed
The s_client function has many useful options. Such as turning on / off ( on / off ) a specific protocol ( -ssl2, -ssl3, -tls1 ). Then restart Apache and check the log files ( / usr / local / apache2 / logs / ) for more information.
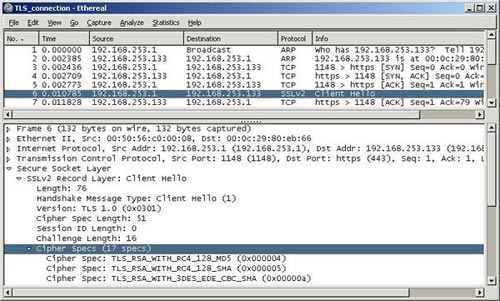
We can also use Ethereal or ssldump . We can passively see SSL Handshake notifications, and try to find out the reason for the error without these tools.
A small screen executing this on Ethereal is depicted in Figure 6 .
Conclusion section I
Installing and running Apache 2 secure with the SSL protocol and a sample certificate has ended in part one of this series. In part two, you will be introduced to the security settings and implementation for mod_ssl, as well as the process of creating an appropriate web server certificate.
See Part II
- Apache 2 supports SSL / TLS: Step-by-step instructions (continued Part II)
- Apache 2 with SSL / TLS: Step-by-step instructions (Part III)
- Compare Nginx and Apache
- How to install Apache Netbean on Windows 10
- Install and configure Apache in Ubuntu
- MSI presents the laptop to play 'dinosaur' GE70 Apache Pro
- How to Install Apache Guacamole via Docker on Ubuntu 22.04
- Guide to connecting MCP Github Local Dev with Claude AI: Step-by-step instructions for beginners.
- How to Shop During Coronavirus
- Replace Microsoft account with Local Account in Windows 8, 8.1
- How to check your computer's IP address easily
- How to Become a Professional Cyclist
- How to Create a Benefit Concert Series
- How to Promote a Concert
- How to Select Folders to Sync with Copy on Windows
- How to Configure CAWE in a Windows Server 2012 R2 Domain
- How to Create a Password Protected File on Windows 7
- Managing certificates in Exchange - Part 1


-
 Troubleshoot SSL connection errors
-
Windows Secure Boot is about to expire, what should users do to avoid security risks?
-
What is mTLS? Benefits of mTLS in Data Security
-
What is OCSP (Online Certificate Status Protocol)? Advantages and disadvantages of OCSP
-
What is an SSL certificate? How does it affect your website?
-
Why Your Online Store Must Have an SSL Certificate
 Troubleshoot SSL connection errors
 Windows Secure Boot is about to expire, what should users do to avoid security risks?
 What is mTLS? Benefits of mTLS in Data Security
 What is OCSP (Online Certificate Status Protocol)? Advantages and disadvantages of OCSP
 What is an SSL certificate? How does it affect your website?
 Why Your Online Store Must Have an SSL Certificate