Table of Contents
A mechanical keyboard stabilizer—often shortened to stab—keeps a long keycap level when you press it away from the center. The switch still registers the keypress; the stabilizer supports both sides so keys such as Space, Enter, Shift, and Backspace do not tilt, bind, or feel loose.
A good stabilizer should move freely, return promptly, and let the long key feel consistent across its width. It does not have to be silent, and it should not be modified simply because tuning is popular in custom-keyboard communities.
What a keyboard stabilizer does
A standard 1u keycap is narrow enough to sit on one switch stem. A 2u or wider keycap creates more leverage: pressing one edge can tilt the cap or make it bind around the center switch. A stabilizer links the two sides so they travel together.
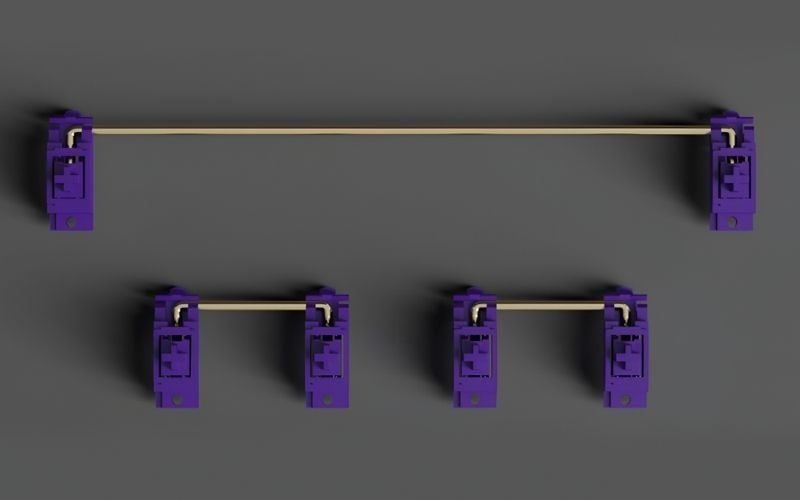
The stabilizer does not replace the switch and normally does not generate the key signal. The switch determines actuation and much of the basic feel; the stabilizer affects off-center stability and can add rattle, ticking, friction, or sluggishness if it is poorly fitted or tuned.
Which keys use stabilizers?
Stabilizers are commonly installed under:
- Space;
- left and right Shift when the key is wide enough;
- Enter or Return;
- Backspace;
- Numpad 0 and Numpad Enter on full-size layouts; and
- other keys measuring about 2u or more, depending on the layout.

The letter u means one standard key unit. A normal letter key is 1u, while common spacebars may be 6.25u or 7u. Layouts vary, so count the required keys and confirm their sizes before buying a stabilizer set.

Basic stabilizer parts
Most Cherry-style stabilizers use three kinds of component:
- Housing: the outer guide that mounts to the plate or PCB.
- Stem or slider: moves inside each housing and connects to the keycap.
- Wire: links the two sides so one side follows the other.
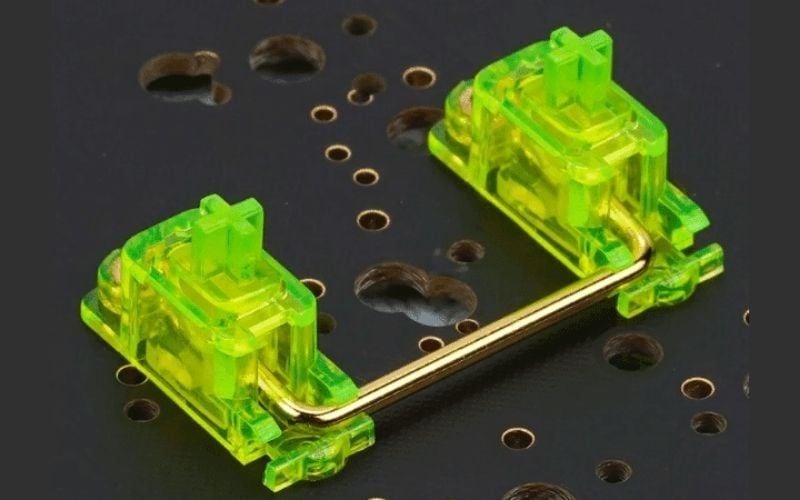
Wire length must match the key size. A 2u wire cannot replace a spacebar wire, and a 6.25u spacebar set does not automatically fit a 7u layout.
Common stabilizer types
| Type | How it mounts or works | What to check |
|---|---|---|
| Cherry-style plate-mount | Housings clip into cutouts in the keyboard plate | Plate cutout, housing fit, wire size |
| Cherry-style PCB clip-in | Housings clip directly into compatible PCB holes | PCB thickness, hole layout, plate clearance |
| Cherry-style PCB screw-in | Housings attach to the PCB with screws | PCB screw holes, insulating washers if specified, case clearance |
| Costar-style | Wire clips into inserts under the keycap and supports at the plate | Keycap removal and reinstallation method |
| Proprietary or optical design | Uses a keyboard-specific mechanism | Exact model compatibility; do not assume Cherry-style parts fit |
Cherry-style stabilizers
“Cherry-style” describes the familiar housing, stem, and wire mechanism used by many mechanical keyboards. It is not a mounting method by itself. Cherry-style stabilizers may be plate-mounted, PCB clip-in, or PCB screw-in.
Plate-mount stabilizers
Plate-mount housings snap into openings in the plate. They can be relatively accessible on compatible boards, but replacement parts must match the plate cutouts and key sizes. A loose housing can contribute to movement or noise.
PCB-mount stabilizers
PCB-mount stabilizers attach directly to the circuit board. Clip-in versions use retaining tabs; screw-in versions use mounting hardware. They require the correct PCB holes and enough clearance in the plate and case. A board designed only for plate-mount stabilizers cannot accept screw-in parts merely because the keyboard is mechanical.
Costar-style and proprietary designs
Costar-style stabilizers connect the wire to small inserts on the underside of the keycap. They can work well, but removing and reinstalling long keycaps is less intuitive for beginners. Optical, low-profile, and other proprietary keyboards may use model-specific stabilizers, so check the service documentation before ordering parts.
How stabilizers affect typing feel and sound
A correctly installed stabilizer primarily improves off-center movement. It can also influence sound because the wire, stems, housings, plate, and keycap all move during a press.
Common symptoms include:
- Rattle: loose plastic or wire movement creates a chatter-like sound.
- Ticking: one side makes a sharper sound, often related to wire alignment or contact.
- Scratchiness: friction is felt during travel.
- Mushy or sluggish return: excess lubricant, interference, misassembly, or a warped keycap may slow the key.
- Binding: the key sticks or becomes much heavier when pressed off-center.
- Uneven height: one side of the keycap sits higher or disengages from its stem.
Not every spacebar sound comes from the stabilizer. The keycap material and shape, switch, case, plate, foam, and desk surface also change the sound.
How to inspect a long key without disassembling the keyboard
- Disconnect the keyboard or open a harmless text field so accidental presses do not trigger commands.
- Press the center of the long key slowly and confirm that it returns without hesitation.
- Press near the left and right edges with similar force.
- Listen for a sound that occurs only on one side.
- View the key from the front to check whether one edge tilts excessively or stays depressed.
- Compare several long keys; one bad key is more informative than a general preference about sound.
If the key moves smoothly and you simply dislike its tone, do not assume the stabilizer is defective.
Should you lubricate or replace stabilizers?
Most users should leave a stable stock keyboard alone. Consider tuning only when a specific long key rattles, ticks, binds, or returns slowly and the keyboard's warranty and construction allow safe access.

Lubrication can reduce friction and wire noise, but more is not better. Excess lubricant can make a stabilizer mushy or slow to return. Glorious documents this failure mode in its sticking-stabilizer guide. Use only a plastic-safe product suitable for keyboard stabilizers and follow the keyboard or stabilizer manufacturer's instructions.
Use this order before a full stabilizer replacement
- Remove and reseat the keycap according to its stabilizer design.
- Check whether the keycap is warped or its mounting stems are cracked.
- Confirm that the switch itself works and returns normally.
- Inspect accessible housings and wire ends for displacement.
- Only then consider lubrication, wire correction, or replacement.
Do not force a tight keycap off a clip-in stabilizer. Pulling hard at an angle can disengage the stabilizer or damage its mount.
Compatibility checklist before buying stabilizers
- Mounting style: plate-mount, PCB clip-in, PCB screw-in, Costar, or proprietary.
- Layout: ANSI, ISO, split spacebar, compact layouts, and special right-Shift arrangements may need different parts.
- Key sizes: count every stabilized key and identify the spacebar length.
- PCB and plate: verify the holes, cutouts, thickness, and clearance specified by the kit maker.
- Keycap fit: confirm the stem system and check for a warped long keycap.
- Access: determine whether switches, plate, or the entire case must be removed.
- Warranty: check whether opening or modifying the keyboard affects coverage.
Hot-swap does not automatically make stabilizers hot-swappable
A hot-swap PCB lets you remove compatible switches without soldering; it says nothing by itself about stabilizer access. Plate-mount stabilizers may still be trapped by the assembled plate, and PCB-mount stabilizers can require removal of switches, the plate, and the case.
Read the hot-swappable keyboard guide before removing switches, and review the mechanical switch overview to separate a switch problem from a stabilizer problem.
When to stop and seek repair help
Stop if a stabilizer housing lifts from the PCB, a wire disappears under an assembled plate, a key remains stuck after reseating, or the board must be desoldered to reach the part. A torn PCB mount or damaged trace needs board-level repair, not additional lubricant.
The practical test is simple: if every long key travels smoothly and returns promptly when pressed at the center and edges, the stabilizers are doing their job. Tune them only to solve an identified problem or to pursue a deliberate sound preference.
Related Articles
 Homemade Keyboard Is Not Difficult6 minutes read
 Top Best Mechanical Keyboards 20257 minutes read
 See the Strange Mechanical Keyboards of the Vietnam Mechanical Keyboard Association3 minutes read
 Instructions for Replacing Mechanical Keyboard Switches with 5 Simple8 minutes read
 How to Change or Rename a PC in Windows 106 minutes read
 What Is the Cause of Mechanical Keyboard Paralysis and How to Fix8 minutes read
Reader Comments 0
Sign in with email or Google to join the discussion.