Turn Raspberry Pi into an Amazon Echo
Amazon Developer allows you to use Alexa software to turn Raspberry Pi into an Amazon Echo.
Table of Contents
Today virtual assistant software is gradually becoming more popular and becoming a useful friend to help us complete jobs in the office and at home easier.It is not difficult to find a virtual assistant speaker, but the interesting thing is that you can completely create your own virtual assistant device with Amazon Developer.Amazon Developer allows you to use Alexa software to turn Raspberry Pi into an Amazon Echo.
Materials needed
For this task, you will need:
- Raspberry Pi 3 or Pi 2 Model B and Micro-USB power cable
- Micro SD card (minimum 8 GB) - If you have not installed the operating system, there is a fairly easy to use new operating system called NOOBS.The easiest way to download NOOBS is to buy NOOBS pre-loaded SD cards.
- A mini microphone has a USB 2.0 port
- Speaker and 3.5mm audio cable
- USB keyboard, mouse and HDMI monitor
- Internet connection (Ethernet or WiFi)
- For the Raspberry Pi 2, to connect wireless Internet, you need to prepare additional WiFi Adapter.And the Raspberry Pi 3 has integrated Wi-Fi.
Register for an Amazon Developer account
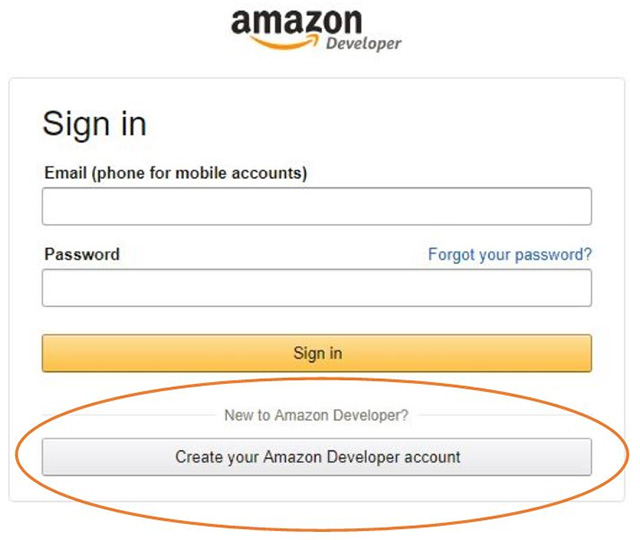
If you don't have an Amazon Developer account yet, create a free account on their site.
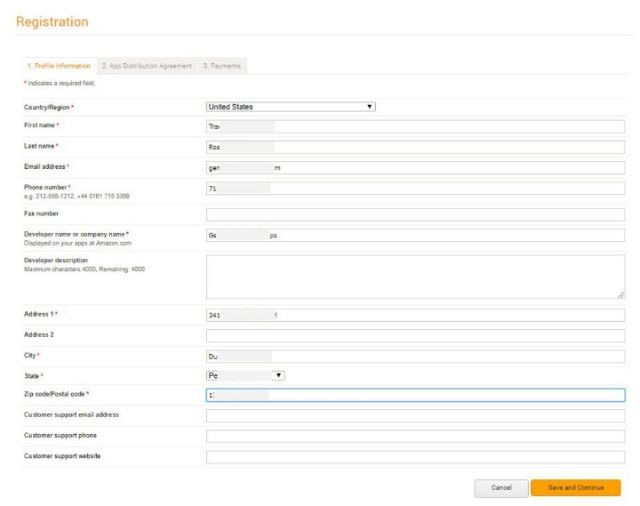
Full dictionary of personal information needed
 Read and accept the Application Agreement.

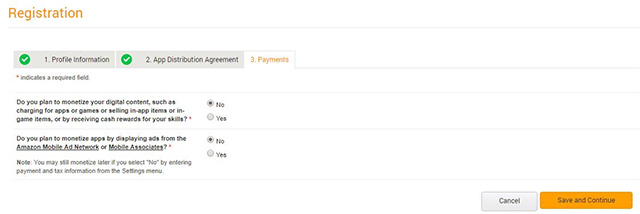
Choose whether you make money from your application or not.
Create your device on Amazon Developer
After registering an Amazon Developer account, create an Alexa device and a security profile.Note, pay attention to this information after you perform the installation: ProductID, ClientID and ClientSecret , because you will need these parameters in the following steps.
At the top of the screen, option menu, select Alexa Voice Service.

The "Welcome to Developer" screen will appear.
The screen first asks you about the product you are developing.
1. First, give your device a name.
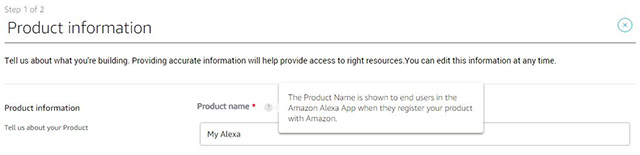
2. Next, enter ProductID (do not have spaces or special characters)(Note you will need this information in the following steps, please note again).

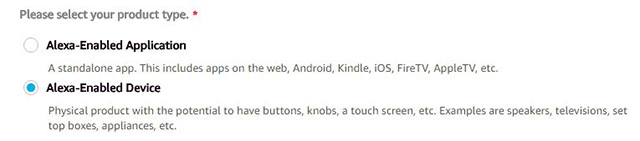
3. Select Alexa-Enabled Device for the product category.
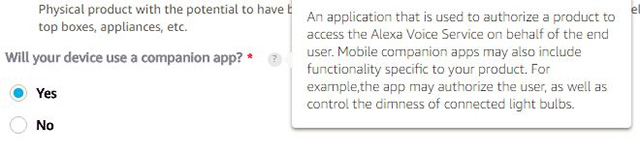
4. Alexa will need a companion application.Select Yes for this section.
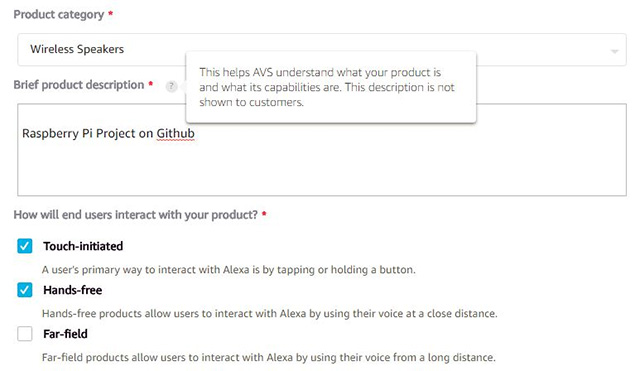
5. Select Wireless Speakers in the options menu.
6. Enter 'Raspberry Pi Project on Github' in the description box.This is information for AVS and other users will not be able to read.
7. Earn both Touch-pay and Hands-free options .
8. You can now upload images to your device.
9. Select No for commercial device development and child related questions.
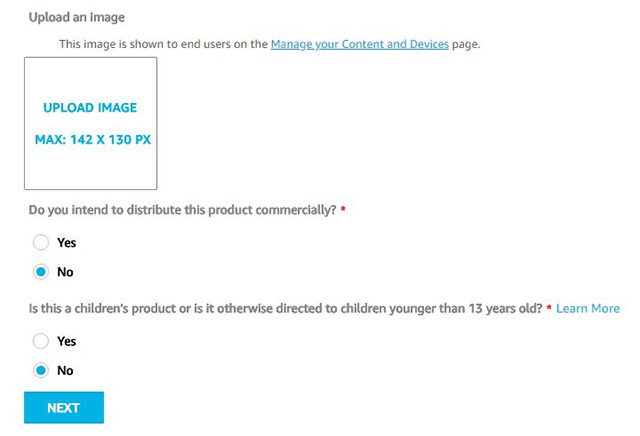
10. Click Next .
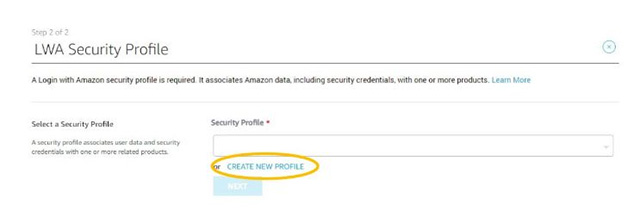
Create your security profile
On this page, you create a new LWA (Login with Amazon) security profile to identify user data and secure login information.
1. Click 'Create new profile'.
2. Create a name for the profile.Examples are "Alexa Security Profile".
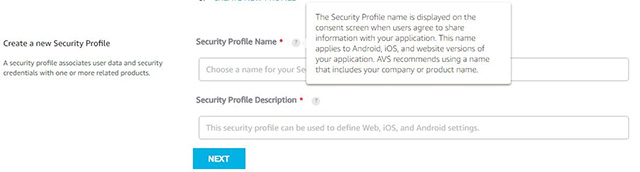
3. In the description entry for the profile.You can select 'Alexa Security Profile Description'.
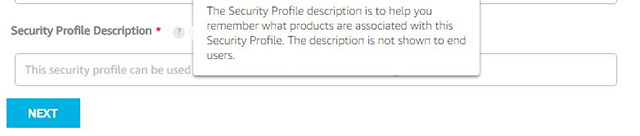
4. Click Next .
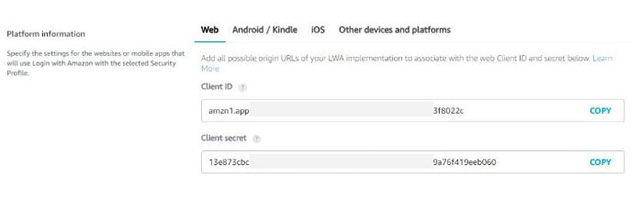
5. Amazon creates a Client ID and Client Secret for you.Here are two information you will need later.So please note.
6. Enter the URL of Allowed origins and Allowed return.We are setting http and https addresses for this project, so enter 'http:/// localhost: 3000.'go to your 'Allowed origins' section.
7. Click Add .
8. Continue typing the address 'https: // localhost: 3000' as you typed in the box above.
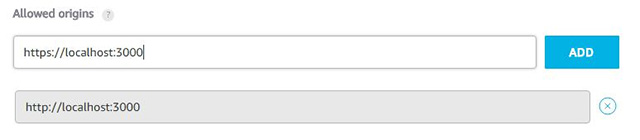
9. Continue Click Add.
10. Do the same with the URL of Allowed return, except enter the following two URLs:
http:/// localhost: 3000 / authresponse
https: // localhost: 3000 / authresponse
11. The website will look like this before you click Finish.Make sure the URLs are displayed in a gray background after you have entered them in the corresponding boxes.
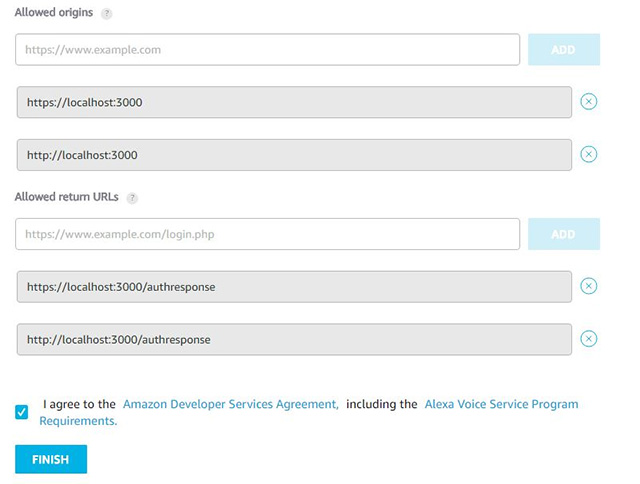
12. After you click Finish , this screen will appear.At this point, your project has been created and ready to go to the installation.
Copy the Alexa sample application
- Open the command input window (Terminal).
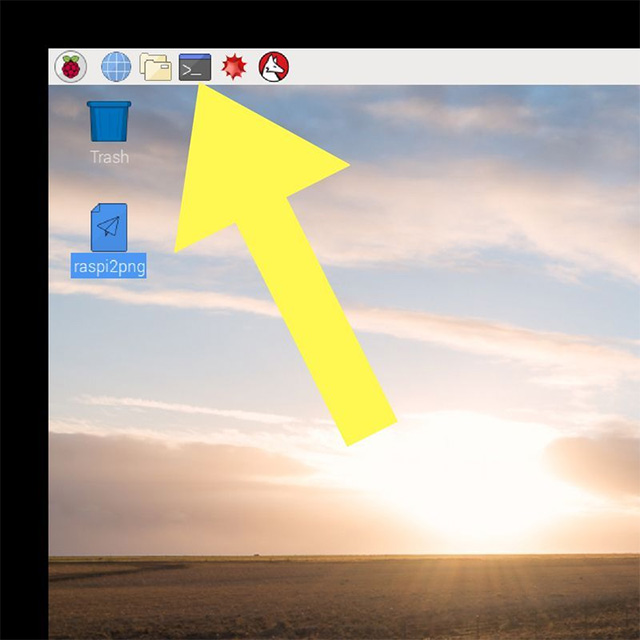
2. Enter the following information:
  cd Desktop
  git clone https://github.com/alexa/alexa-avs-sample-app.git
Update installation commands using credentials
Before running the installation commands, update them with the credentials provided by Amazon: ProductID, ClientID, ClientSecret.
1. In Terminal, type the following:
cd ~ / Desktop / alexa-avs-sample-app
nano automated_install.sh
2. When the command runs, a screen like this will appear. You use the keyboard arrow navigation keys to navigate and replace the fields for ProductID, ClientID and ClientSecret with the values you have received.
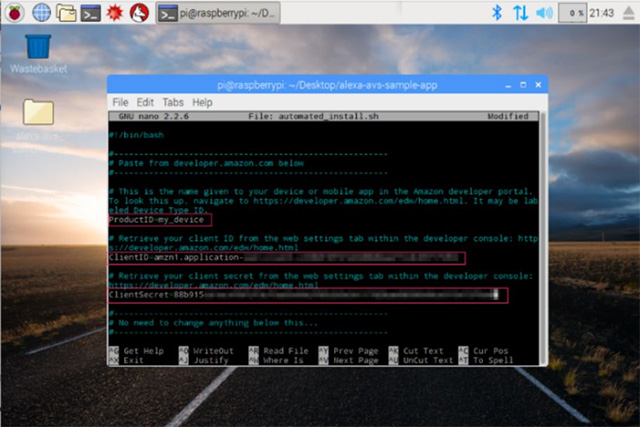
The following change command will look like this:
  ProductID = "Your Device Name"
  ClientID = "amzn.xxxxx.xxxxxxxxx"
  ClientSecret = "4e8cb14xxxxxxxxxxxxxxxxxxxxxxxxxxxxx6b4f9"
Click Ctrl + X to exit the script.Click Y and then press Enter to save your changes.
Run the installation commands
To run the script, open Terminal and enter the following commands:
  cd ~ / Desktop / alexa-avs-sample-app
  .  automated_install.sh
While this script is running, you will be asked to answer some simple questions to make sure that you have completed all the necessary settings on Amazon before installing the program.

The installation process will take about thirty minutes.
After a successful installation, your Terminal window will look like the image below.
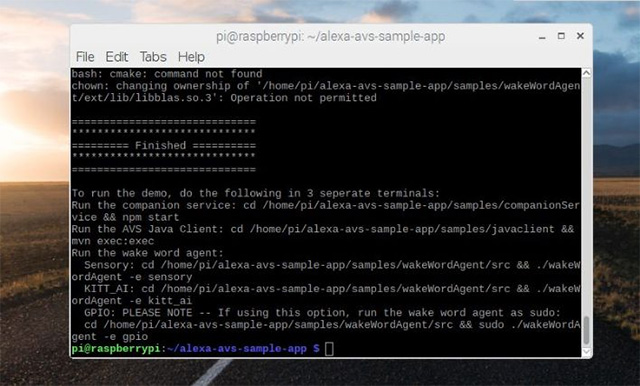
3 Terminal
You must complete three steps to run the Alexa application.Each step is run in a separate Terminal window, and you perform the steps in the correct order.
Terminal 1
This window will run a web service to authorize your application with the AVS (Alexa Voice Service).
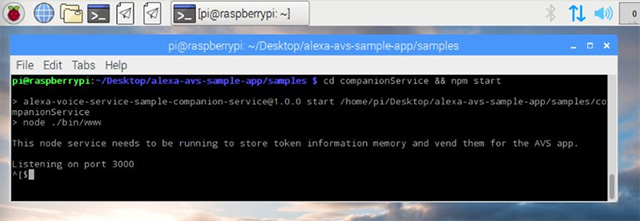
Open Terminal and enter the following commands:
  cd ~ / Desktop / alexa-avs-sample-app / samples
  cd companionService && npm start
Note : npm is a management package for JavaScript programming language.If it is not available when you run the command, you can get it here.
When the command process finishes, a window that looks like this will appear.
Do not rush to close, this window needs to remain open while you proceed to the next steps.
Terminal 2
This window helps communicate with AVS.
Type the following command into another Terminal window:
  cd ~ / Desktop / alexa-avs-sample-app / samples
  javaclient cd && mvn exec: exec
Note: mvn stands for Apache Maven.If you don't have one, click here.
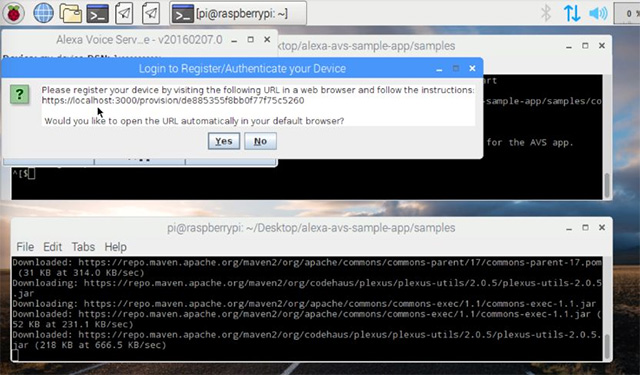
When you run the client, a dialog box will appear, saying: " Please register your device by . "
Select Yes .
For some browsers, you will receive a warning that this connection is not secure.Turn off this notification by clicking the Advance button. Then, on the next screen, click Proceed to localhost (unsafe).
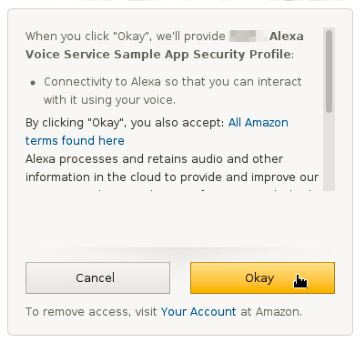
Now, log into Amazon with the developer login you already have.
The next screen will require permission to use the security profile you created earlier for the device you are registering.Click OK.
You will then be redirected to a URL starting with 'https: // localhost: 3000 / authresponse' that looks like the image below.
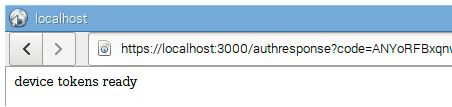
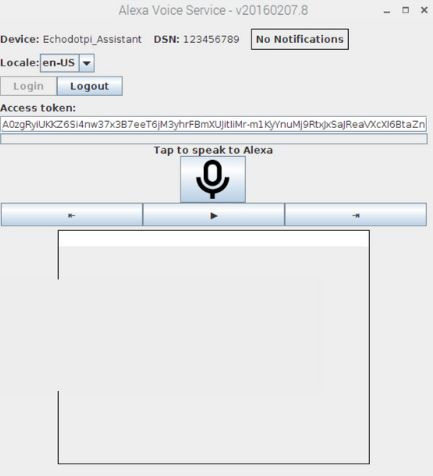
Go back to the open dialog and click the OK button.Now the client can accept requests from your Alexa device.
Do not close the terminal window and the Voice Service Dialog dialog box .
Terminal 3
Alexa voice wake up application will be installed in this window.If you do not want to use voice to command Alexa, you can skip this step.
Open a new Terminal window and use one of the following commands to bring up the Alexa wake-up speech system using Sensory or KITT.AI.
To use the wake up speech system, enter the command:
  cd ~ / Desktop / alexa-avs-sample-app / samples
  cd wakeWordAgent / src && ./wakeWordAgent -e sensory
Trial
Awaken virtual assistant by saying 'Alexa'.After a beep appears you can start the command.For example, try by saying, 'Alexa.'Wait for a beep and ask, 'what time is it?'(What's the time?).
If Alexa answers correctly then your virtual assistant is ready for work.
See more:
- How to set up Alexa virtual assistant as the default assistant on Android
- Instructions to turn on Cortana and use this virtual assistant on Windows 10
- 18 useful commands you should try with Cortana
Was this article helpful?
Your feedback helps us improve.
Related Articles
 Instructions for making a call using Amazon Echo4 minutes read
 7 things Amazon Echo can do and Google Home does not6 minutes read
 What does the red light on Amazon Echo mean? How to prepare?7 minutes read
 Amazon also has a smart virtual assistant1 minutes read
 How to play music with Amazon Echo and Alexa10 minutes read
 8 ways to protect your Amazon Echo privacy while working from home8 minutes read
Reader Comments 0
Sign in with email or Google to join the discussion.