Table of Contents
This updated guide examines The Basics of Using Ipados and organizes the essential facts, background, and practical takeaways in clear American English.
Whether you're a brand new iPad user or a longtime iPad user learning iPadOS for the first time, here's an introduction to the basics of iPadOS.
New iPad home screen
The main screen on iPadOS gives you redesigned layout options and interesting widgets that you can pin for easy access.

Change layout
When you look at iPadOS, you immediately notice that it contains more application icons on the screen. The grid of applications is closer, allowing you to applications at once. However, if you don't like this, you can change it.
1. Open the Settings application and select Display & Brightness .
2. In the Home Screen Layout , check the Bigger option .
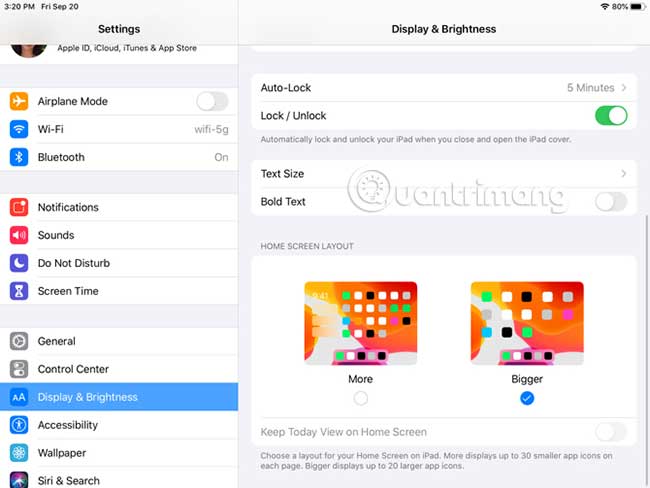
Bigger will bring the grid of 20 application icons back on your screen, while with the More layout , you will get 30 application icons.
Today View
Another improvement to the iPad's main screen is the Today View . Access this handy section by swiping from left to right. Then you have a quick look at the date and time, along with the widget.
You can choose to keep Today View on the home screen or just access by swiping. To keep it on the home screen, follow these steps:
1. Open the Settings application and select Display & Brightness .
2. In the Home Screen Layout , turn the switch for the Keep Today View on Home Screen option to On.
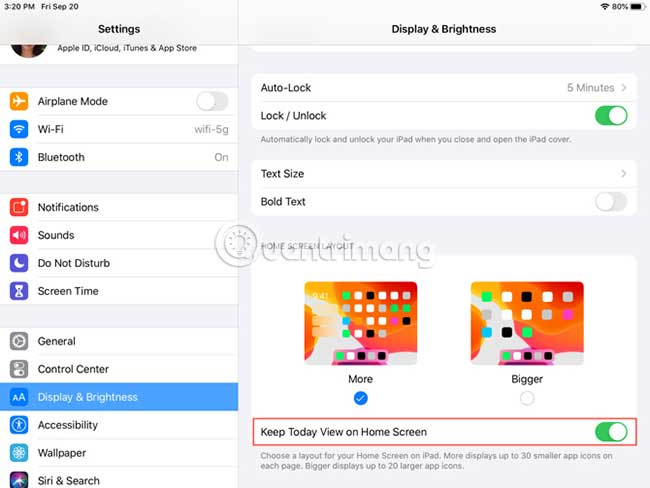
You can also see a message at the top of Today View with the content Add to Home Screen . Just click on it to add it. Alternatively, you can swipe down to the bottom of Today View, press Edit and switch the switch on the next screen to On.
Note that if you decide to keep Today View on the main screen, it will only be there when in landscape view.
Widgets are pinned and favorite
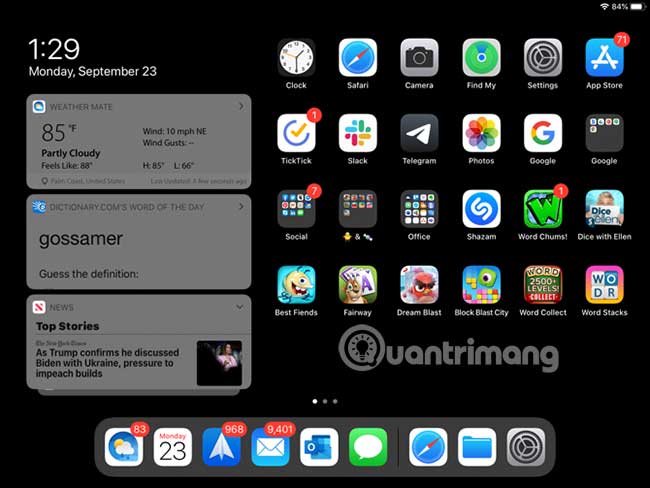
Today View described above is a useful point for application widgets, similar to the Today Screen widgets on iPhone. So it's perfect for those applications that you use daily or many times every day. Plus, the best widgets give you a quick glimpse of things like weather, tasks, news or more about the app.
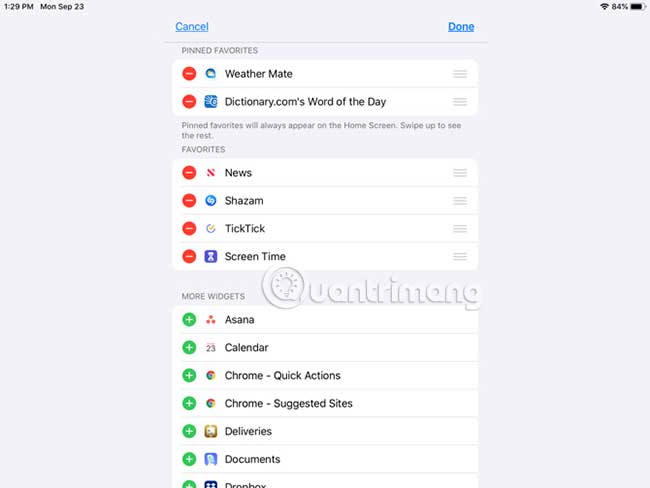
To add, delete and rearrange gadgets, swipe down to the bottom of Today View and press Edit. You have two ways to handle widgets in Today View: Pinned Favorites and Favorites .
Favorites are widgets that will appear in Today View, while Pinned Favorites is Favorites will always appear in Today View. If you open Today View and swipe down, the only widget you'll see is Pinned Favorites. Then just swipe up to see all your favorites ( Favorites ).
Now you know the difference between widgets. You can set them on that Edit screen. Click the green plus to add widgets to Favorites. To turn Favorite into a Pinned Favorite, touch and drag the item to the Pinned Favorites section at the top. And to rearrange widgets, just touch and drag them where you want. Click Done when you are finished.
Other changes on the home screen
You may notice a few additional changes on the home screen with iPadOS.
To rearrange apps, tap and hold on the app's icon as usual. You will then see a pop-up menu with application shortcuts and the Rearrange Apps option. If you do not make a selection from the shortcut menu and continue to hold the application icon, all applications will sway, just like on iOS 12 and earlier, then you can move or delete them.
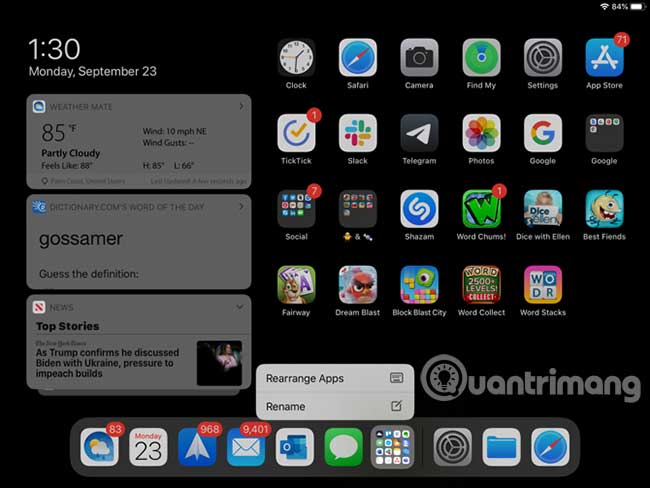
You can now add folders to the Dock on iPad. Hold a folder, select Rearrange Apps and move it to the Dock. Or, hold until the shortcut menu disappears, the folder wobbles and then moves it.
New iPad keyboard
You'll be happy to see improvements to the keyboard (like QuickPath, which lets you swipe to type) in both iOS 13 and iPadOS. In addition, iPadOS also provides you with a floating keyboard.
Floating keyboard
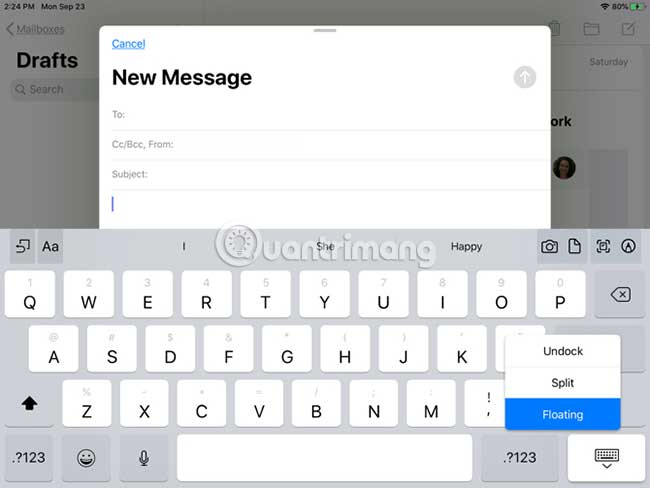
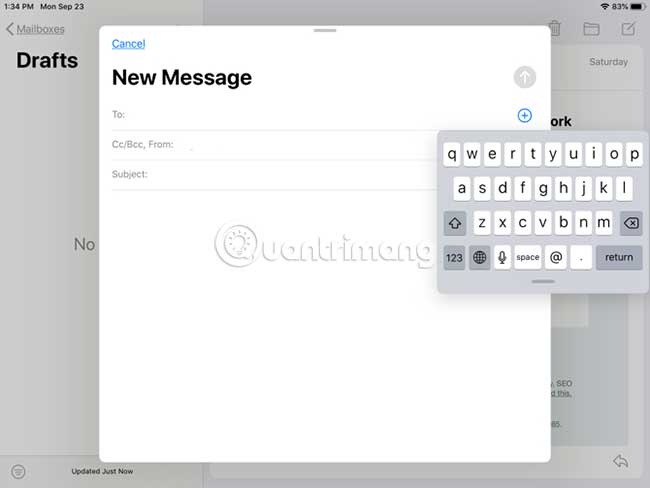
The floating keyboard is one of the additional features available in iPadOS. With this new feature, you can minimize the keyboard and move anywhere you want on the screen. This gives you a greater view of what you're typing without being interrupted by a large keyboard.
In addition, the floating keyboard also uses QuickPath, so you have two new features in one with the iPadOS keyboard.
You can make the keyboard float using either of the following convenient methods:
- Touch and hold the keyboard button at the bottom right, then slide your finger onto the Floating.
- Pinch two fingers into the middle of the keyboard.
When you see the keyboard shrink, you can place it anywhere on the screen by dragging the bottom line of the keyboard. To set the keyboard back to normal size, swipe two fingers apart from the middle of the floating keyboard.
QuickPath
If you're a fan of apps like SwiftKey or Gboard, allowing you to swipe to create words instead of pressing each individual key, QuickPath is the option for you.
Just slide your finger across each letter of a word without releasing it until you move on to the next word. This is a useful feature for those who cannot improve their typing speed by thumb. As mentioned, you can also access this feature on iPhone with iOS 13.
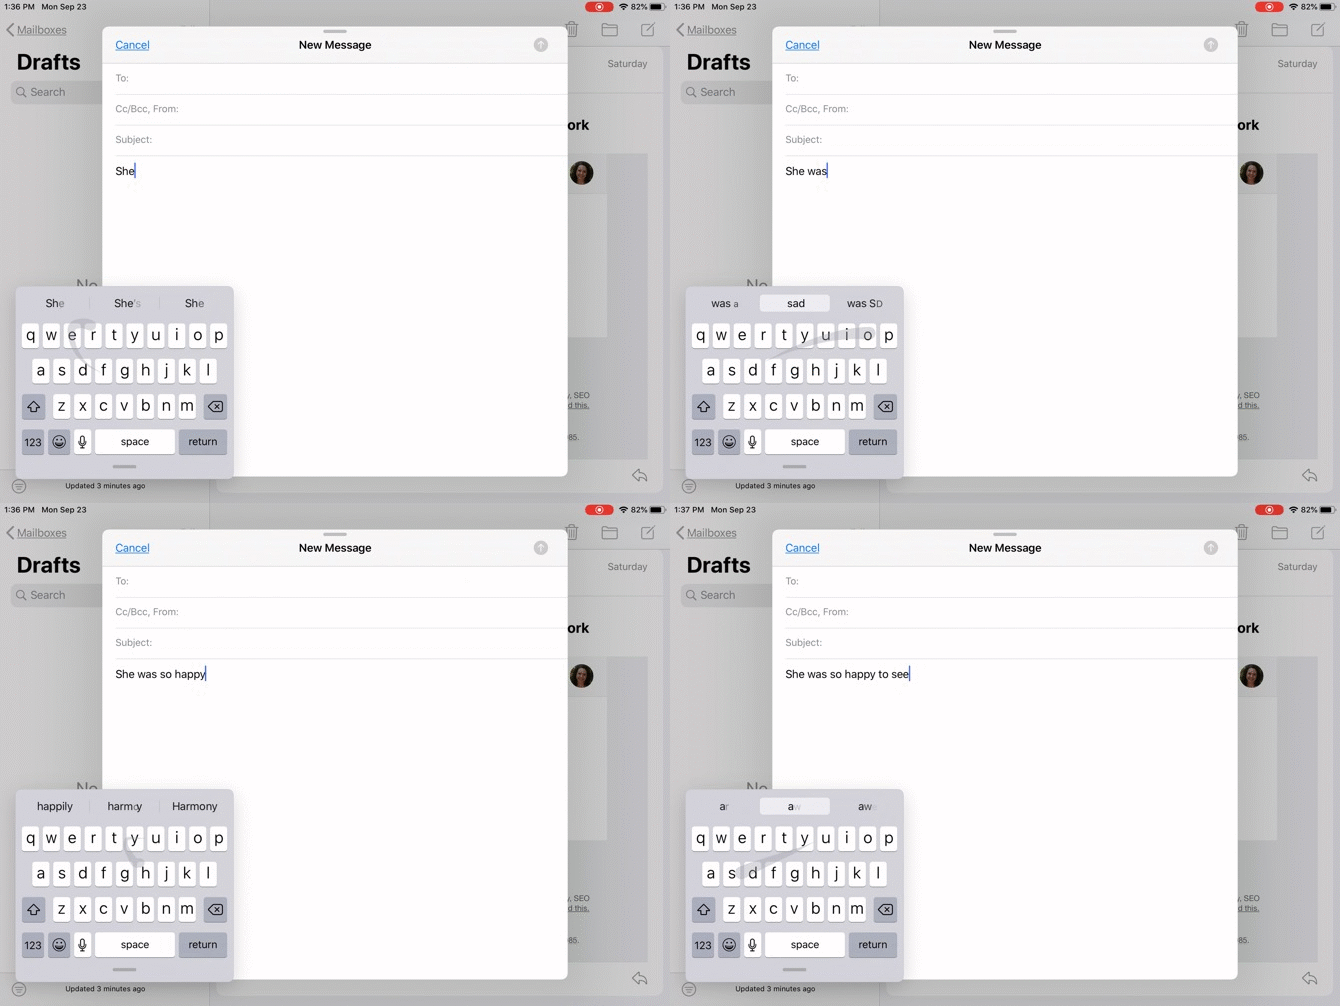
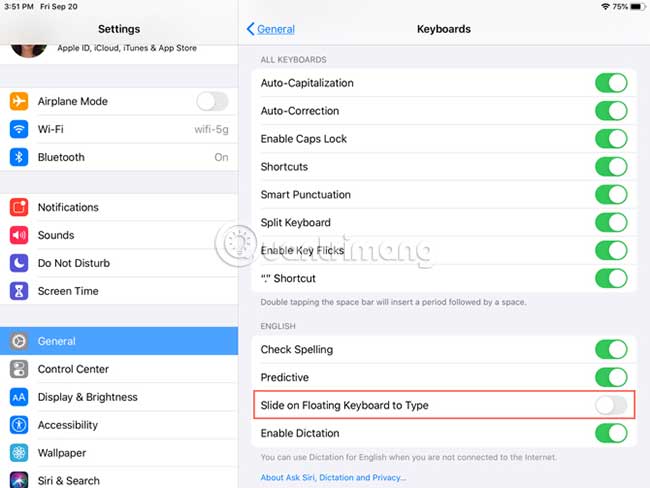
If you don't want to use QuickPath when using the floating keyboard, you can disable it:
1. Open the Settings application and select General.
2. Click Keyboard.
3. At the bottom of the language area, switch the Slide on Floating Keyboard to Type option to Off.
Dark Mode
Although Dark Mode is a feature available on both iPadOS and iOS 13, it is definitely worth a mention for iPad users. This fascinating theme (first seen on macOS Mojave) is now available on Apple mobile devices.
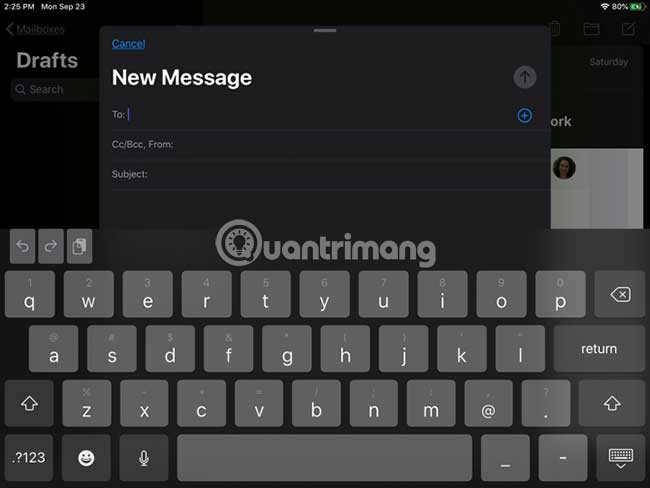
This setting helps reduce eye strain and reduces the brightness of the screen so as not to affect those around them. You can see the richness of Dark Mode in integrated applications, system views and some third party software. You will also find lots of third-party iOS apps that support Dark Mode.
Activate Dark Mode
You can enable Dark Mode on iPad manually with a few simple steps:
1. Open the Settings application and select Display& Brightness .
2. Under Appearance, check the Dark button .
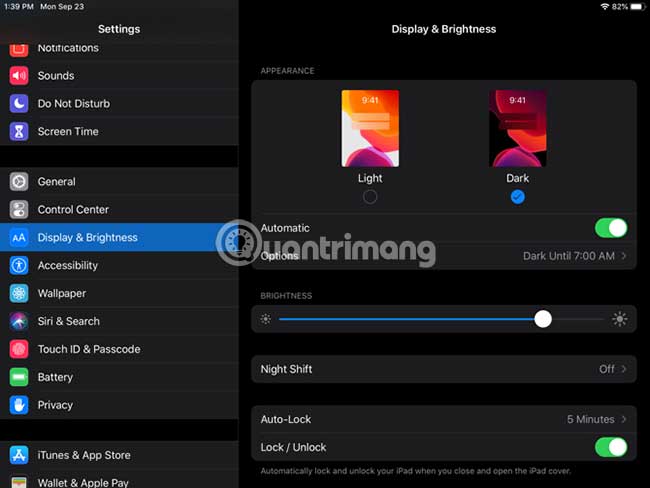
You can also schedule Dark Mode to turn it on and off. This is a great way to enable the feature without having to open Settings each time and do it manually.
1. Open the Settings application and select Display & Brightness .
2. Under Appearance, switch the switch for the Automatic option to On.
3. Click Options and set to Sunset to Sunrise or select Custom Schedule to set specific conversion time for light or dark mode.
The fact that Apple created iPadOS, a system specifically for iPad users, is surprising. But as you can see, this operating system provides additional options and features that you don't get on iPhone. Hopefully, this means that Apple will continue to provide iPadOS with unique features and make it even more useful for tablet users.
For more on iPad in general, see the article: How to connect and use a mouse with an iPad or Which iPad should you buy?
Good luck!
FAQ
What is The Basics of Using Ipados about?
It provides a structured overview of iPadOS, explains the main context, and highlights practical takeaways for readers.
Why does this topic matter?
Understanding the main concepts helps readers evaluate the issue, avoid common mistakes, and make better-informed decisions.
How should readers use this information?
Use the guidance as a practical starting point, confirm details that may have changed, and follow current product, safety, or security recommendations.
Related Articles
 Summary of New Features on iPadOS 2613 minutes read
 Ipados 15: Release Date, Features and Supported Devices4 minutes read
 How to Downgrade iOS 14, IPadOS 14 to iOS 133 minutes read
 IPadOS 14 Launch: Improved Application Interface, Support for Converting4 minutes read
 How to Customize Widgets on iPad: Step-by-Step Guide3 minutes read
 Summary of New Features on IPadOS 146 minutes read
Reader Comments 0
Sign in with email or Google to join the discussion.