Testing Claude Code, Codex, and Antigravity on a real-world electronics project: What were the results?
Claude Code, Codex, and Antigravity were tested in a real-world electronics project — a simple control panel with ESP32, an OLED screen, and temperature sensors capable of performing multiple tasks simultaneously..
AI programming agents will be everywhere in 2026, but not all of them are worth your time. Each model will react differently to problems, and a model that can create a perfect website in minutes might not be good at writing bash scripts. Of course, there are some projects where people won't use code vibes, but working on smaller electronics projects is the perfect place for these models to shine.
Therefore, Claude Code , Codex , and Antigravity were tested in a real-world electronics project—a simple control panel with an ESP32, OLED display, and temperature sensor capable of performing multiple tasks simultaneously. And while all three models can help you create a working prototype, you shouldn't choose a programming assistant blindly.
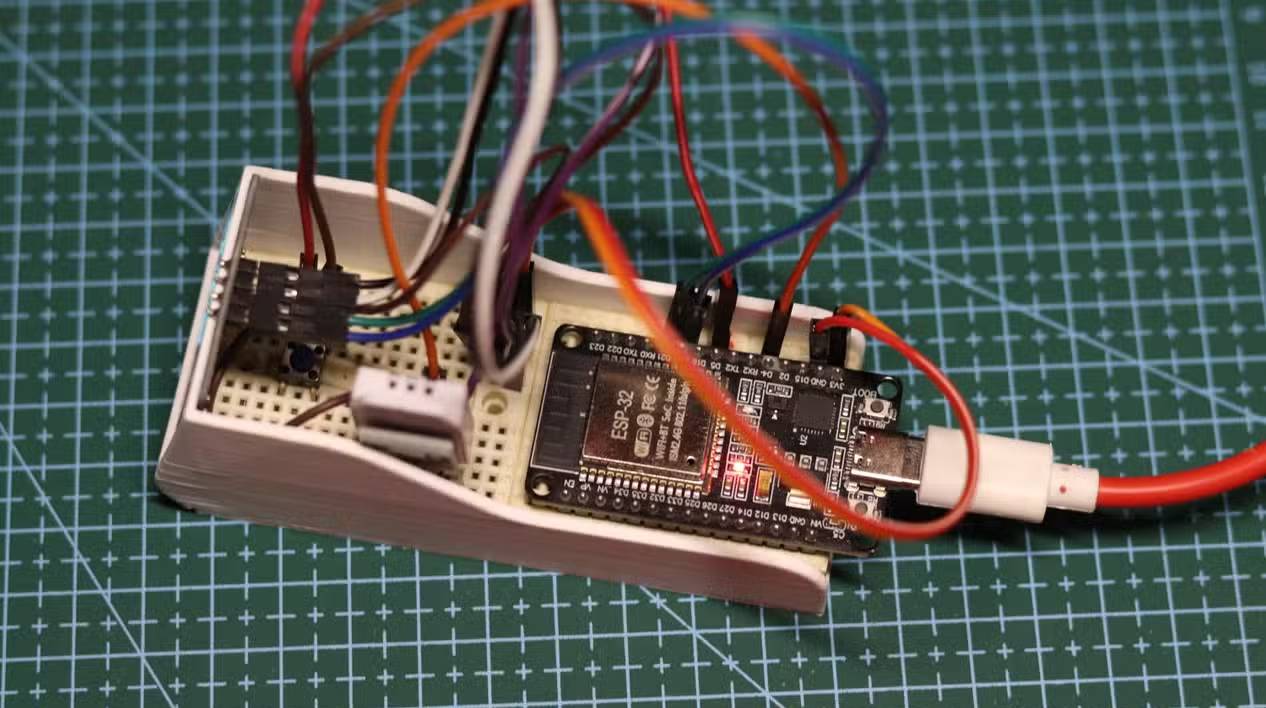
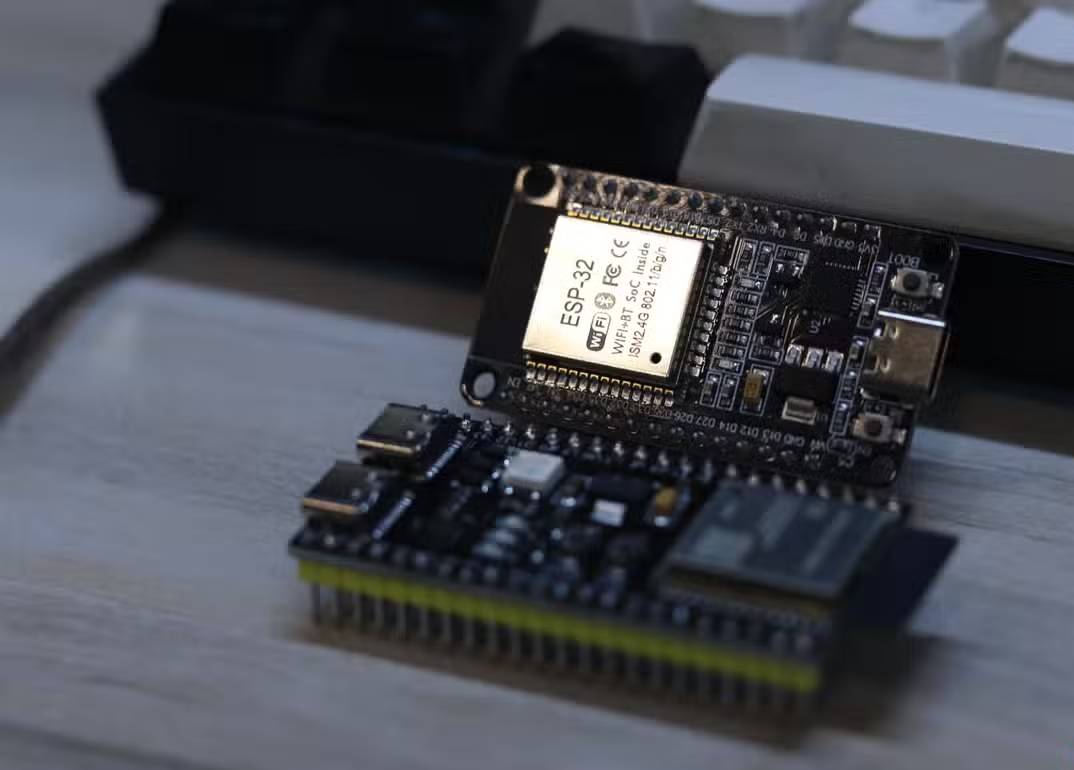
Perform thorough testing with a simple control panel.
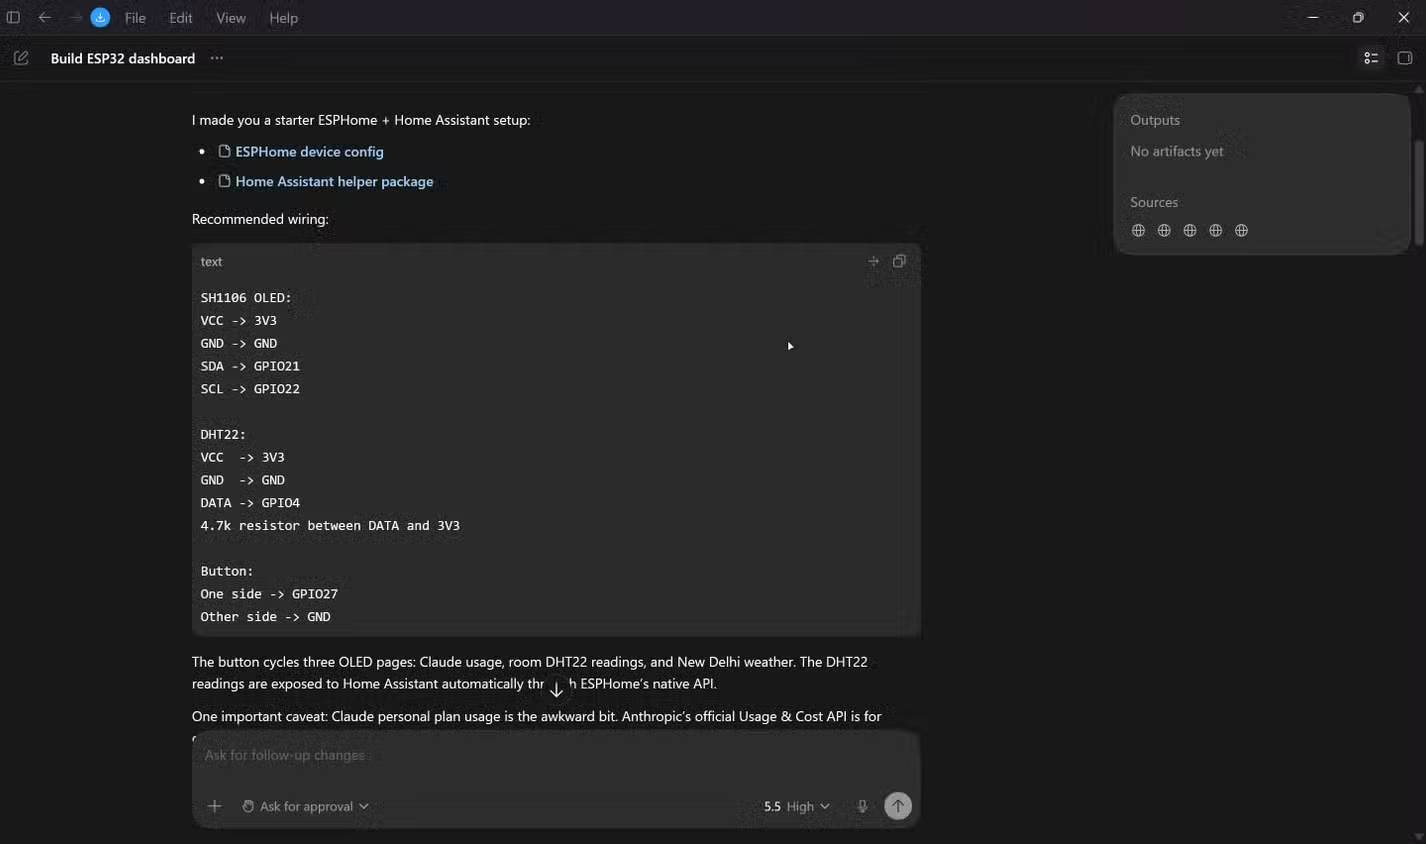
Build an ESP32 device that integrates APIs, sensors, a display, and Home Assistant.
If you're working with larger codebases or monorepos, the context window is quite limited, and Claude Code's usage limitations can be a problem. Claude Code's memory usage is addressed by the Postgres database, but constantly having to click on a small icon to see how much space you have left is still quite annoying.
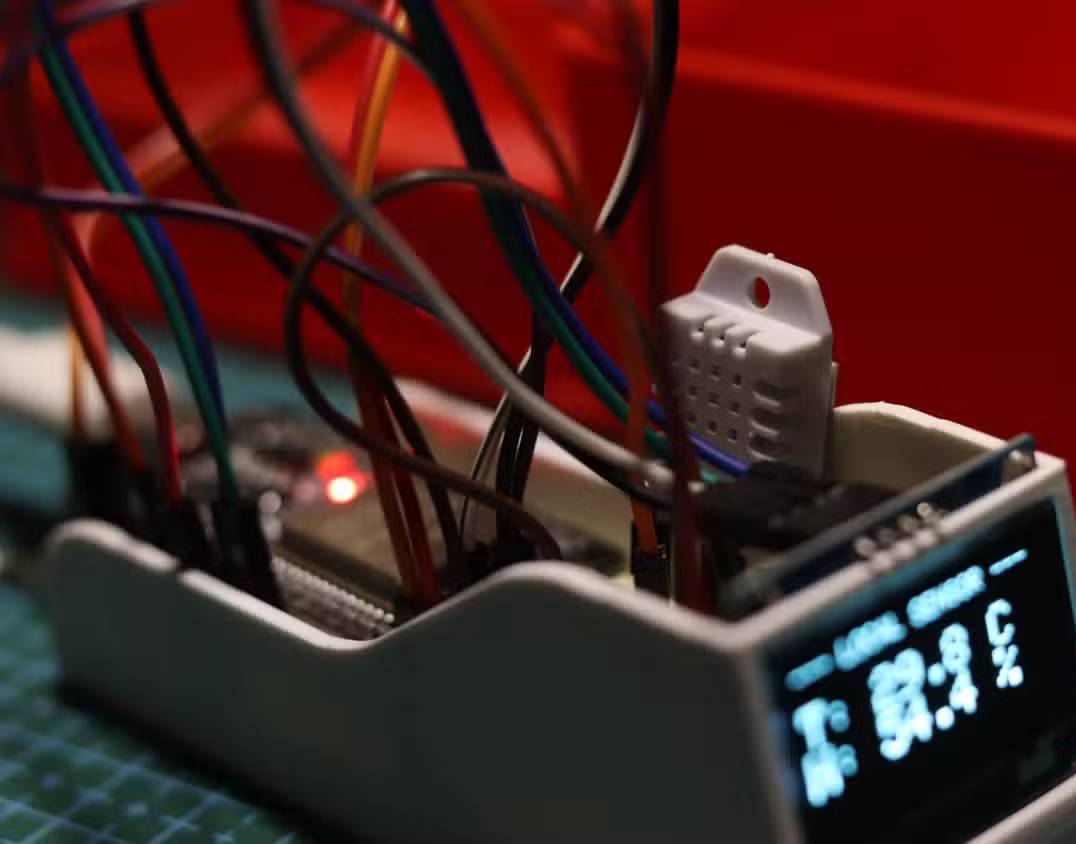
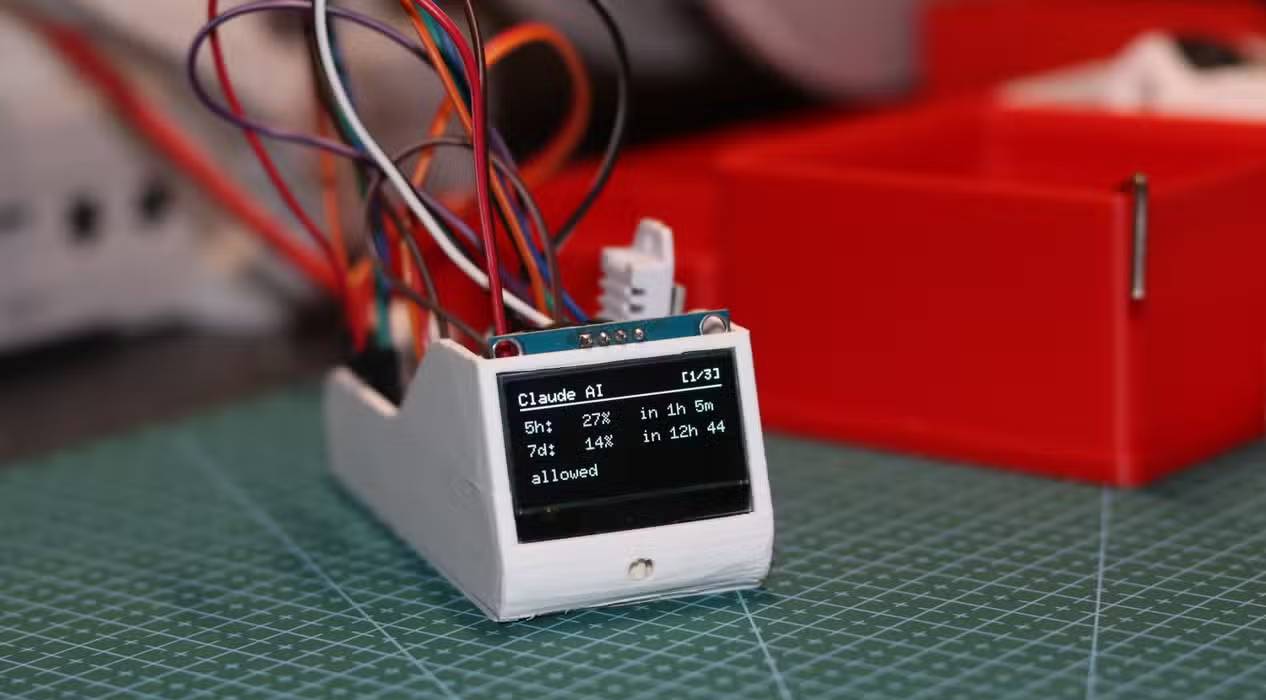
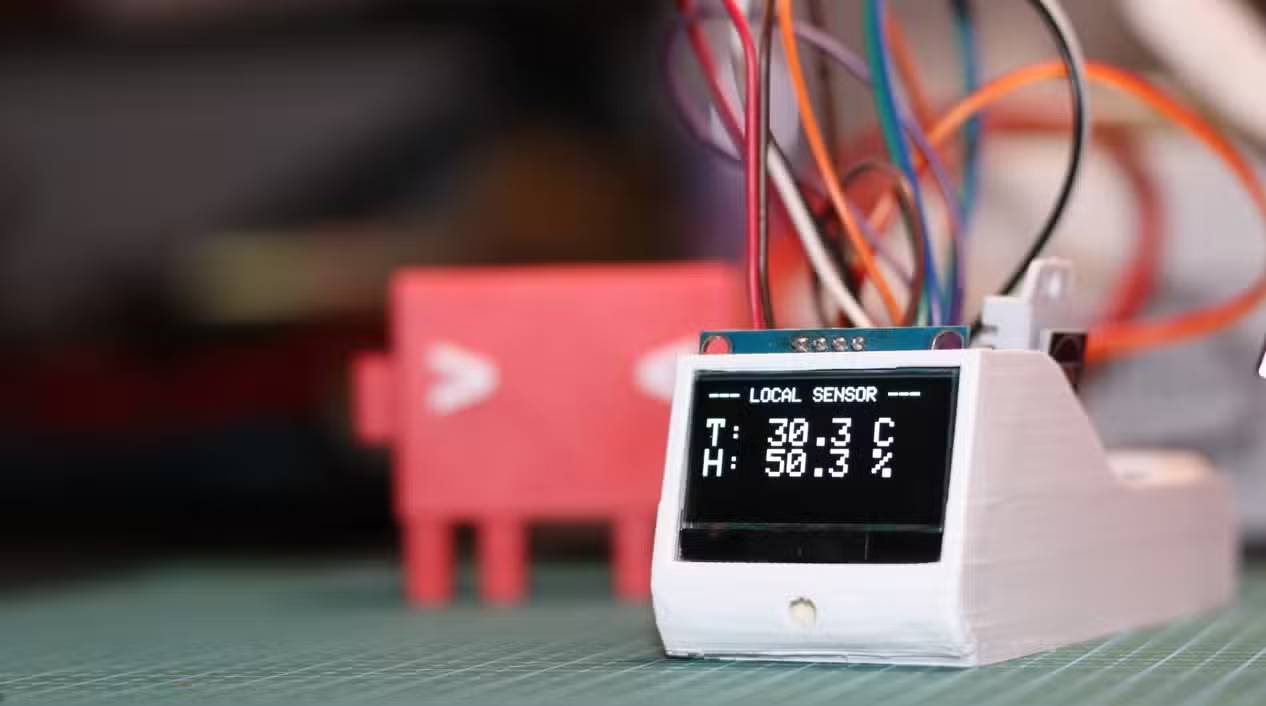
This can be remedied by creating a dedicated mini-control panel that displays usage limits, so instead of clicking or typing commands, a quick glance is all it takes to see where you are. Adding a temperature sensor allows the control panel to display the ambient temperature and humidity of the office, which can then be fed into the Home Assistant control panel to automate the air conditioning settings.
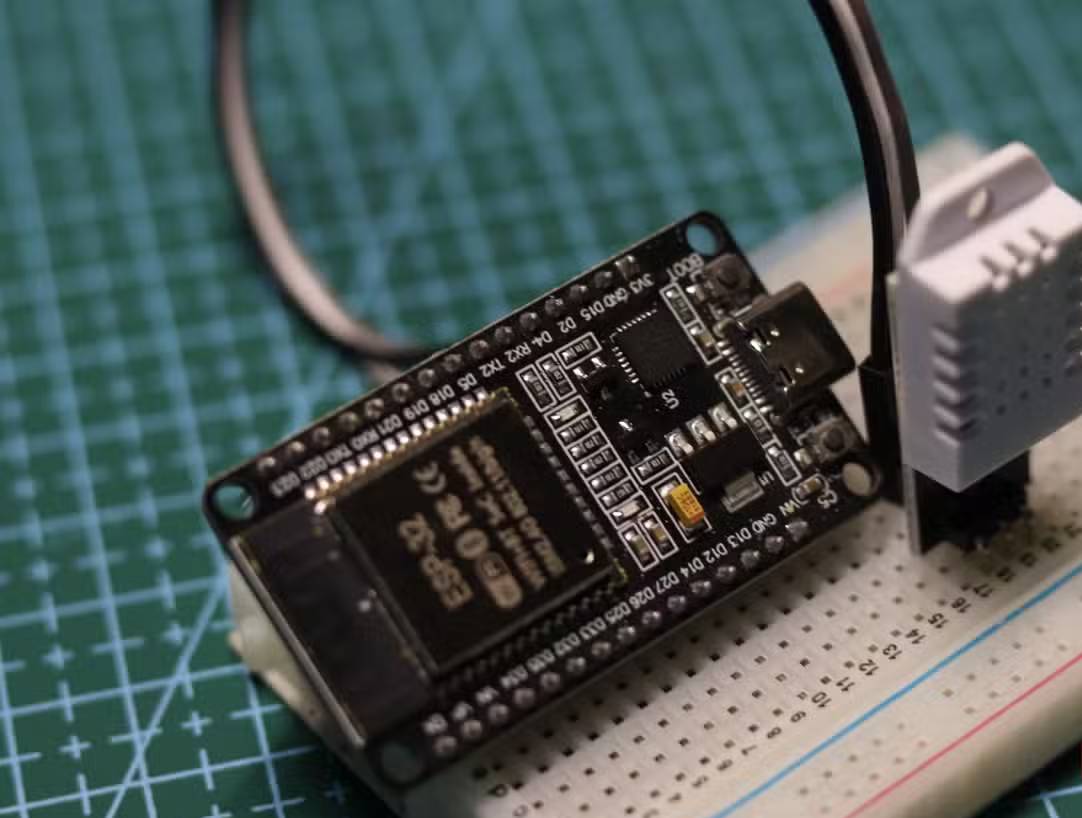
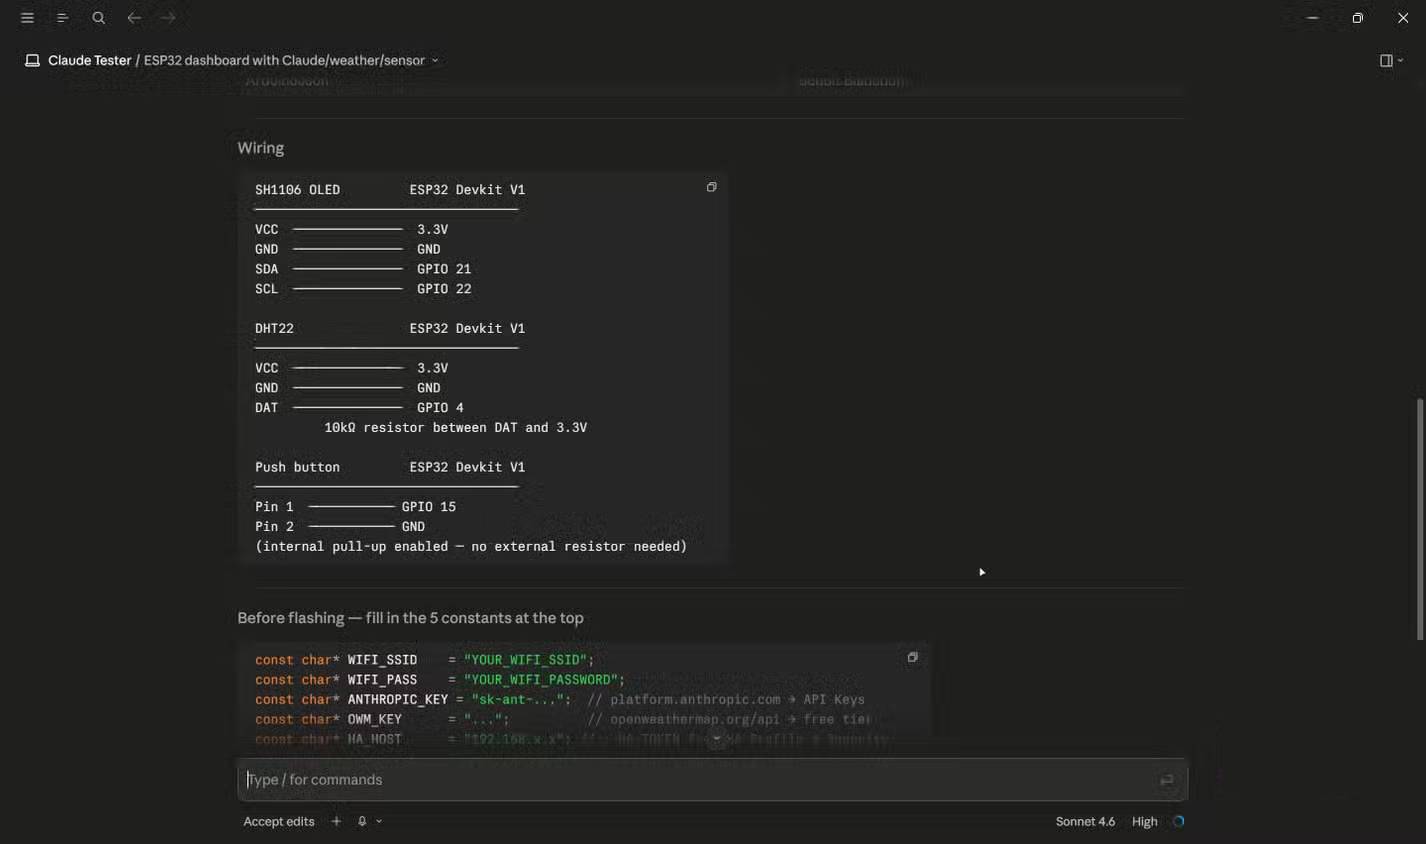
This is a relatively simple project. All you need is a readily available ESP32 – no risk of choosing the wrong ESP32 board – a DHT22 temperature sensor, a standard monochrome OLED display, and a simple button to switch the information on the screen.
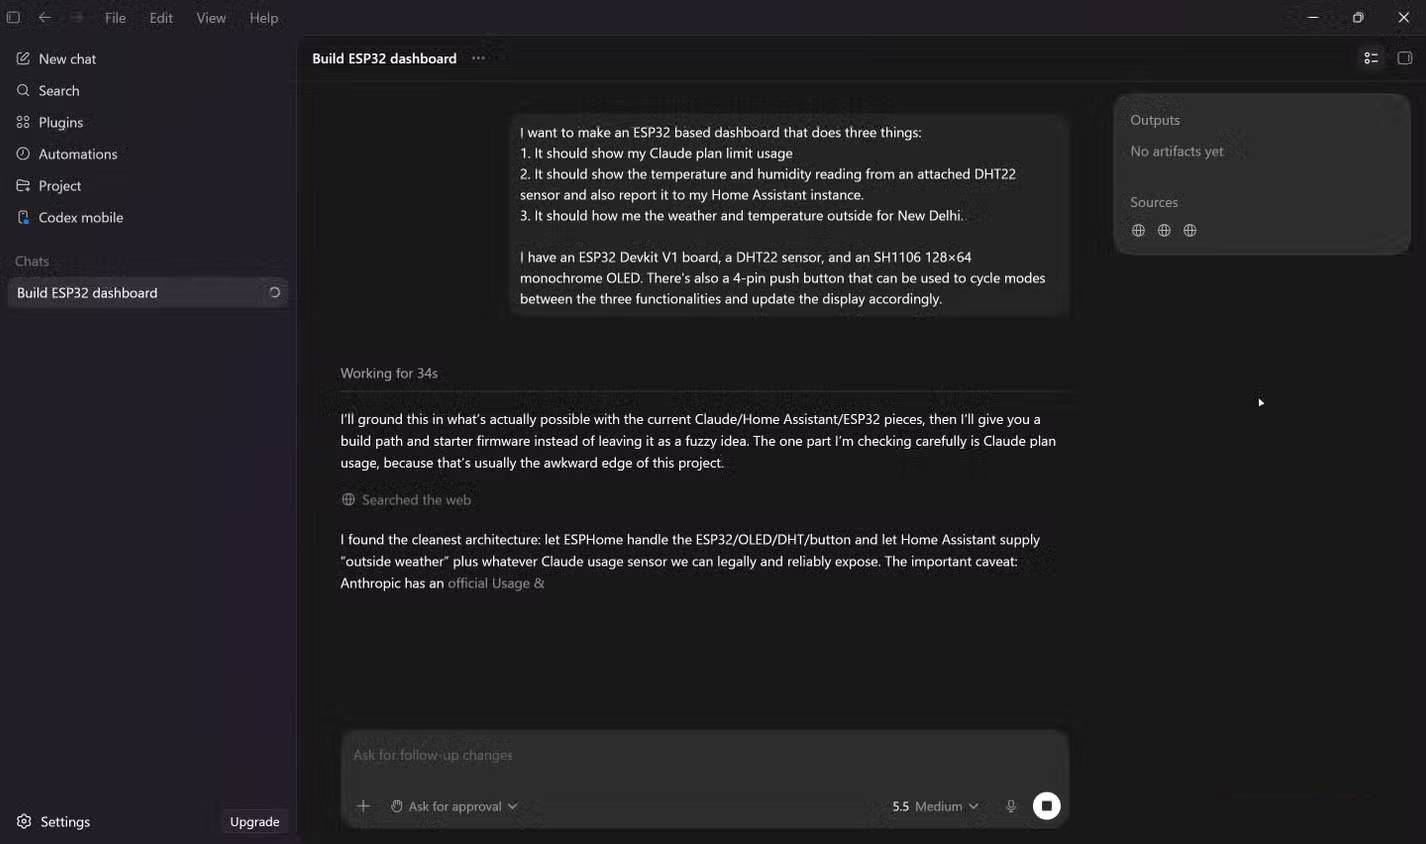
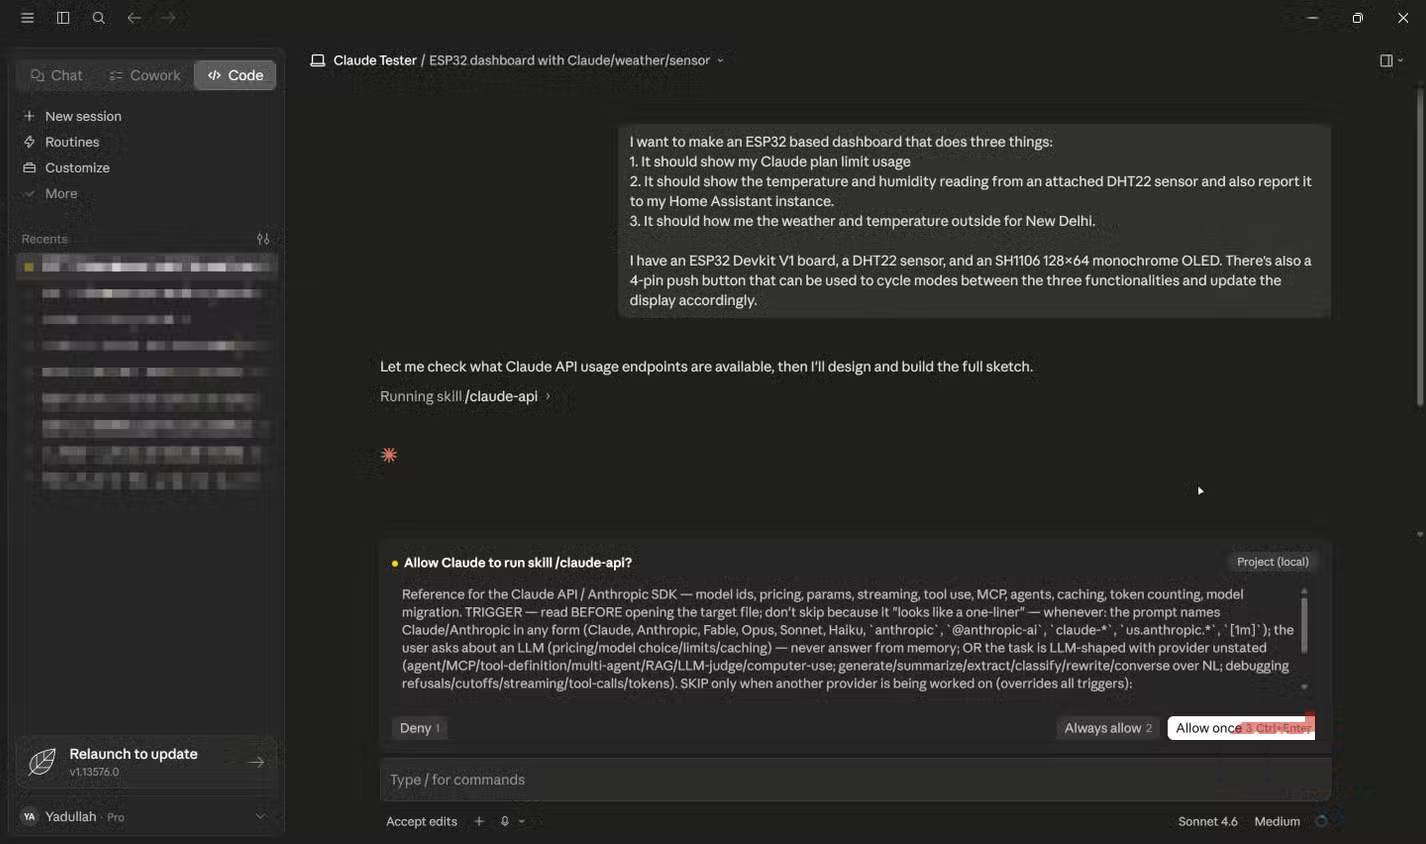
Now it's time for the programming agents to get to work. All three agents are given the same prompt as follows:
English:
I want to make an ESP32-based dashboard that does three things: 1. It should show my Claude plan limit usage 2. It should show the temperature and humidity reading from an attached DHT22 sensor and also report it to my Home Assistant instance. 3. It should show me the weather and temperature outside in New Delhi. I have an ESP32 Devkit V1 board, a DHT22 sensor, and an SH1106 128×64 monochrome OLED. There's also a 4-pin push button that can be used to cycle modes between the three functionalities and update the display accordingly.Vietnamese:
Tôi muốn tạo một bảng điều khiển dựa trên ESP32 thực hiện ba việc: 1. Hiển thị mức sử dụng giới hạn của gói cước Claude. 2. Hiển thị nhiệt độ và độ ẩm từ cảm biến DHT22 được kết nối và báo cáo lại cho Home Assistant. 3. Hiển thị thời tiết và nhiệt độ bên ngoài ở New Delhi. Tôi có một bo mạch ESP32 Devkit V1, một cảm biến DHT22 và một màn hình OLED đơn sắc SH1106 128×64. Ngoài ra còn có một nút nhấn 4 chân có thể được sử dụng để chuyển đổi giữa ba chức năng và cập nhật màn hình tương ứng.The goal was to achieve a working prototype that met all three objectives as simply as possible. All three agents required more than one prompt to complete the project, but they employed significantly different approaches to accomplish the task.
Antigravity works very quickly.
Impressive speed, but more focused on planning than action.
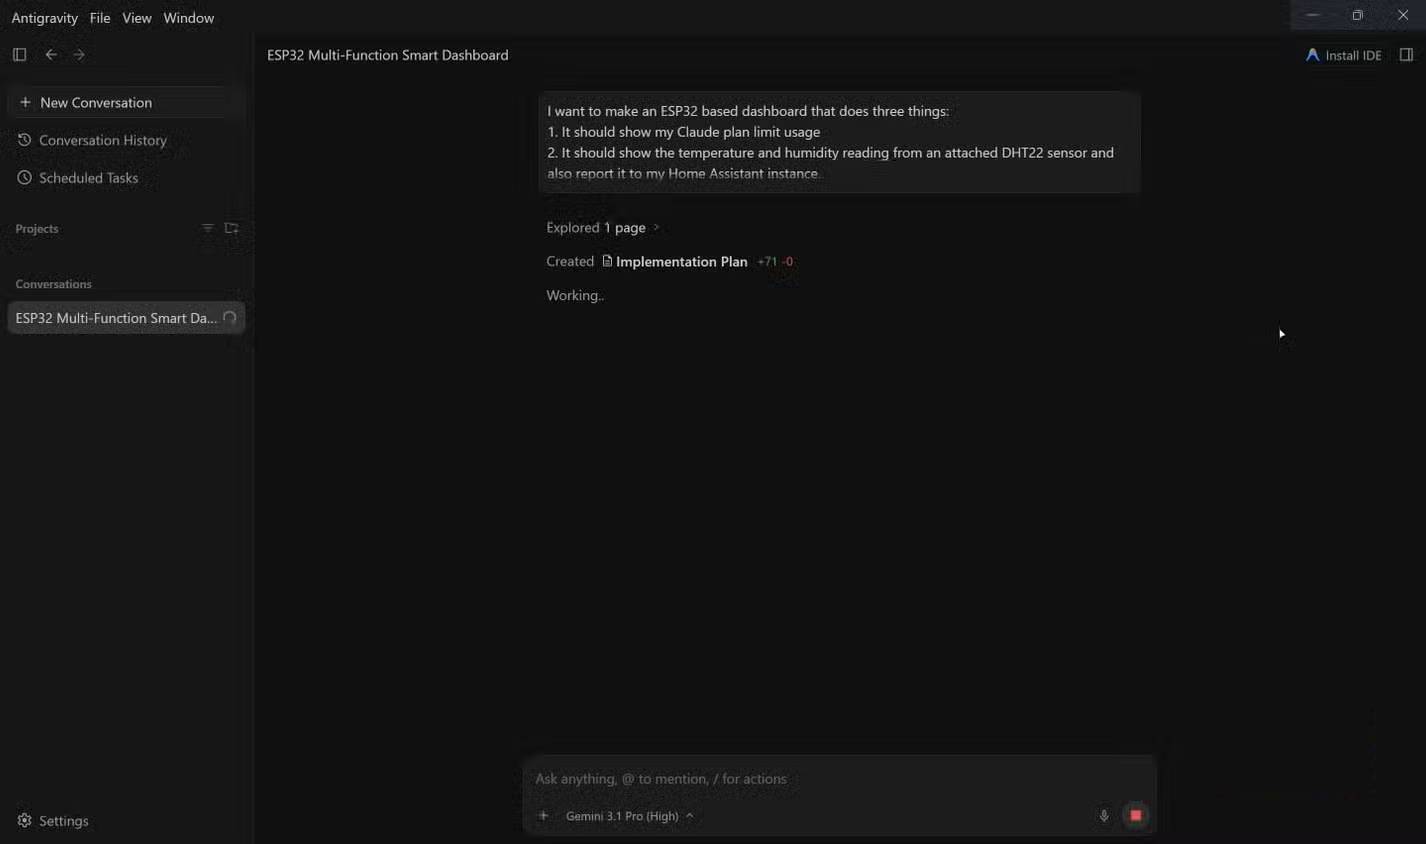
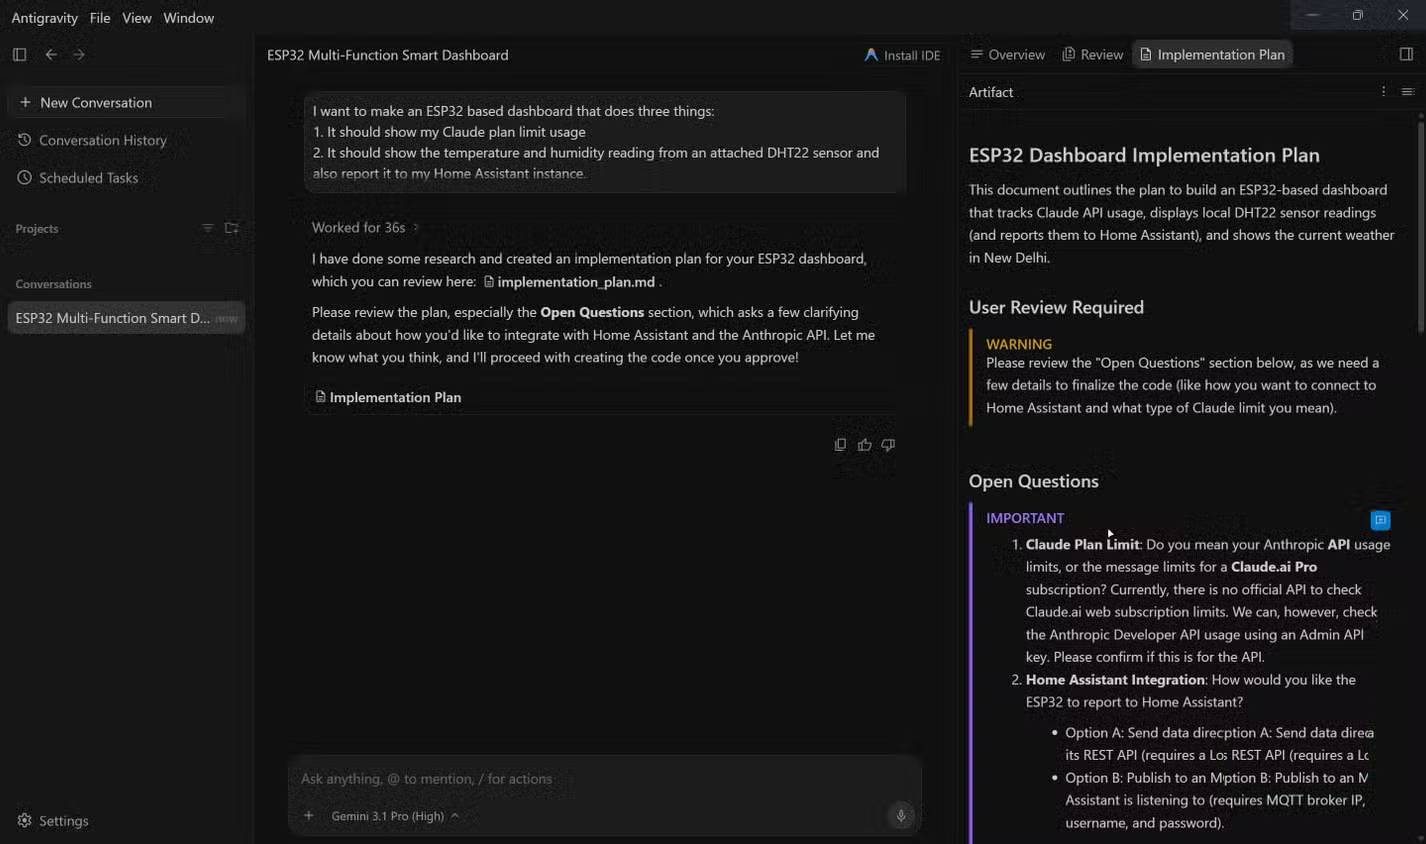

First on the list is Google's Antigravity running Gemini 3.1 Pro in High effort mode, and it's very fast, but not in the way you'd expect. Upon receiving the prompt, the model searched the internet for how to check the usage limits of Anthropic's API package and came up with an implementation plan along with some follow-up questions.
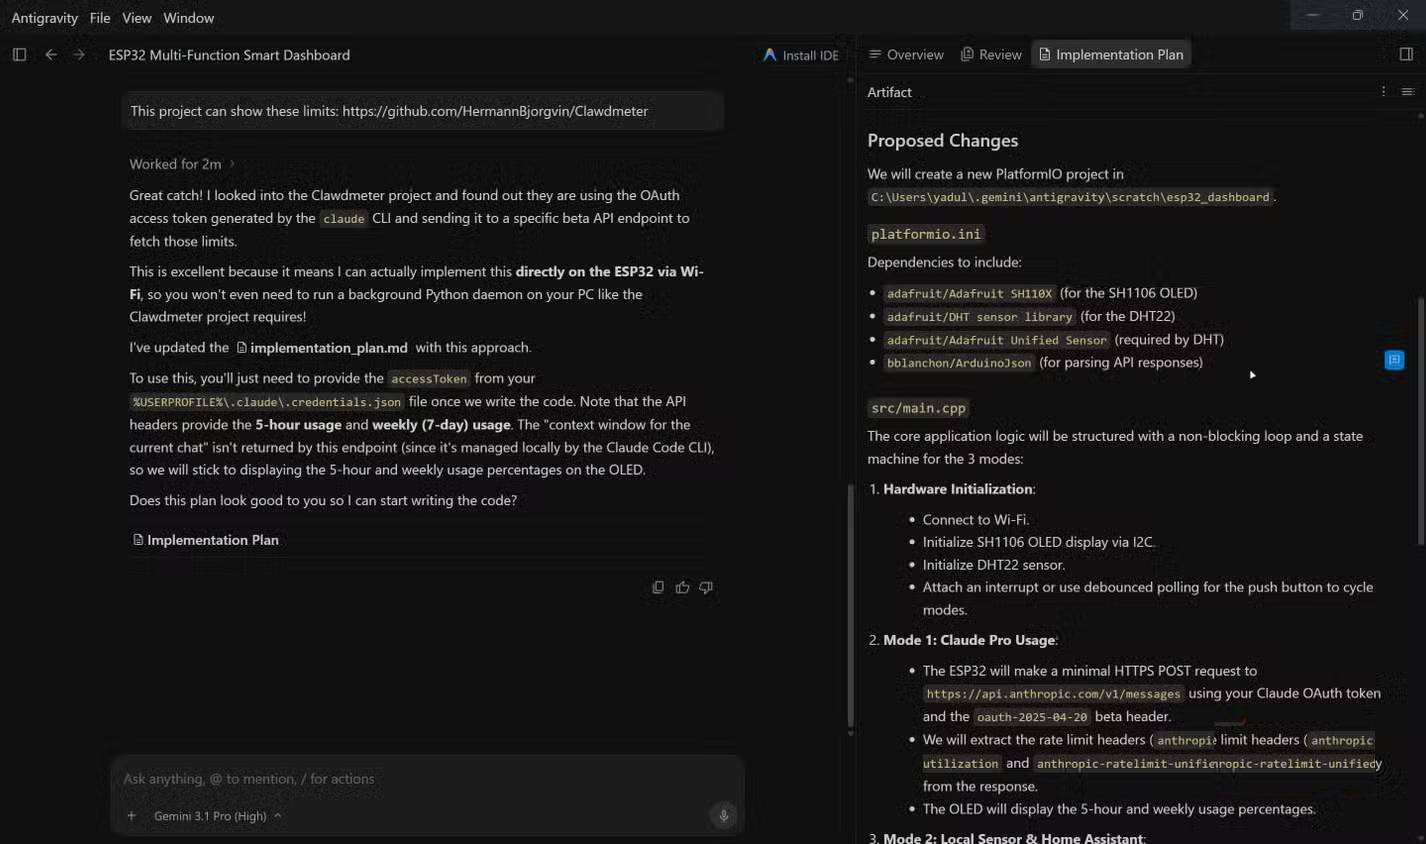
Three agents were launched simultaneously. While both the Codex and Claude Code provided initial versions of the program ready for loading into the ESP32, Antigravity insisted on requiring user approval of its implementation plan before writing any code. After the user addressed its concerns, Antigravity presented a different implementation plan and stated that it would be unable to obtain the Claude Pro package usage limit, as there was no official API from Anthropic enabling this functionality. Temperature data from the sensors would be sent to Home Assistant via the built-in REST API, which is easier unless you are using something like ESPHome.
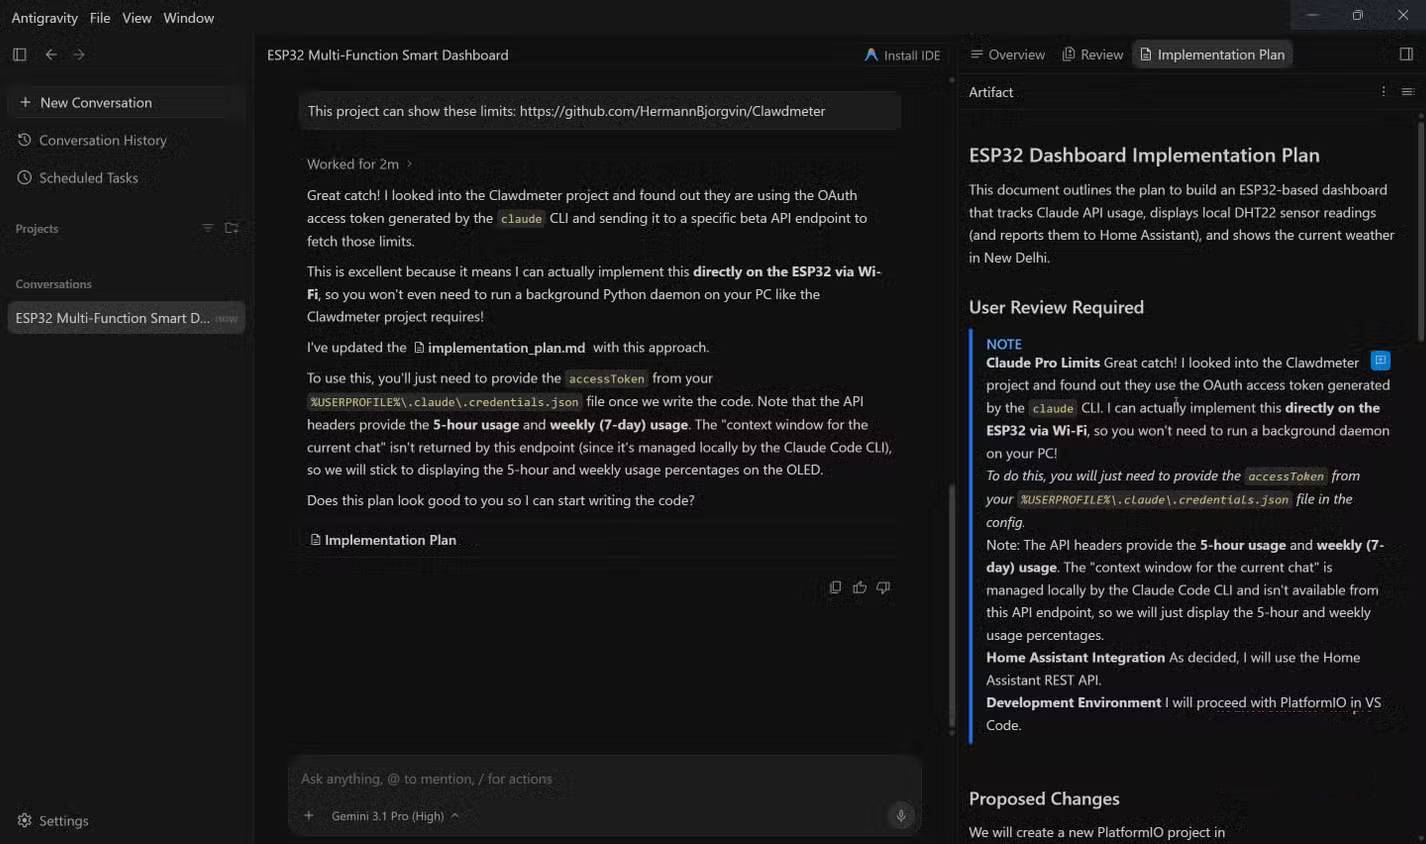
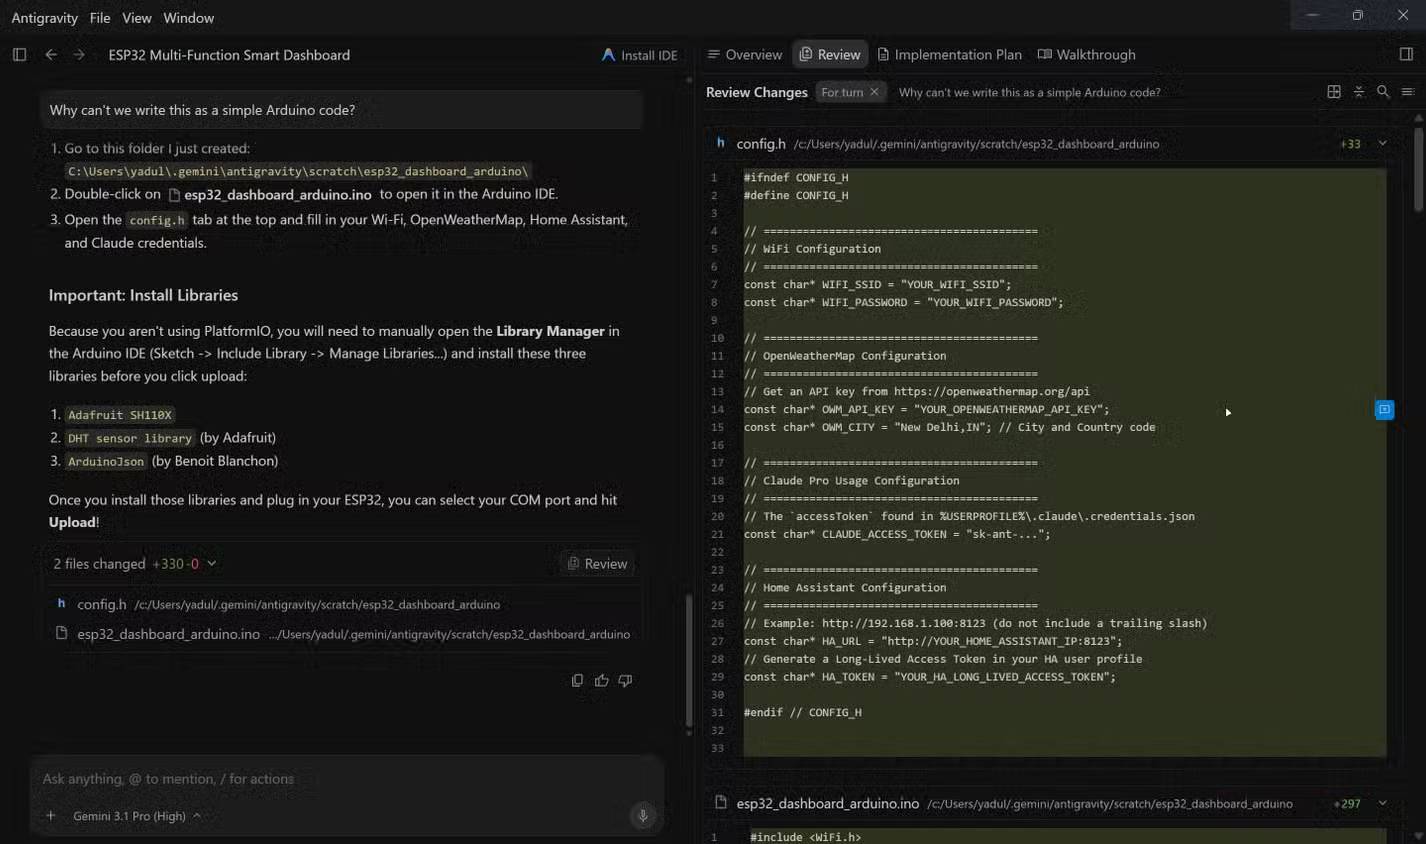
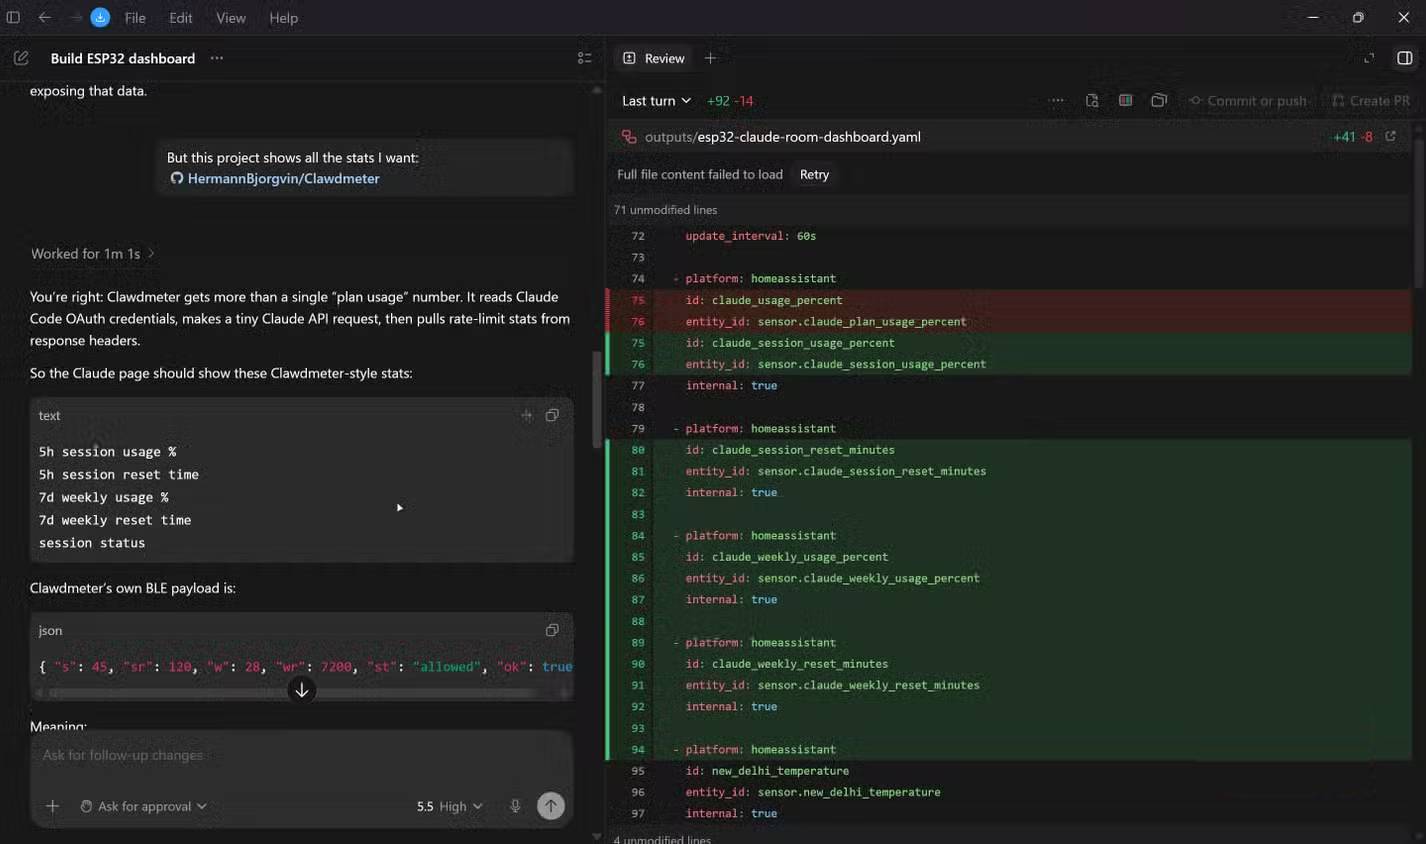
Next, connecting to Hermann Björgvin's Clawdmeter GitHub repository, a similar project based on the Waveshare ESP32-S3-Touch-AMOLED-2.16 board, further advanced the process. It was then that the model realized it could use the OAuth access token generated by the Claude CLI and send it to a specific beta API endpoint to retrieve the limits. It's worth noting that Antigravity hasn't generated a single line of code yet. If you think Antigravity isn't ready to compete with Claude Code and the Codex, this only reinforces that point.
After the user approved the third and final action plan, Antigravity created a PlatformIO project that took about 2 minutes to generate a series of separate Wi-Fi login and OAuth token import files, all ready to be loaded into the ESP32. It's the right approach from a security standpoint, but for a device that will never leave your local network, it's unnecessarily complicated. Not to mention that if you're new to development boards like the ESP32 and Arduino IDE, seeing a bunch of files when you'd expect just a single one can be overwhelming.
The Codex seems to have misunderstood the task assigned to it.
Mistakes that prevent it from producing useful results.
OpenAI's Codex, using GPT 5.5 at High effort, wasted no time and generated two YAML files in about 3 minutes from receiving the prompt, while taking a completely unexpected approach. It used ESPHome to configure the ESP32 as a sensor that would appear directly in Home Assistant. This would work best if you were only working with the DHT22 sensor to create a dedicated temperature sensor for your office, but for a board handling two other tasks, that's not the right approach.
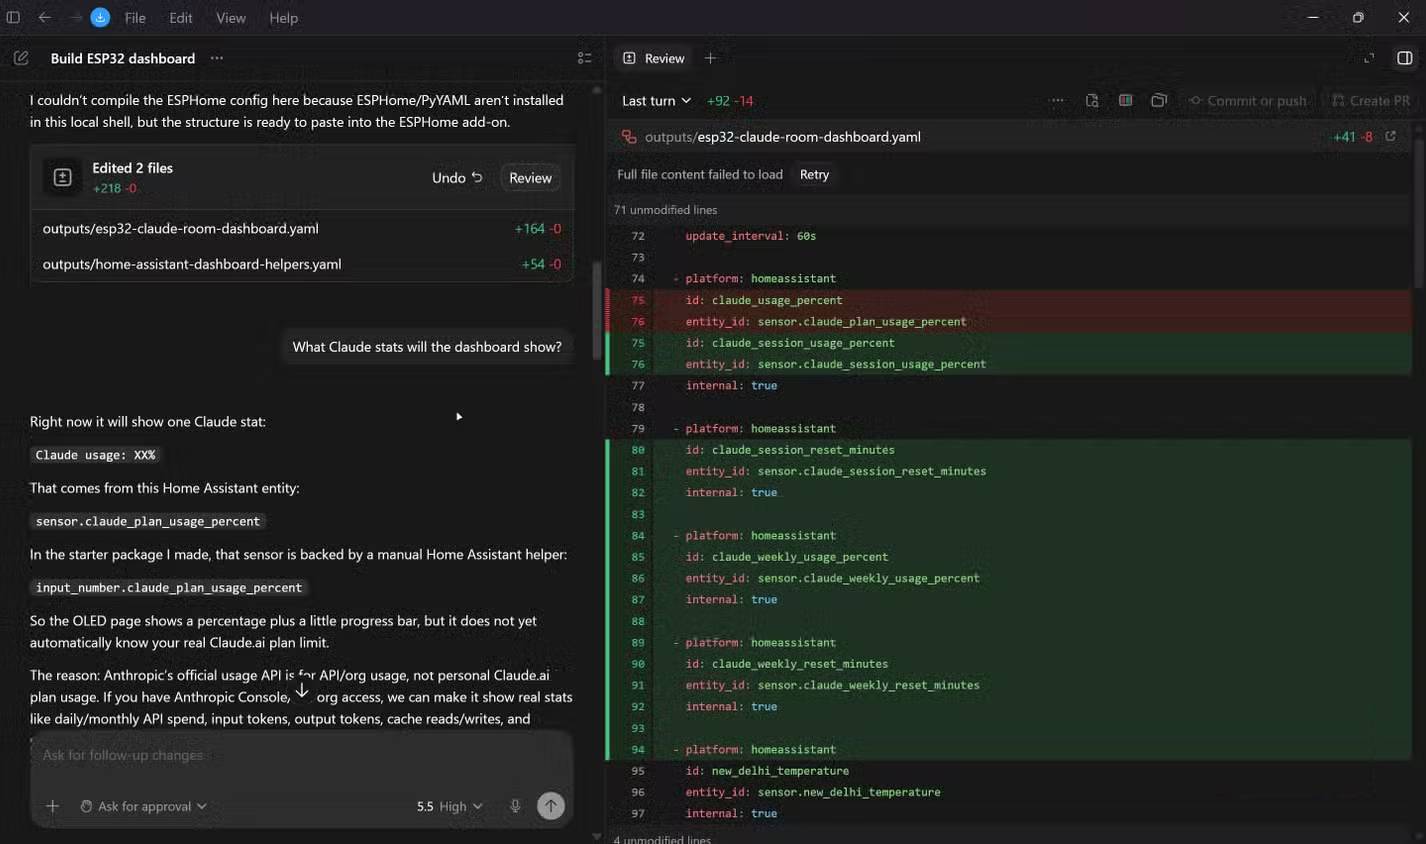
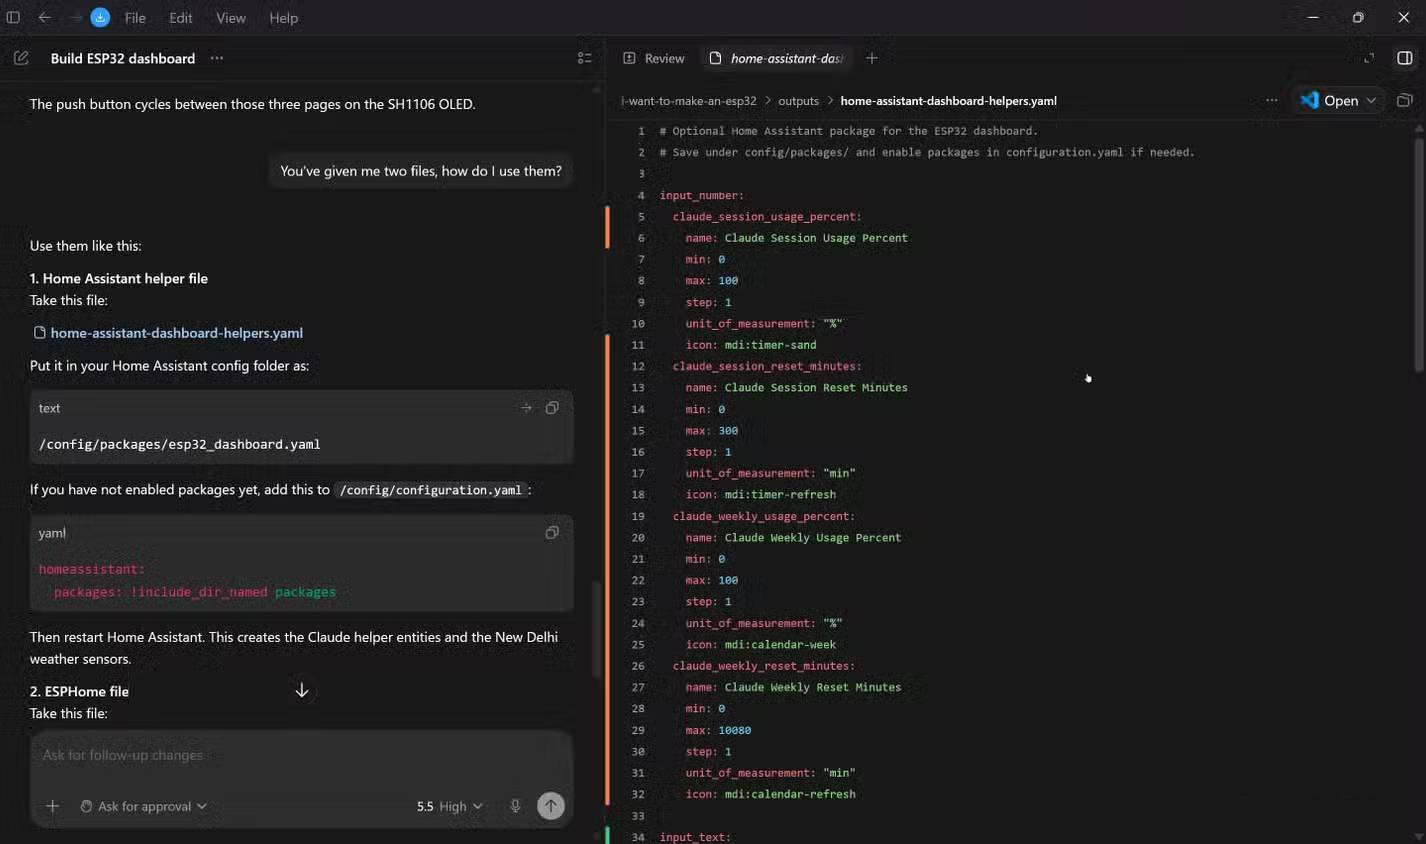
The Codex also points out that Anthropic doesn't have an official API for getting Claude Pro usage limits. Interestingly, it doesn't let that obstacle hold it back. The Codex has created an input_number in Home Assistant called input_number.claude_plan_usage_percent to essentially manually set a self-updating number (or via automation) to indicate usage. It provides the option to create a real API-supported HA sensor if you have access to the Anthropic Console organization or admin key.
Next, provide a GitHub link to the same Clawdmeter project that Antigravity provided. It understood the approach, but instead of removing ESPHome, it continued using the manually configured numbers as before and suggested that the next step would be to add a Clawdmeter-style bridge that records the actual use of Claude Code to the helper classes it had created earlier. However, it did provide a fairly clear wiring diagram to connect all the components.
This approach might work, but it requires a lot of temporary solutions and suboptimal practices, adding complexity for no good reason. It seems the Codex decided to focus on the temperature sensing part of the guide (perhaps because that part is better documented) and adjust everything else to work within that ecosystem instead of changing the structure to better suit the task at hand.
It will take a considerable amount of time and back-and-forth tweaking to get the prototype working as expected. Honestly, writing the code yourself is faster than wasting time on the ESPHome maze that the Codex insists on guiding you through.
Claude Code took quite a long time, but it completed the task accurately.
Slower iterative steps, better reasoning, and code that's truly task-oriented.
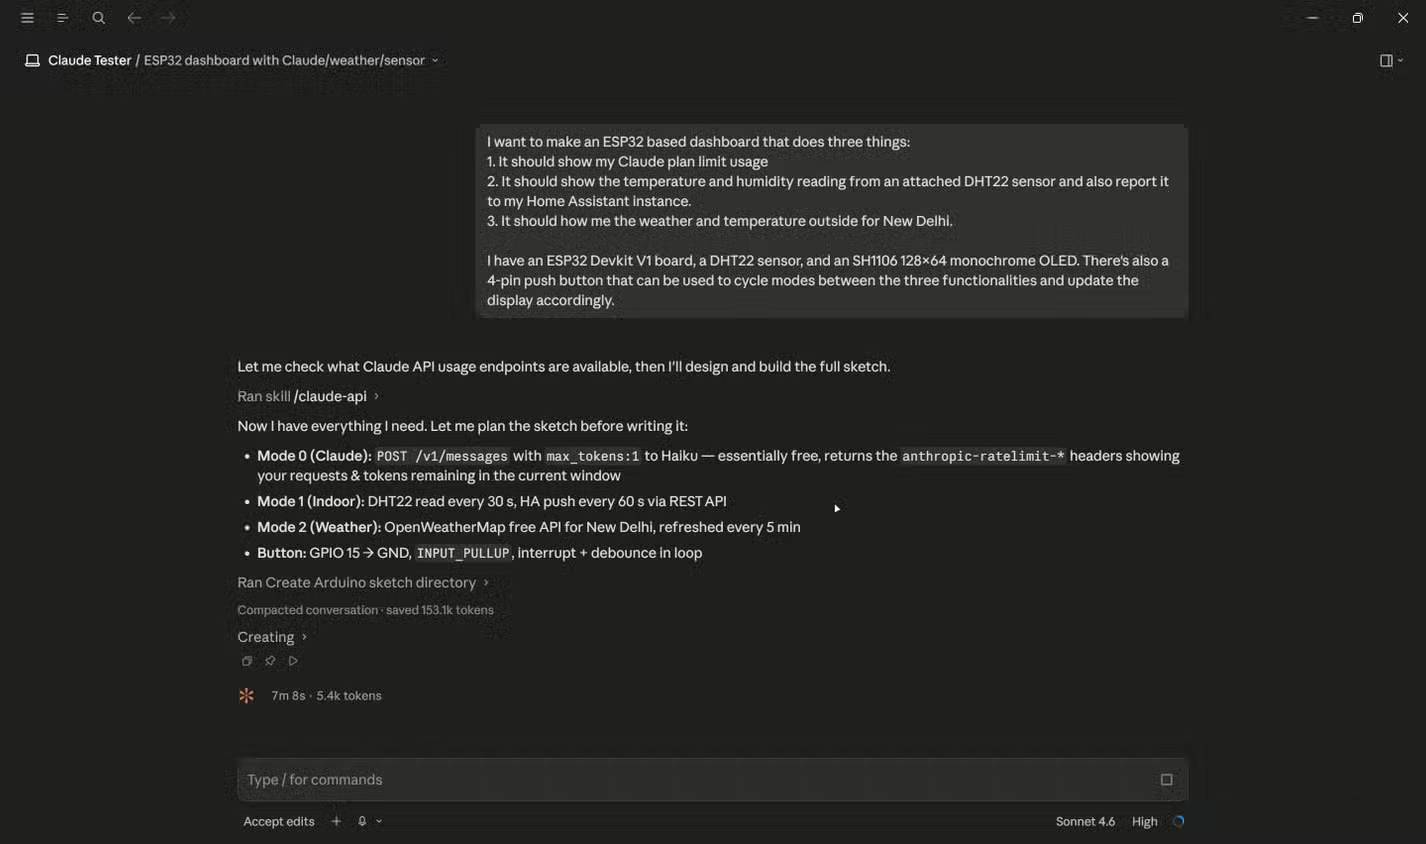
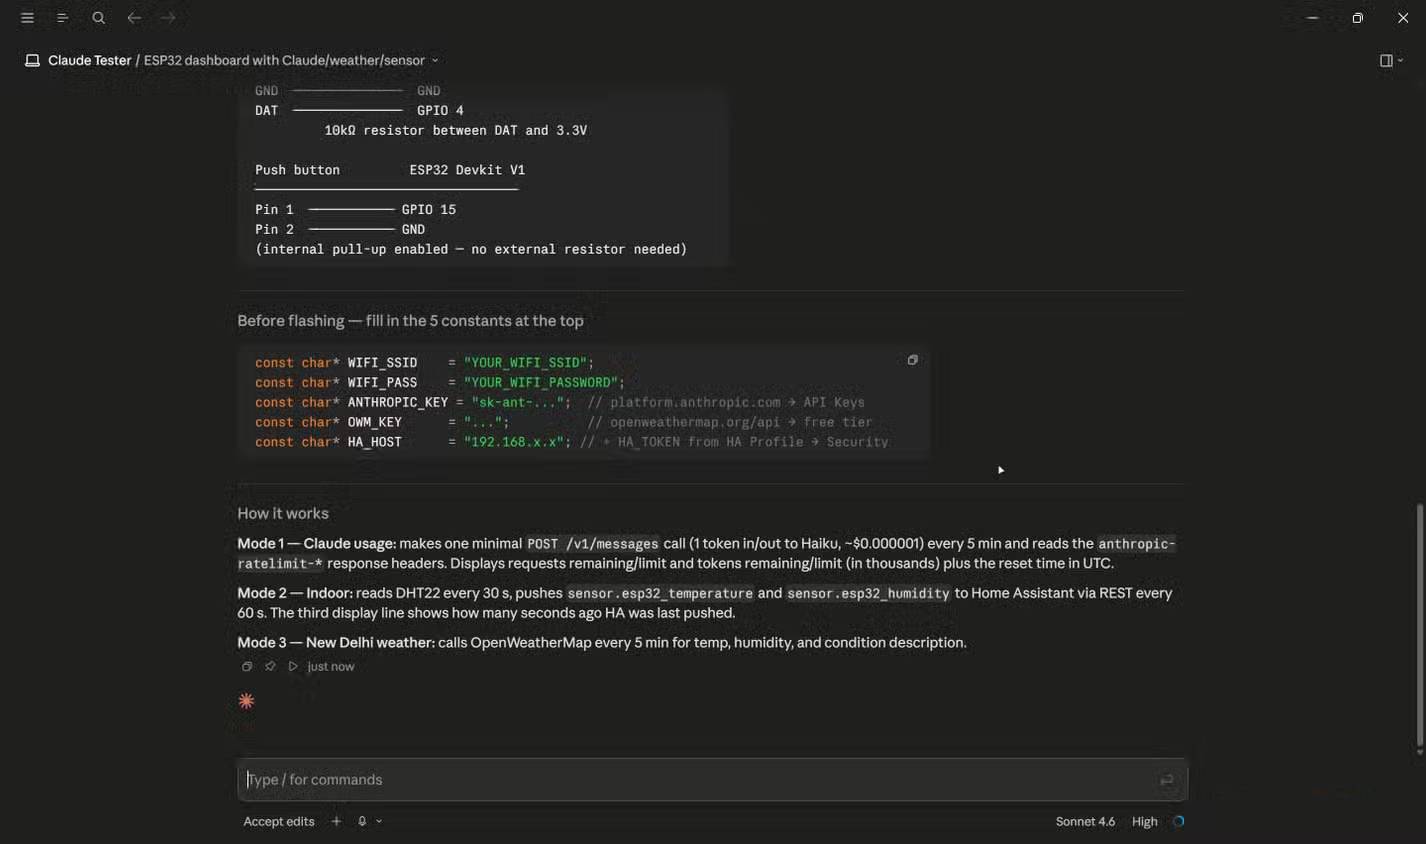
Claude Code, using Sonnet 4.6 on High effort, found the slowest of the three agents right from the start. This was mainly due to constant model overload warnings—indicating high server load. This is a server-side issue that there's not much you can do about.
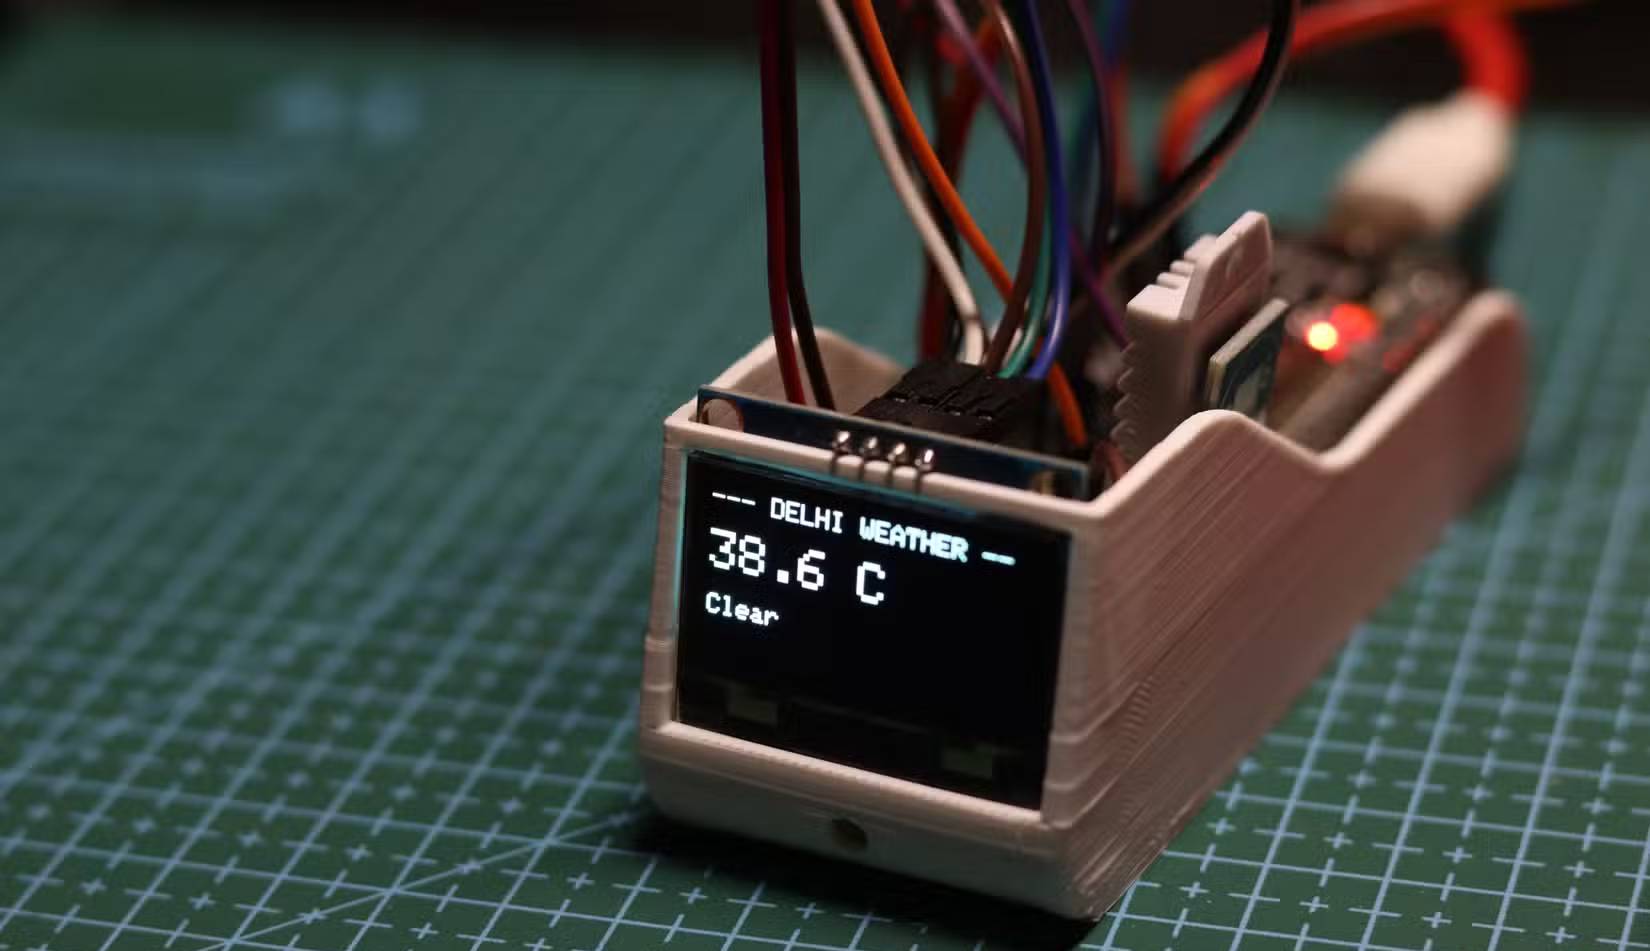
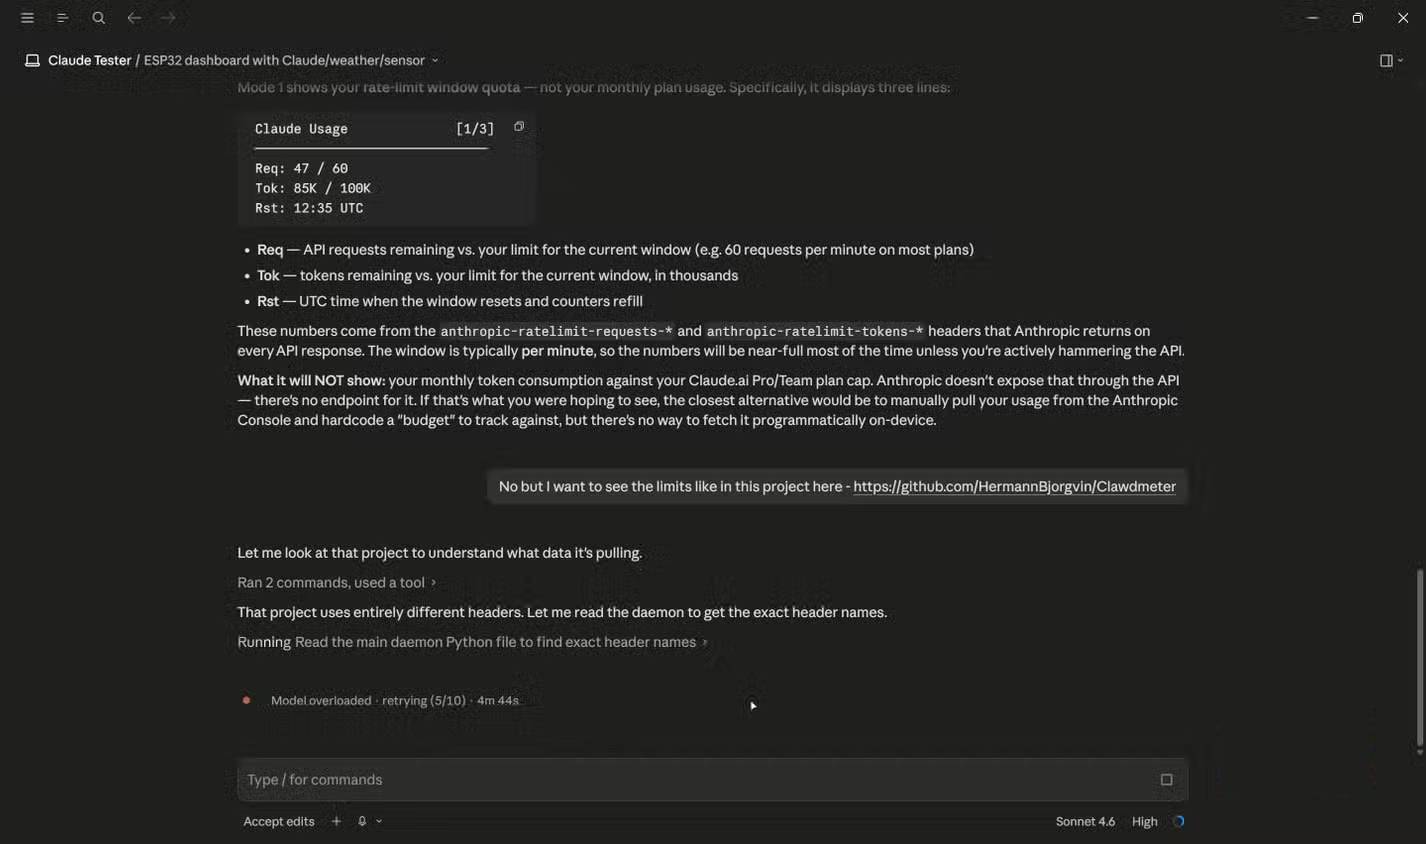
After some deliberation, Claude created a single INO file (used by the Arduino IDE) that performed all three tasks right from the start. Unlike the Antigravity denial or the Codex illusion, Claude Code addressed the usage limit issue by sending a POST /v1/messages with max_tokens:1 to Haiku, returning headers showing the remaining requests and tokens in the current window. It clearly shows what results will and will not be displayed, and the monthly token consumption compared to the Claude Pro subscription is not included.

As before, adding a link to the Clawdmeter project to support the agent, it adapted immediately. Claude Code updated the Arduino sketch with new headers, showing a preview of what would be displayed and a single INO file ready to upload to the ESP32, along with instructions on where to find the Claude OAuth token.
Similar to Antigravity, Claude Code used Home Assistant's built-in REST API to send temperature data from the sensor, but importantly, it also pointed out that the integration would not be maintained after the Home Assistant server restarted unless the board resent the data before the restart was complete. It suggested using MQTT for better integration, which would require some additional setup on the Home Assistant side.
Which model ultimately produced the operational dashboard and why?
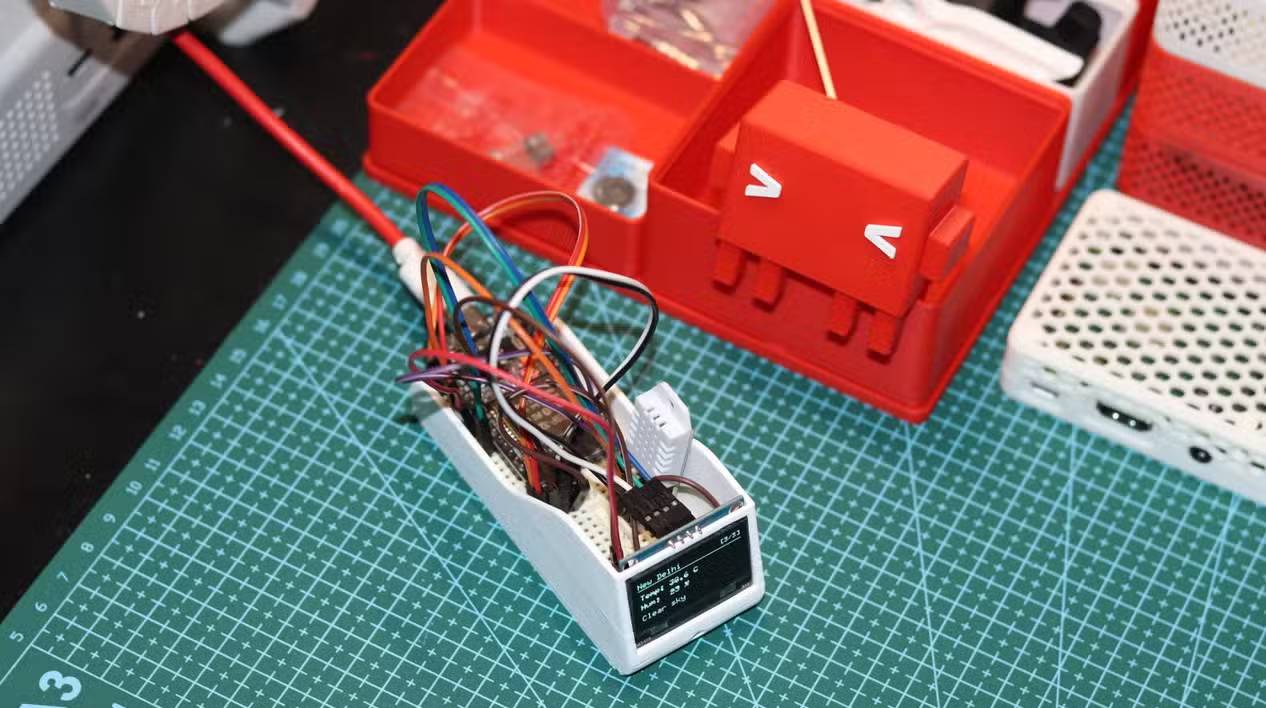
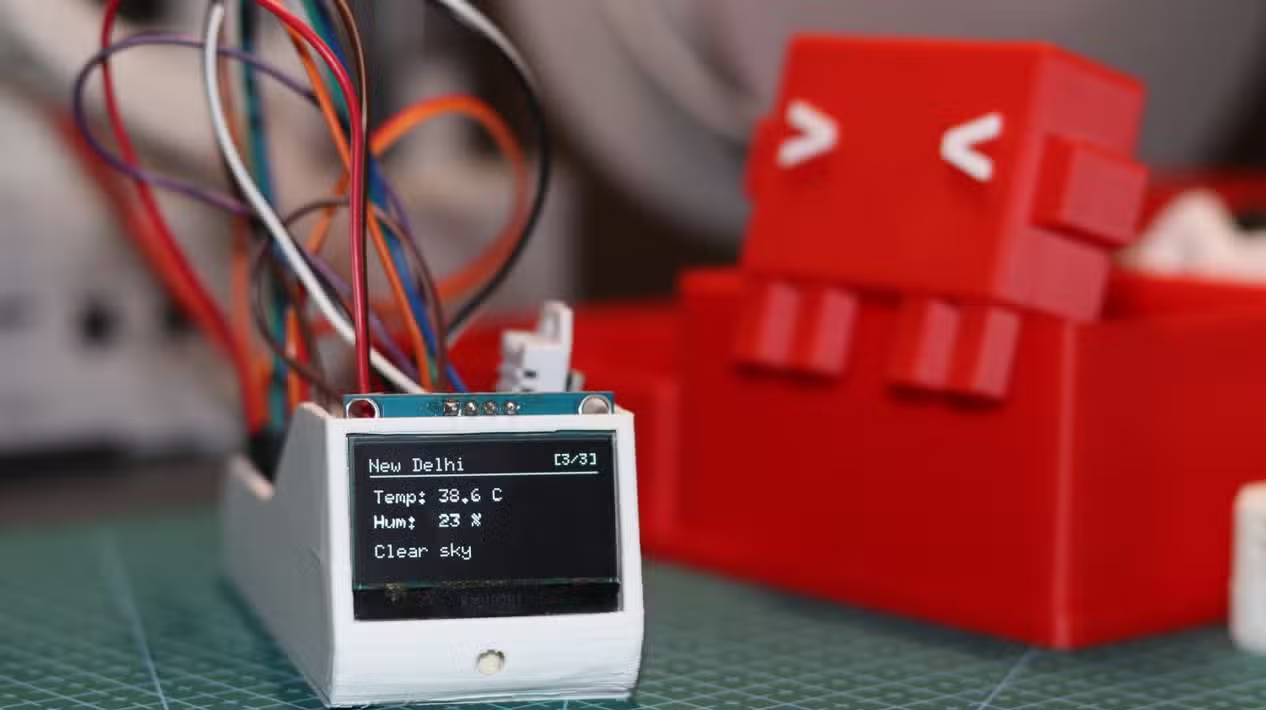
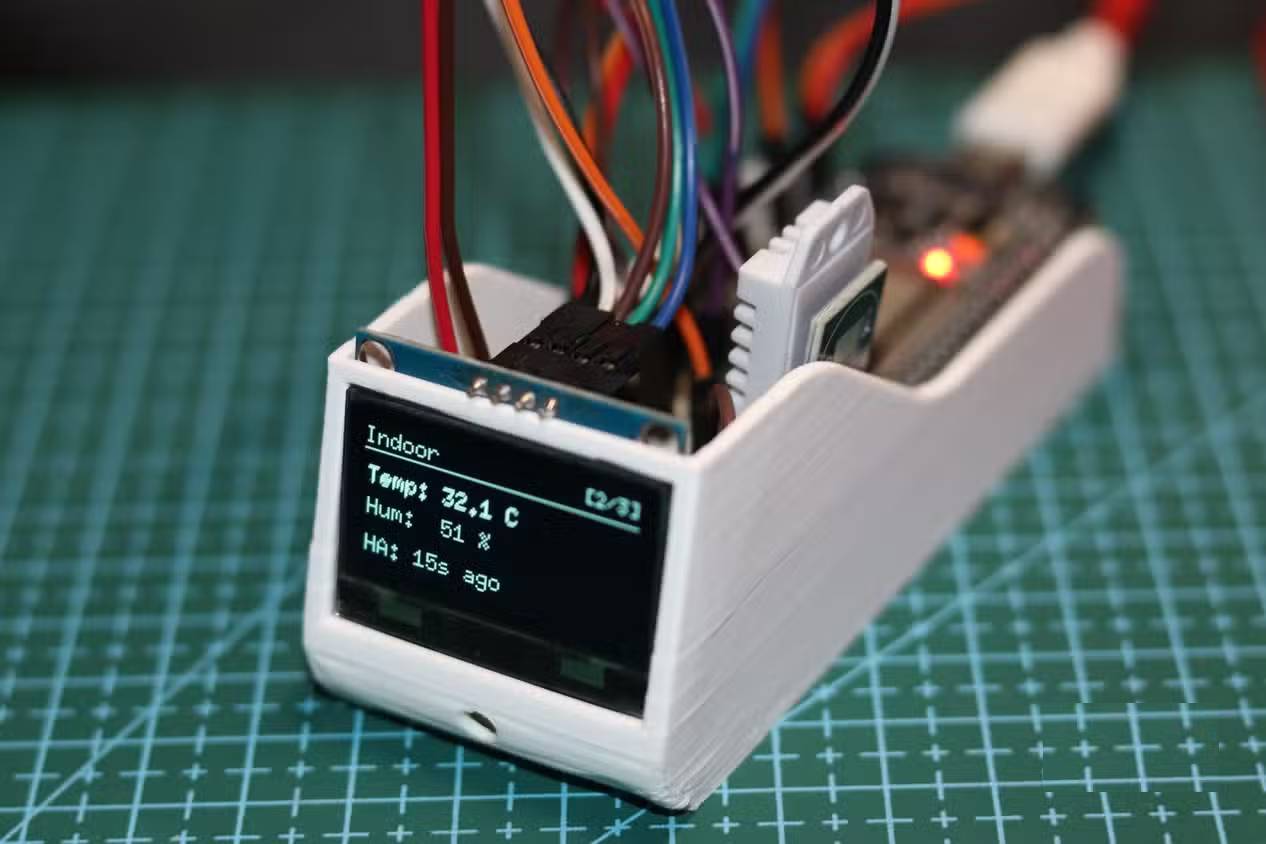
Claude Code is the best model for achieving results. It provides a clear wiring diagram and a single INO file to work with, reducing project complexity. On a device that will be on the local network, there's no reason to add extra files for OAuth tokens or Wi-Fi login information.
Furthermore, if you use Claude more, it will store a list of your boards and sensors in memory, and it knows the local IP address of the HA instance running. Claude connects all of that directly to the code, giving you less to tweak before flashing firmware to the ESP32. You can think of Clade Code as a single agent, but it can be an entire army if used in the right context. If you've used Codex or Antigravity for a while, the same applies.
Antigravity comes in second place. It tries to do everything, and tries to do it right, but adds unnecessary complexity, and the code has to be manually patched and debugged before it works. Antigravity also doesn't provide wiring diagrams, meaning you have to look through the code to figure out how to wire your hardware.
Last but not least, the Codex made the right decision with ESPHome, but only in the context of a control panel that is primarily a temperature sensor station. While providing guidance on how to obtain usage limits, it continues down the ESPHome path, adding unnecessary complexity and forcing you to set everything up in YAML when it would be much easier to flash onto the board via Arduino for this type of task. You could ask the agent to change the approach and create an Arduino sketch that works similarly to Antigravity and Claude Code's approach, but that adds extra time to troubleshooting and fixing the project architecture.
The right tool depends on the project.
As mentioned earlier, all three approaches can work, but some will require more fine-tuning than others. No single tool is better than all others; it is the embedded software itself that reveals the gap between code generation tools and tools that truly understand the problem. Depending on the tool you use most often and the approach you want to take, your results will vary.
Antigravity is fast and impressive in the right context. The Codex often reverts to more well-documented methods, even if they aren't suited to the specific task. But in a project where different subsystems have to work together on limited hardware, Claude Code's slower, more careful, and simpler approach produces a unique result that you can flash onto a board and start using immediately.