Secure the server with Scapy - Part 1
Network Administration - There are many tools to help protect the security of your server and network, but choosing a suitable tool is not easy at all . In this article we will show you how to use the Scapy tool to protect your servers.
Protecting the network against Internet threats is a simple task. A firewall is a type of internal network protection technology that uses two separate Ethernet connections with the proxy software used to filter traffic between the two ports. At this point, Linux supports as a great platform with netfilter / iptables tools.
Some other techniques are used to create filter packet inspection tools such as Wireshark or port scanning tool like nmap. Both of these tools are very familiar to most network administrators. So in this article we will introduce a completely different tool, Scapy, a tool that combines the preeminent features in Wireshark data analysis and capture, nmap's data delivery feature. Part 1 of this article will focus on how to install and some basic operations like how to capture and display Ethernet traffic and how to create some simple scripts in Python. . Part 2 will cover more about how to use Scapy in testing web servers to find possible vulnerabilities, then how to find fake DNS servers as well as wireless network scans to find. release potential security holes.

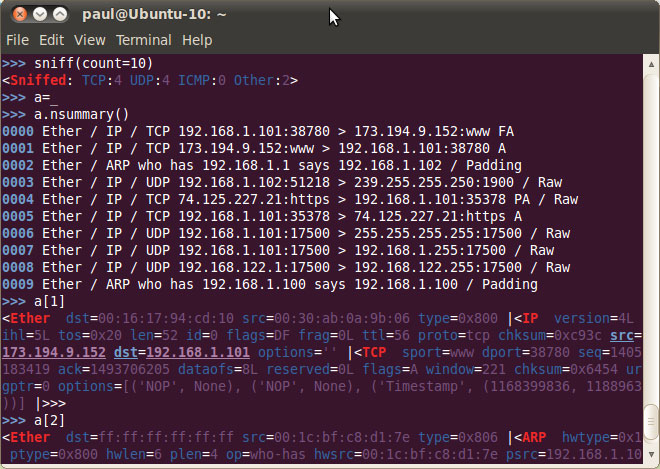
Figure 1
Setting
Installing Scapy is simple and fast, only takes a few minutes on an Ubuntu desktop. All you need to do here is open the Ubuntu Software Center and search for SCAPY. The real name you will find is python-Scapy, which is a set of tools written in Python. Also you need to install some other software if you want to exploit all the strengths of SCAPY. The list of additional software to install includes python-crypto, python-gnuplot, python-pyx, graphviz and imagemagick.
If you want to get the latest version of Scapy, you need to download the source and execute a few commands to install it. The commands are available on the Scapy wiki but basically what you need to do is download the scapy-latest.zip file, extract this file to a folder and execute the setup.py command as follows:
$ sudo python setup.py install
There are many places where you can learn more about Scapy, such as the online HTML documentation, Scapy Wiki and some other articles on the Scapy website. To maximize Scapy, you need to know about TCP / IP network protocols and a bit of Python language. Python website is where you can learn more about this language. There are also many other guides that can be searched on Google. Dive Into Python is another place you can use to learn more about this language.
Basic activities
There are quite a few basic activities you can do by Scapy. It is almost similar to Wireshark in capturing data traffic and sniffing Ethernet devices. There are many command options when you launch Scapy. You must also launch Scapy with your administrator privileges if you want to capture Ethernet traffic directly from any network device. The command to do that is:
$ sudo scapy
When Scapy runs, you will see a command prompt with three arrows >>>. Here you can enter commands or use Python code. A simple but useful command that we show here demonstrates how to execute an ICMP Ping action for a range of only:
>>> ans, unans = sr (IP (dst = "192.168.1.1-254") / ICMP ())
The sniff command allows you to capture Ethernet packets for further analysis. You can specify an interface to use with the iface = option , or leave it blank to capture all devices. Other options include: filter to set filtering conditions for capture packets, count to specify the number of captured packets, prn to create the function of printing your output format. The ls () and lsc () functions will display the list of available classes and functions. (Searching for a detailed document will help you understand the commands and how to use them more deeply).
One of the main features of Scapy is that it is written in Python language. This allows you to write scripts to automate testing and analysis you want to perform. When installing Scapy, you have direct access to all features from the Python command prompt. Scapy also has its own interactive capabilities, which you will see if you type scapy into the terminal window. If you look at the file / usr / local / bin / scapy , you will see many comments and two Python commands:
from scapy.main import interact

Figure 2
interact ()
Python will help simplify the script creation process to send requests and then format the information back to make the output easier to understand. To make the ICMP request output easy to understand, you can use the following line of code:
>>> ans.summary (lambda (s, r): r.sprintf ("% IP.src% is alive"))
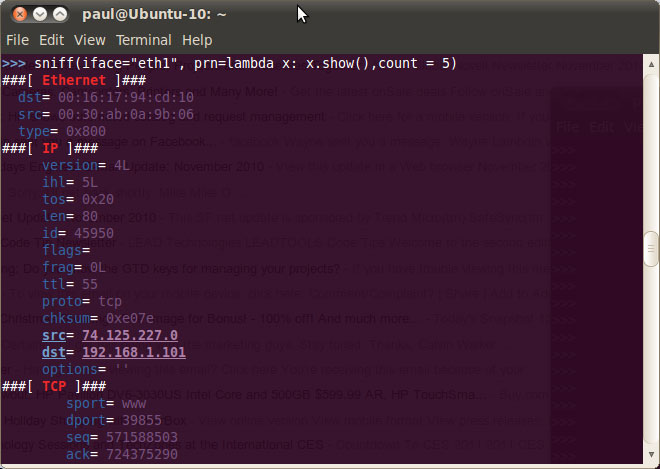
Lambda functions used with sniff command:
>>> sniff (iface = "eth1", prn = lambda x: x.show ())
If you run this command in a terminal window, you'll see a full list of all traffic on eth1 until you stop it with control-D .

Figure 3
Conclude
It can be said that Scapy is a particularly useful tool for administrators with a bit of experience with Python. In the next part of this series, I will show you how to use Scapy in a number of other modes to protect the network.
 Free Wi-Fi security tools
 Stealth rings and the Internet
 Backup data: directly on the system or apply the Cloud model
 Beware of phishing emails impersonating Facebook
 Microsoft blocked IE attacks with smart tactics
 Microsoft patched a critical vulnerability in Windows