Secure data in USB card
We store everything from good music to important documents and there are also some documents that are your own secret, it's unfortunate that someone can read what you don't want the world to know that now he is
USB cards have come into the daily life of many people and they become more and more popular as their content grows and more features. We store everything from good music to important documents and there are also some documents that are your own secret, it's unfortunate that someone can read what you don't want the world to know that now it is read by others. In this article, I will introduce one of the utilities available in the driver disk when I use the two most popular products today: KINGMAX & TRANSCEND.
1. With KINGMAX product:
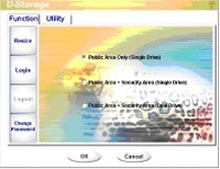
Figure 1
First we install the driver on the PC (click here if you do not have one) and install it as you would on another device. When the window appears, you can choose 1 of 3 methods:
- Public Area only : this option can be ignored because only one partition is created here and there is no security.
- Public Area + Security Area (Single driver): here you can create a partition and have a password protected area.

Figure 2
In this window we can specify whether the protected area is large or small depending on your needs. Next, enter the password in the two fields below and press Ok to start the card formatting process. ( Note : when you do this, make sure the card does not have any data, and when using the volume indicator you are not protected, do not be surprised when your card is 128M now only 62M ).

Figure 3
When you want to use the secured area, just double-click on the icon ( Figure 3 ).
Especially when you miss the card format, the documents you store in the secure area will not be lost.
- In Public Area + Security Area (Dual Driver) last option:
You also do the same thing as the other option, here is to create 2 partitions and have a secure area.
2. Product of TRANSCEND:
In the above section, I mentioned the security on the card of KINGMAX and followed by TRANSCEND. First run the mformat file (download here)
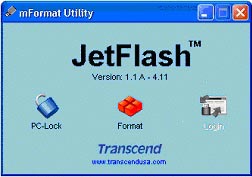
Figure 4
In the above window ( Figure 4 ) select format
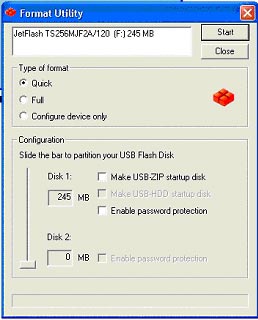
Figure 5
Here we can create 1 or 2 partitions including 1 protected area by dragging the slider up and down and kicking the check box: Enable password protecion
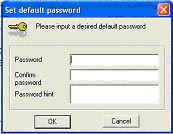
Figure 6
Here you just need to enter the corresponding boxes and click OK to confirm, at the next window press Stat to start the initialization process, click OK to finish.
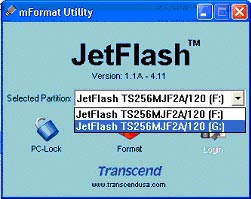
Figure 7
When you use it, click the icon ( Figure 8 ) to select that you are importing into the secured partition (here I choose the G drive and the secured partition) to enter the password in the empty box and you will use this partition . As well as protected KINGMAX card data will not be lost if you format when not logged into the protected area.
With the security of the above documents, I hope you will not lose sensitive data stored on the USB.
Hoang Linh
Email:hoanglinh687888@gmail.com
Was this article helpful?
Your feedback helps us improve.
Related Articles
 Super secure SIM card, only connecting data via Tor anonymity network helps protect information for users2 minutes read
 Criteria when choosing to buy SD memory card10 minutes read
 What is Secure Erase?4 minutes read
 What is the maximum SD card capacity that can be achieved?4 minutes read
 Protect data on CD with Secure CD2 minutes read
 Create a rescue SD card for Mac OS X operating system4 minutes read
Reader Comments 0
Sign in with email or Google to join the discussion.