Mistakes when using white balance in taking photos
When we use white balance in photography, the color of the image will be changed to make the image the most authentic, and processed in color right on the camera.
Table of Contents
The concept of white balance in photography is that through the camera's color processor, it recognizes the white of the image as well as other colors. From that process, the picture will bring the most true color. However, using the wrong white balance will cause the color of the image to deteriorate and not be true. Therefore, when using white balance, please avoid the mistakes below.
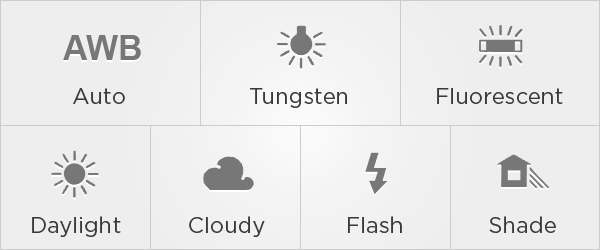
1. White balance with auto mode:
Auto mode when using white balance conveniently when the light environment changes constantly. However, not in any situation, auto mode is also effective. When capturing sunrise or sunset, your scene will have a certain dominant color. But the camera's white balance system will handle to eliminate that dominant color as much as possible.
You should only use automatic mode when shooting in a beautiful sunny day or when it is clear because the system will help your photos look warm and beautiful.

2. Using Shade or Cloudy mode when taking photos:
Although the "Shade" and "Cloudy" modes are designed by manufacturers to capture in the shade or cloudy days in most cases, this mode makes your photos look too warm and carry a More orange tones. Now you should switch to "Daylight" mode so that the picture has a more accurate color tone than the actual.
"Shade" and "Cloudy" modes will be useful when you want to remove warm tones on your photos. For example, when shooting in the early morning and you want the picture to bring a feeling of cold rather than warm.
3. Do not use manual white balance:
Many photographers often overlook the option of white balance manually, but this is an extremely easy to use mode and offers great performance. Note that you need to use a gray card to determine the color of the shooting time and adjust the white balance to a reasonable one.

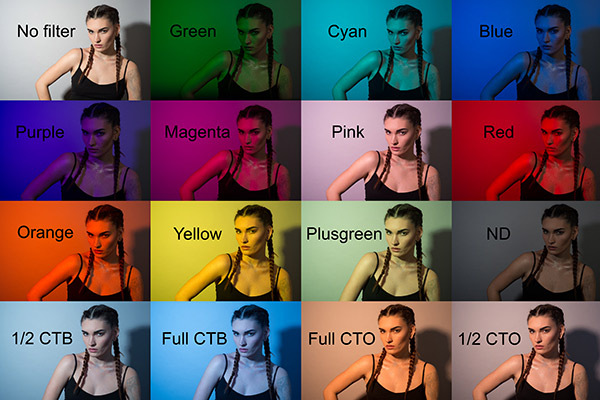
4. Do not use the color gel plate:
When shooting with complex lighting conditions and mixing different sources of light, choosing a white balance mode is extremely difficult. For example, a base mixed with sunlight and a yellow light, using the "Daylight" mode will make the image look orange. But if you use "Tungsten" mode, your image will appear in blue. The manual white balance option allows the subject to be neutral, but other areas will have blue and orange tones.
To solve this problem, you can use colored Gel plates to change the light from yellow lights that resemble the sun light. The blue Gel plate can be placed in front of the yellow light to make your photo more neutral.
5. Do not capture RAW format:
RAW file will contain the maximum information that your sensor can record. When shooting in RAW file, you will easily adjust white balance with just a mouse click.
Refer to the following articles:
- 10 simple photography techniques for impressive photos
- Instructions for taking photos with flash
- The secret to photography is backlit in the bright sunny days
Hope the above article is useful to you!
Was this article helpful?
Your feedback helps us improve.
Related Articles
 How to have perfect white balance when taking photos with a smartphone?4 minutes read
 What is white balance in photography?8 minutes read
 Learn about white balance - White Balance in digital cameras7 minutes read
 Make artistic black and white photos with PhotoScape3 minutes read
 Common errors when taking photos with a phone7 minutes read
 4 ways to take photos with rain give the picture more romantic part6 minutes read
Reader Comments 0
Sign in with email or Google to join the discussion.