Liquid heat sink
Liquid cooling system (liquid cooling system) is one of the top options with 'hands on' players who love technology or hardware overclocking. The advantage of liquid heat dissipation is the ability to transfer heat quickly ...
Table of Contents
Liquid cooling system (liquid cooling system) is one of the top options with 'hands on' players who love technology or hardware overclocking. The advantage of liquid heat dissipation is the ability to transfer heat quickly, keeping hardware components at low temperatures.
 Computer hardware is often 'power- hungry ' and heat is directly proportional to the speed of operation. To avoid overheating, resulting in unstable operation, the hardware usually comes with a heat sink. Often, a fan with a normal fan (air cooler) or a standard heat sink with hardware still works effectively in most cases. However, if overclocked, to keep the hardware at low temperatures, you need to be equipped with better, more efficient heat sinks such as heat sinks using a combination of heat pipes (heatpipe) and cooling fans. Traditional or best is the liquid radiator. The liquid radiator (LCS for short) is quite expensive and is not easy to install, but if you really focus on keeping the system cool and quiet when operating, this solution is worth considering.
Structure and principles of operation
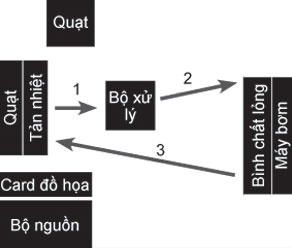
Basically, LCS is made up of components including Cooling block, heat treatment unit with attached cooling fan (Radiator), Liquid reservoir (Reservoir), pump (Pumb). . Included accessories are piping (Tubing) and coolant with water-based components and chemicals to increase the liquid conductivity. The operating principle of LCS is quite simple: the base absorbs heat from the processor and transfers it to the cooling liquid. The pump will push the liquid with this amount of heat to the heat treatment unit to cool it before repeating the new cycle.
For convenience, the article will show how to install the LCS XSPC Rasa 450 (RS120) for Intel Core i7-990X Extreme Edition processor inside Cooler Master 690. The Rasa 450 (RS120) has 3 main parts. Heat absorption base, heat treatment unit with 120mm cooling fan and pump integrated liquid tank. This radiator is compatible with AMD socket AM2 / AM2 + / AM3 processor, Intel socket 775/1156 / 1155LGA processor. In Vietnam, the Rasa 450 (RS120) costs about 3.9 million.
Note
The size and design of the chassis will affect the selection of other components as well as their installation locations. LCS is only suitable for mid-tower standstill or it is best for full-sized standstill if you want to build a liquid cooling system for both graphics cards, RAM and BMC chipset. The Cooler Master 690 case used in the article with the inside space is wide and airy to 'fit' the LCS components neatly.
Before doing so, outline the installation diagram and location of LCS components. To avoid warming up when you have to 'go all the way' inside the case before reaching the heat-absorbing base, you should choose the installation as shown above. The liquid comes out of the lowest temperature heat treatment unit, helping the processor to dissipate heat more efficiently.
installation
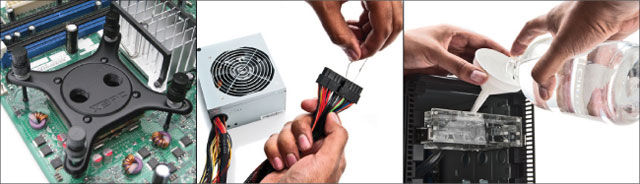
Turn off the device, remove the power cable of BMC and all hardware devices.
Remove the heat sink from the processor to install the heat sink base. You should clean the old thermal paste on the processor surface and apply a new layer of glue (with LCS).
Remove the cooling fan on the back of the case to attach the Radiator.
With the pump integrated liquid tank, fix them in the 5¼ 'drive bay.
Next, you should try it before you cut the tube into appropriate sections to connect the three parts. Refer to the documentation to determine the correct input and output of each part, making sure the tube is properly attached. Tighten the screw to prevent liquid leakage when the system is operating.
Pour the liquid into the container. Attach the power cable to LCS, directly activate the power supply by connecting the circuit between the blue and black pins of the ATX power line. The pump will push the liquid to the parts until the loop is completed. You need to continue filling the container with liquid until it is safe.
After installation is complete, do not start the computer but run it for about 24 hours to detect liquid leaks. This is the most important step to avoid future problems.
Was this article helpful?
Your feedback helps us improve.
Related Articles
 What is CPU heat sink and how does it work?4 minutes read
 Top 5 best heat sinks 201911 minutes read
 Choose cooling equipment for summer laptops6 minutes read
 You have to use thermal paste properly?10 minutes read
 The computer does not need a fan to dissipate heat thanks to the copper foam heat sink2 minutes read
 YouTuber test uses a Mac Pro heat sink for $ 6000 to make a cheese shaver and an end2 minutes read
Reader Comments 0
Sign in with email or Google to join the discussion.