Instructions to overclock computer RAM
Factory RAM is often slow, but with a few minutes of BIOS editing and testing, you can make the memory run faster than the manufacturer's specifications..
Factory RAM is often slow, but with a few minutes of BIOS editing and testing, you can make the memory run faster than the manufacturer's specifications.
- Easy and safe overclocking of CPU, GPU and RAM
- Guide to overclocking graphics card for better gaming performance
- Is it possible to overclock the computer screen? How like?
Things to know before overclocking RAM
Overclocking RAM is a bit more complicated than overclocking a CPU or GPU. With RAM, there's a lot to do but it's safe because they don't generate much heat.
Each user program stores its working data on RAM before it is loaded into the CPU's internal cache, and the program that uses a lot of memory can transfer it to RAM. In games, improving overall RAM latency can dramatically reduce frame time. This helps to improve overall frame rates and (most importantly) reduces stuttering in CPU-intensive areas where new data needs to be loaded from RAM into cache or VRAM.
RAM speed is usually measured in megahertz (Mhz). The initial speed of DDR4 RAM is usually 2133 Mhz or 2400 Mhz, although the actual speed is only half when it is Double Data Rate (DDR). Memory has more than 20 timing (measuring latency of memory) different control latency and read and write speed. They are measured according to clock cycles and are often grouped by the abbreviation CAS Latency (CL). For example, a mid-range DDR4 RAM with 3200 Mhz CL16. Improving speed or timing will improve latency and throughput.
- Compare SDRAM, DDR, DDR2, DDR3, DDR4, and DDR5
The memory that communicates with the rest of the computer using a system is called Serial Presence Detect. Through this, it provides the BIOS with the main set of frequencies and timing it operates called the JEDEC parameters. This is the initial speed and it is assigned to each DDR bar when created.

But Intel has found a way to cheat the system. By providing another configuration on JEDEC, called XMP (Extreme Memory Profile), they can run RAM faster than standard speeds. If you buy RAM with a speed above 2400 Mhz, you can get RAM with XMP configuration to activate.
Manufacturers often don't put everything to 100%. They have priced higher expensive RAM, so normally your memory may come with XMP configuration. RAM also works at a certain voltage, usually 1350 V for mid-range DDR4 RAM, but you can increase it a bit, which manufacturers do with higher speed RAM.
But the main problem is that the SPD does not show every timing. According to a representative at Kingston, they only adjust the main timing (CL, RCD, RP, RAS) and because the SPD system used to store XMP configurations has limited items, the rest depends on The motherboard decides and often doesn't always make the right choice. In this example, the auto setting of the ASUS motherboard sets some strange values for some timing, resulting in the RAM refusing to run with the XMP configuration and requires manual timing correction to fix the problem.
How to determine the perfect RAM timing
Although overclocking RAM is quite safe, it is also a little more complicated. If you're running an AMD Ryzen system, there's a tool called the Ryzen DRAM Calculator that makes it easier to squeeze RAM. The Calculator will eliminate some headaches during trial and error, you don't have to leave RAM for the motherboard's AUTO settings.
https://www.techpowerup.com/download/ryzen-dram-calculator/
For Intel systems, this tool is still handy for the main timing guide and the built-in memory tester will work the same way. You can also download this tool when you are not using an AMD system.
Open the tool and enter the running Ryzen version (only need to import Ryzen 2 Gen if using Intel) and the type of memory. If you do not know, you can find the part number of RAM on Google.

Press the purple R-MXP button at the bottom to download the XMP configuration. Get the Ryzen version and memory type, then click Calculate SAFE to calculate the timing. You can use the Compare Timings button to compare with the XMP installation.

SAFE installation will work fine. FAST Timing can work, but the base voltage is not stable. To use it, you must save this screenshot (there is a Screenshot button on the bottom left) and send it to another device to view it while in the BIOS.
How to overclock RAM in BIOS
Make sure you took the screenshot on and saved it on another device (or recorded it somewhere), as the rest of this process will go into the BIOS and you won't be able to access the desktop.
Shut down the computer and boot it to the UEFI or BIOS firmware setup screen. You need to press a specific key like Del repeatedly for PC to boot into this screen.
- Instruction on BIOS on different computer lines

Find the memory section and download the XMP configuration to get started. Here you need to change the frequency, if you do not want to change the timing, you can increase the frequency while keeping the timing (especially on Intel).
There is another timing control section. Open the section as below screenshot shown.

Now, open the screenshot on the phone, enter the number. In this example, the order matches the Calculator, but you need to double check and enter it correctly.
Here, ASUS BIOS shows the full names of many key timing points, so here is a list of key timing points:
- tCL - Primary CAS Latency
- tRCDRD - RAS to CAS Read Delay
- tRCDWR - RAS to CAS Write Delay. This is sometimes grouped with read, though not always.
- tRP - RAS Precharge (PRE) Time
- tRAS - RAS Active (ACT) Time
The rest needs to be accurate.
For Intel, you will need to enter the main timing and the rest can be done automatically. If you want, you can try entering the subtiming that Calculator provides. If you have problems with automatic installation, try entering them manually.
When timing is completed, look for voltage controls. You need to enter the suggested DRAM voltage (Calculator displays unsafe voltage in red, the index below 1,450v can work well). If using Ryzen, you need to enter the suggested SOC voltage, power the memory controller on the CPU.
Save settings and exit BIOS. The computer will reboot and if it boots into Windows, you can move on to the next step.
What to do if the computer does not go through the POST phase?
If the computer does not boot, the motherboard is unable to test itself when the power is on (power-on-self-test - POST), you have to wait about 30 seconds for the BIOS to boot into safe mode and recover last active installation. You can try increasing the voltage to 25 millivolt (0.025v) before reaching the recommended maximum voltage. Or you can try increasing the SOC voltage a bit on Ryzen systems, because Ryzen 1st and 2nd generations are particularly difficult with memory overclocking. Intel does not have the same SOC as Ryzen so it is less likely to encounter this problem.
If the computer does not boot in safe mode, do not worry. Your BIOS may not have this feature and need to clear CMOS manually. It is usually the battery on the detachable motherboard or the battery on the front connector of the case. Refer to the motherboard manual if you do not know how to do it. You need to use a screwdriver or a pair of scissors and touch the two batteries together, creating an electrical connection. Don't worry, this will not shock you. The computer will be reset normally.
Ensure stable overclocking
When returning to Windows, you need to check if the overclocking is stable. The calculator has a tab called MEMbench that is used to check overclocking. Set custom mode and task scope to 400%. Click Max RAM at the bottom to allocate all remaining RAM. It will check RAM errors 4 times.

Click Run when testing starts and wait a few minutes. In this case, testing 32GB RAM at 400% task range takes less than 10 minutes.
If there are no errors, you can try increasing the clock slightly or checking FAST settings. Memory overclocking is trial and error, delete spam and wait for the MEMbench to complete.
Once you've used Numpad and are happy with the results, you can check overnight to confirm 100% fully stable overclocking. Set the task scope to a higher level, for example, 100,000% and test it after waking up. If there are no errors, you can enjoy overclocking. If you skip this overnight step you may get a blue screen error or a random crash (sometimes with any RAM speed, unless there is ECC memory).
Check RAM performance
If you want to compare RAM with other RAMs, you can download UserBenchmark to perform a performance test of the entire PC, including RAM. This test will give you an overview of system performance. You can perform game-specific performance tests like Unigine SuperPition, but you have to do a lot of tests because the error is quite high.
Here, the performance is quite impressive. Performs a 32 GB RAM overclocking of Micron E-die (known to be cheap and good at overclocking) with 3200 @ CL16 spec for $ 130. UserBenchmark results in a speed score of 90% compared to average RAM but even timing can reach 3200 @ CL14 RAM making it 113%, increasing performance by 23%.
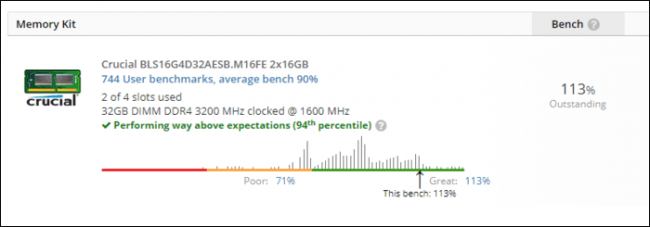
Overclocking makes E-die RAM 130 USD on par with 3200 @ CL14 RAM sold for more than 250 USD, quite cost effective.
I wish you successful implementation!