Instructions for connecting a computer to a projector, connecting a laptop to a projector
In this article TipsMake.com will guide you how to connect a projector to a computer or laptop using HDMI and VGA cables, along with how to fix some errors when connecting a computer to the projector.
Table of Contents
1. How to connect the computer to the projector using an HDMI cable
Connecting a projector to a laptop using an HDMI cable will give better image quality because it transmits an uncompressed signal. Depending on which standard your HDMI cable belongs to, it can produce images at what resolution (the highest currently is HDMI 2.1, which can transmit 8K content).
Below are 5 steps to connect a projector to a laptop using an HDMI cable:
Step 1: Turn on the projector
Step 2: Turn on the computer/laptop
Step 3: Plug one HDMI end into the HDMI port on the projector (circled in red in the picture).
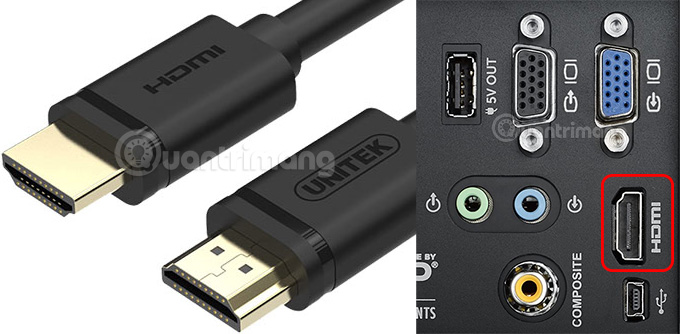
Step 4: Plug the other end of the HDMI cable into the HDMI port on the computer/laptop:

Step 5: After plugging in the cable, the computer screen will usually appear on the projector. If you don't see it yet, then press the Windows key + P on the keyboard, select the mode to display the computer screen on the projector. Duplicate (displayed exactly like the laptop screen), Extend (only the parts pulled to the projector screen will be displayed).

2. Connect the projector to the laptop using a VGA cable
To connect the projector to a laptop using a VGA cable, you need to prepare a VGA cable, then follow the steps below.
Step 1: Turn on the projector by pressing the POWER button once on the remote or projector. If you see the light on the projector turn green, it's okay. If the projector has just turned off, you need to wait a few seconds for the fan in the machine to stop spinning and then press it to turn it on again.
Step 2: Turn on the computer/laptop
Step 3: Plug one end of the cable into the VGA port on the projector (usually blue).
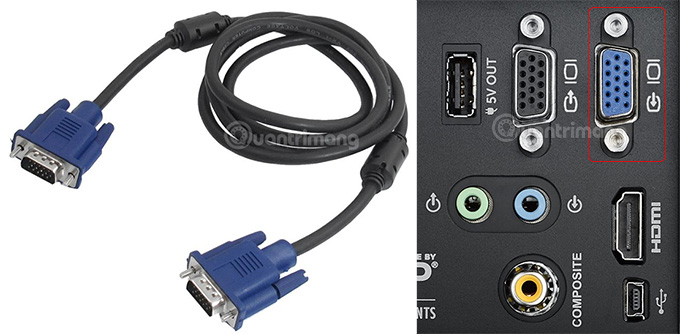
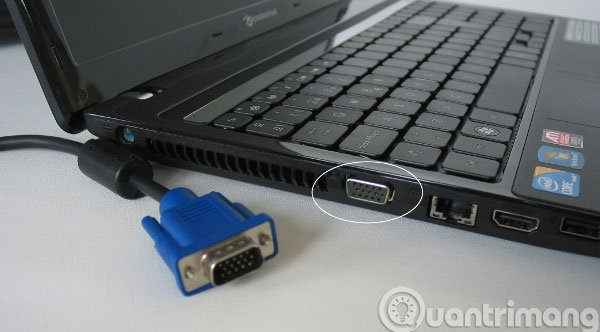
Step 4: Plug the other end of the VGA cable into the VGA port on your laptop or computer. You need to insert the correct connector, push it firmly into the slot and insert it tightly. When removing the cord, we will hold the end and pull it out, avoiding bending up or down the plug.
Step 5:
When the connection is successful, the computer screen will appear on the projector. If there is no signal, press the Auto Setup button on the remote again to let the projector detect the signal from the computer again.
Step 6:
If the laptop screen is not displayed on the projector even though it has been successfully connected, press the Windows + P key combination and select Duplicate . If it still doesn't work, continue reading how to fix the error connecting the projector to the computer below.
3. Connect the projector to the computer via WiFi
To connect your computer to the projector via WiFi, you need to pay attention to the following issues:
- The projector supports connection via WiFi.
- The devices that need to be connected (computer and projector) need to be connected to the same WiFi network.
- WiFi connection is very convenient but sometimes it will not be as stable as connecting via HDMI or VGA cable.
Steps:
Step 1 : You need to connect a projector that supports WiFi connection to a common WiFi network. This setting depends on the projector type but can be found in Settings > Network . Then you need to set up the Screen Mirroring feature to allow receiving image signals over WiFi.
Step 2 : On a Windows computer, press Windows + S then type Connect to wireless display , click on the result in the search section.
Step 3 : Find and click the Connect to a wireless display section .
Step 4 : Click Detect to find the name of the projector to connect, then select and click Connect.
With a Mac computer, you can connect to the projector via AirPlay. Of course, to do this, you also need a projector model that supports AirPlay connection. First, you need to connect the projector to a common WiFi network and then activate AirPlay (usually in the same place as the Screen Mirroring option).
On a Mac, click the AirPlay button then find the projector and click to connect.
4. How to fix errors connecting the projector to the computer
As mentioned, during the process of connecting the computer to the projector, there may be an error of no signal, or no image recognition due to incorrect implementation or other errors. Readers can refer to some error correction methods in the section below.
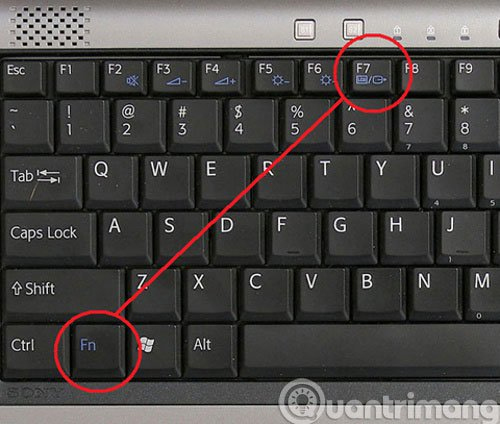
Method 1: Press the shortcut key combination on the computer
Depending on the type of laptop connected to the projector, we press different key combinations. But first, we need to select LCD + Monitor mode .
- For ACER, TOSHIBA, SHARP projectors : Fn + F5.
- For SONY, IBM, LENOVO projectors : Fn + F7.
- For PANASONIC, NEC projectors : Fn + F3.
- For ASUS, DELL, EPSON projectors : Fn + F8.
- For FUJITSU projectors : Fn + F10.
- For HP, COMPAQ projectors : Fn + F4.
- Other projector models : Fn + Key with screen icon depending on the brand.
Method 2: Edit on the Desktop interface
Method 1:
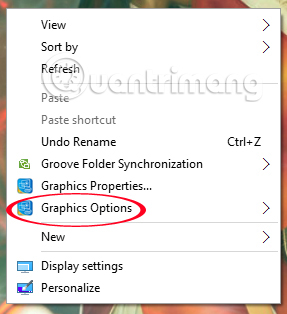
Right-click and select Graphics option > Output to > Intel(R) dual display clone > Notebook + monitor .
Method 2:
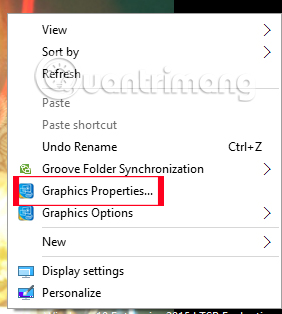
We also right-click and select Graphics Properties . Next, in the Muliple Display section , check Intel (R) Dual Display Clone , then click OK .
Method 3: In case the device does not have the Graphics option and Graphics Properties options
At the interface on the screen, right-click and select Properties > Settings > Advances . Next select the Intel ® Graphichs Media accelerator Driver for mobile > Graphichs properties tab .
In the Muliple Display section , we check Intel (R) Dual Display Clone and click OK .
Method 4: With Windows 7 computer
Method 1:
We press the Windows + P key combination and select Duplicate .
Method 2:
At the Desktop interface, right-click and select Graphics Options > Output to > Clone Displays > Monitor + Built-in Display .
Method 3:
On the screen, right-click and select Personalize > Display > Connect to a projector > Duplicate .
Method 4:
Click Start > All Programs > Accessories > Windows Mobility Center . In the External Display panel of Mobility Center , we click on the Connect Display option and then click Duplicate .
Method 5: Fix errors with laptops with ATI and Geforce discrete cards
1. With ATI discrete card
At the Desktop screen, right-click and select Catalyst(TM) Control Center . At the Graphics settings tab, select Display manager > Displays properties . Then right-click on the blurred screen image and click Clone main with monitor .
2. With GeForce discrete card
Right-click on the computer screen, select Nvdia Control Panel . In the Display section, select Setup multiple displays . Next, right-click on the screen 2 select Duplicate .
You can try the above methods to fix the error of not receiving signal when connecting the computer to the projector. Depending on the projector model being used, the remote will have a Shutter or Avmute key to put the projector into Standby mode and temporarily turn off the device. To restart, you only need to press the above buttons once.
Was this article helpful?
Your feedback helps us improve.
Related Articles
 Instructions for connecting the projector to a computer, laptop6 minutes read
 Instructions for connecting macbook to projector quickly6 minutes read
 How to connect a tablet to a projector5 minutes read
 How to connect a Mac to a projector3 minutes read
 5 popular wireless projectors to connect to laptops, phones5 minutes read
 Summary of ways to quickly connect a computer to a projector6 minutes read
Reader Comments 0
Sign in with email or Google to join the discussion.