Instructions for configuring Reverse Proxy with the latest NGINX
In today's article, TipsMake will help you learn and configure Reverse Proxy with NGINX fully and in detail.
In today's article, TipsMake will help you learn and configure Reverse Proxy with NGINX fully and in detail.
While most popular applications can run as web servers on their own, the Nginx web server provides some advanced features such as load balancing, TLS/SSL, and acceleration that most specialized applications do not have. Using an Nginx reverse proxy allows you to take advantage of all of these benefits.
Benefits of using Nginx Reverse Proxy on an instance
Some notable benefits of setting up an Nginx HTTPS reverse proxy:
Load Balancer: An Nginx reverse proxy can perform load balancing to evenly distribute client requests across backend servers. It also improves redundancy in case one server fails, the reverse proxy will simply reroute requests to another server according to the established policy.
Enhanced security: An Nginx reverse proxy can also act as a line of defense for backend servers. Configuring a reverse proxy ensures that the identity of the backend servers cannot be discovered.
Improved performance: Nginx is highly regarded for its ability to stream, deliver static content files, and parse URLs.
Easy logging and auditing: Since there is only a single point of entry when deploying an Nginx reverse proxy, logging and auditing becomes much simpler.
Encrypt the connection between the client and the Nginx reverse proxy using TLS, the encrypted and secure HTTPS connection helps users protect their data.
Now we will go into the main part of the article:
Model:
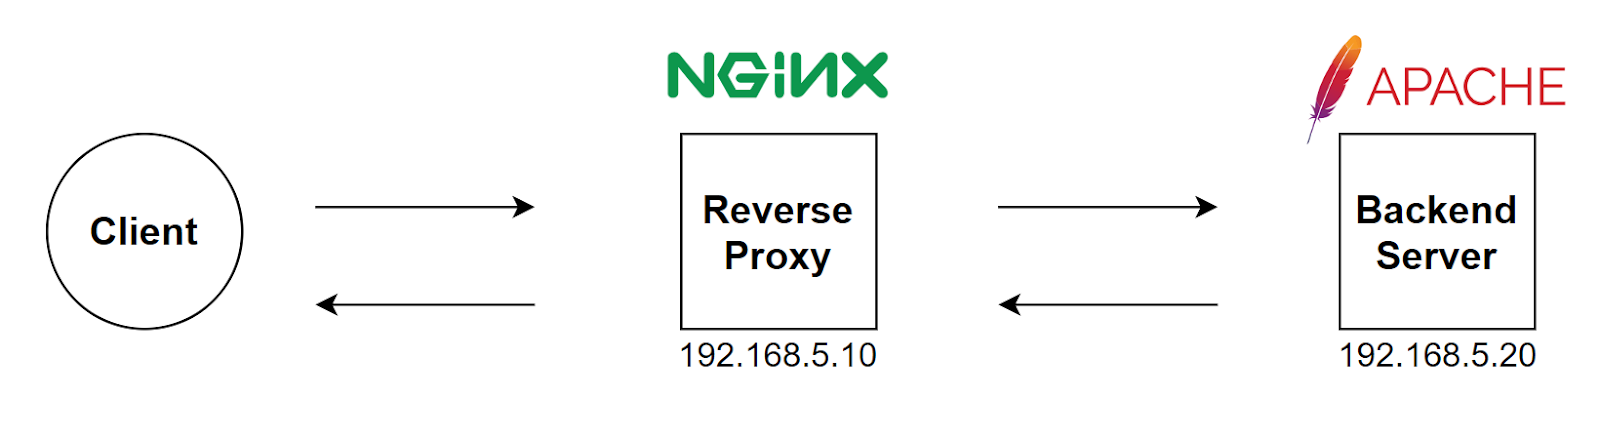
NGINX Reverse Proxy Configuration
Initialize NGINX repo:
Add the following content:
Import authentication signature:
Update repo information:
Install NGINX via the previous repo:
Configure firewalld to allow port 80:
Start and configure startup for the service:
Edit the configuration file /etc/nginx/nginx.conf
Add the following paragraph:
# where 192.168.5.20 is the address of the Backend Web Server
Restart NGINX service:
Apache Web Server Configuration (Backend)
Install httpd :
Configure firewalld to allow ports 80 and 443:
Start and configure startup for httpd service:
Edit the log format in the configuration file /etc/httpd/conf/httpd.conf
Edit at line 196:
Restart the httpd service:
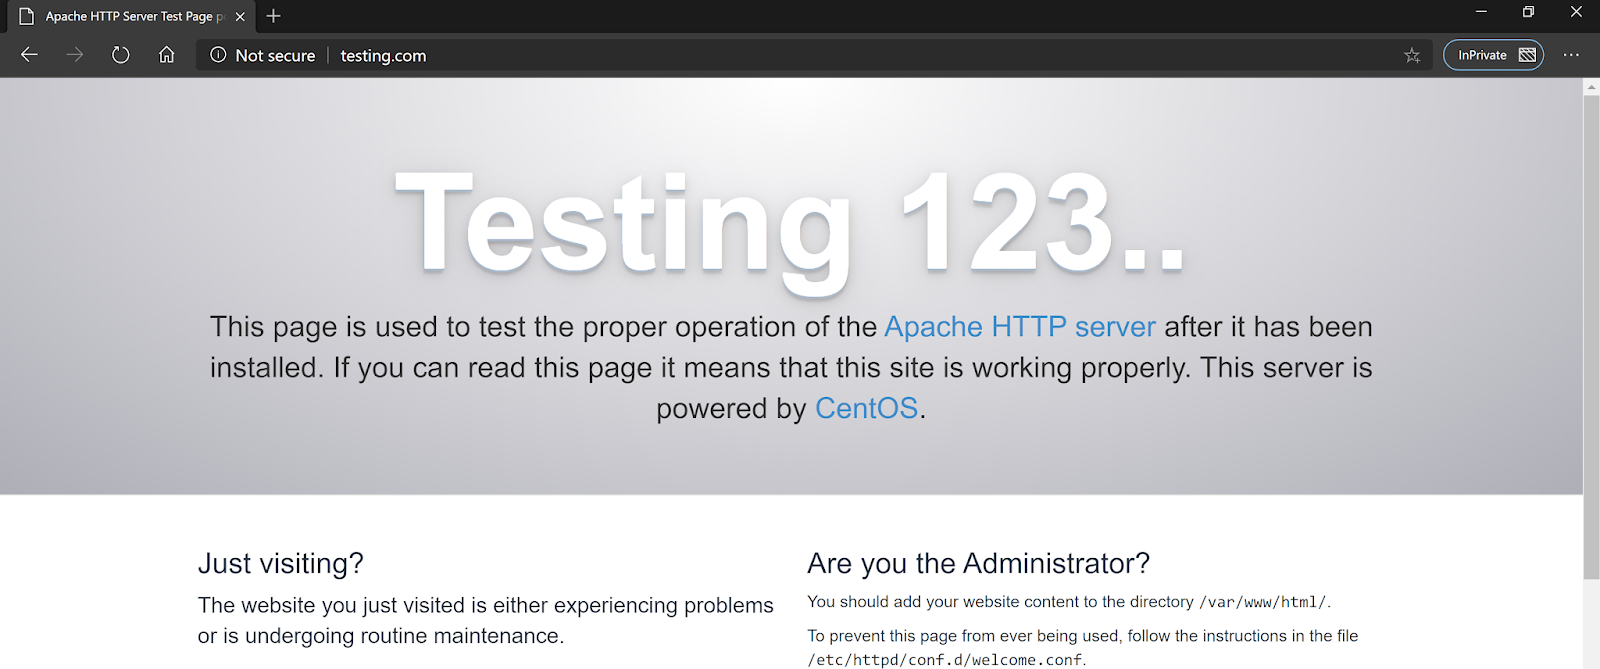
Check the results
Go to the NGINX Reverse Proxy address on the client browser and you will be redirected to the Apache Web Server:
According to TipsMake share
- How to use Nginx as a reverse proxy
- What is SOCKS Proxy? How is SOCKS Proxy different from Proxy Server?
- Compare Nginx and Apache
- What is Web Proxy?
- What is Proxy? Instructions for Installing Proxy Server on PC and Phone
- How to install and run Nginx Server on Windows 10
- Instructions for creating reverse text
- [Theory] What is Proxy Server?
- What is Proxy? How to install free Proxy Server
- What is Proxy? - How to use Proxy when browsing the Web
- Fixing the issue of CD/DVD drives not showing up on Windows 10/8.1/7 computers.
- How to use Storage Spaces to protect Windows 11 data
- Autrace - Tool to check, count and monitor Linux processes
- Next.js vs Express.js: Exploring the Differences Between the 2 Frameworks
- Kubernetes Cluster Basics
- Install LAMP Stack on Ubuntu 18.04
- How to connect Windows Server 2008 and Windows Vista to iSCSI server (Part 1)
- Web Server vandalism activities (Part 1)
- Google launches a 'Share' button for Google+ users
- Top 10 missing features from Google Plus
-
 Learn about Freenginx: A branch of the most popular web server today
-
8 ways to tweak NGINX performance on Linux
-
How to install Grafana on Alma Linux
-
8 commands for efficient management of Linux processes
-
How to install fcgiwrap for Nginx on Ubuntu 20.04
-
How to install and run Nginx Server on Windows 10
 Learn about Freenginx: A branch of the most popular web server today
 8 ways to tweak NGINX performance on Linux
 How to install Grafana on Alma Linux
 8 commands for efficient management of Linux processes
 How to install fcgiwrap for Nginx on Ubuntu 20.04
 How to install and run Nginx Server on Windows 10