Table of Contents
This guide provides a clear overview of using tcpdump to analyze traffic, including how it works, key details, and practical considerations that can help you use the information effectively.
Linux comes with a wide variety of network utilities to choose from. Tcpdump is a powerful network tool that can capture and analyze network traffic if you need to troubleshoot network problems on Linux.
Let's practice with the tcpdump command and explore how to use it to capture network traffic.
Install Tcpdump in Linux
Tcpdump comes pre-installed with all mainstream Linux distributions and security-based alternatives, so you should be able to use it right away by typing tcpdump with the sudo prefix.
In case you are unable to run the tcpdump command and stuck at the error "tcpdump: command not found" , Here is how to install tcpdump on Linux machine.
To install tcpdump, fire up a terminal and run the command corresponding to the Linux distribution you are currently using:
On Debian/Ubuntu derivatives, run:
sudo pacman -S tcpdumpOn Arch-based systems, run:
sudo pacman -S tcpdumpTo install the tcpdump utility on Fedora, CentOS, and RHEL, issue the following command:
sudo dnf install tcpdumpKeep in mind that if you are asked to install libcap, enter Yes or Y As this is a core dependency, otherwise tcpdump will refuse to start. This will install the tcpdump utility and resolve the "command not found" Error.
Now that tcpdump is installed on your system, let's explore the various options and functionalities it offers.
Capture Network Traffic with Tcpdump
Tcpdump provides a lot of flags to modify its execution but it can also be run as a standalone command. However, running tcpdump without any flags or arguments will miss its full potential. It is better to use some flags to tweak the execution and output as needed.
Enter this command to monitor network transmissions using tcpdump:
sudo tcpdumpNow, tcpdump will start automatically capturing network packets until a interrupt signal is sent with the Ctrl + Z Shortcut, interrupting the process manually. To limit the total number of packets captured, use the -c flag and enter the desired packet limit next to it:
sudo tcpdump -c 5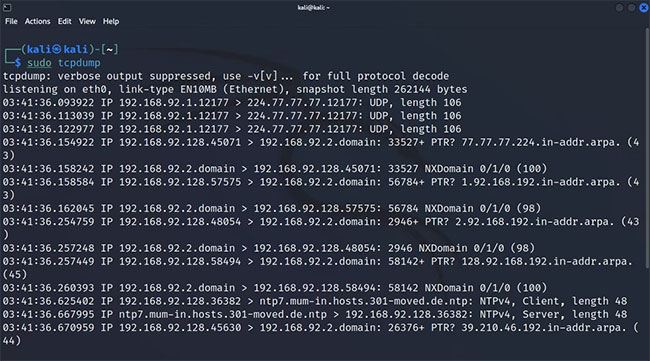
If you can't understand the output right now, you first need to get familiar with the tcpdump output format.
Check Available Network Interfaces with Tcpdump
By default, tcpdump captures traffic from any available network interface. If there are multiple network interfaces active, you may want to specify the network interface from which tcpdump will capture packets. To start tcpdump on a specific interface, you will first have to find out the interface name.
Here's how to list all available network interfaces with tcpdump:
sudo tcpdump -DAlternatively, you can add the --list-interface Flag to the command:
sudo tcpdump --list-interfaces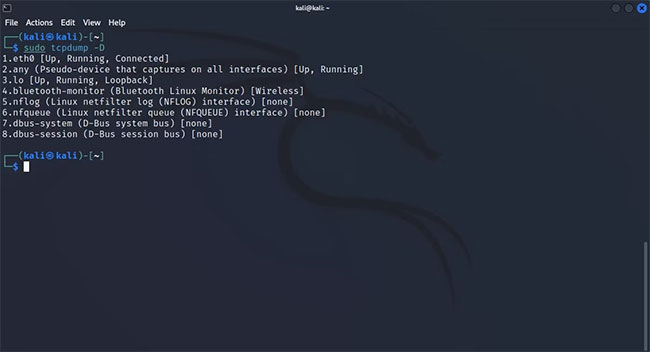
The returned output contains a list of all active network interfaces that tcpdump can listen on. To configure tcpdump to capture transmissions from a specific network interface, enter the following command:
sudo tcpdump -i interface_idAlternatively, you can add the --interface Flag to the command:
sudo tcpdump --interface interface_idNow that you have captured a few packets, let's take a closer look at them and see how you can tweak the output to make it more readable.
Explore Tcpdump Filters
Tcpdump has the potential to capture a large amount of traffic in a single run. Such an information overload can throw you off track when investigating or troubleshooting a problem with a particular host or network protocol.
This is where tcpdump filters come in handy. You can chain the tcpdump command with certain flags to filter out network traffic and capture specific packets. You can then store these packets and analyze them later to find the root of any network-related issues. Let's take a look at how to use filters in tcpdump.
Packet Filtering Based on the Network Protocol Being Used
To filter packets transmitted over a specific protocol, enter the protocol name using the tcpdump command and it will capture only packets transmitted over the specified network protocol.
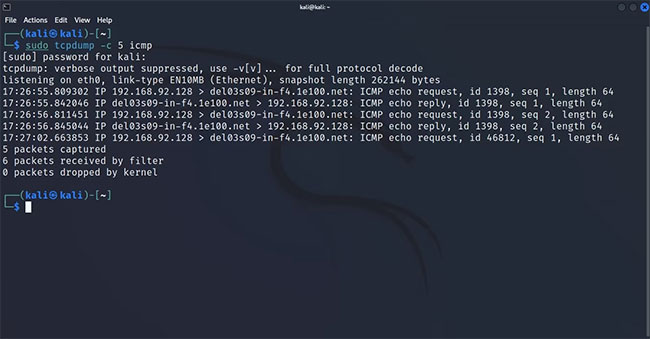
For example, to capture ICMP-based packets, you simply append icmp to the end of the tcpdump command. The process is the same if you only want to capture UDP or TCP packets.
sudo tcpdump -c 5 icmpThis command will only return output if there is data exchange via the ICMP protocol.
Host-based Packet Filtering
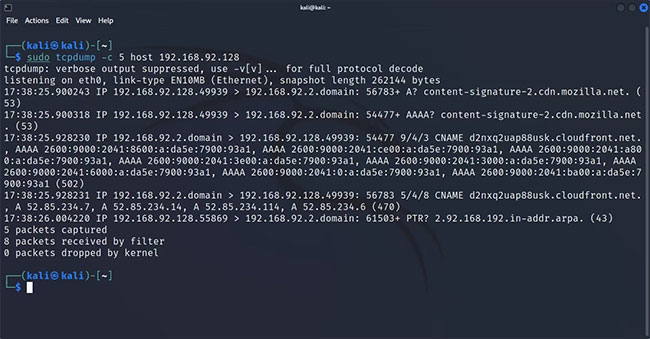
You can configure tcpdump to capture packets related to a single host with the host parameter. This is especially useful when all systems on your network are up and running except for one. This filter lets you perform targeted investigations and speeds up the overall troubleshooting process because you are not distracted by unnecessary data.
To capture packets related to a specific host, specify the host's network address with the host parameter:
sudo tcpdump -c 5 host 192.168.2.1Similar to the network protocol filter, this command will only return output if any ongoing transmissions are related to the specified host.
Active Port Based Packet Filtering
Tcpdump comes equipped with a parameter that lets you filter network traffic and capture only packets transmitted to or from a specific port.
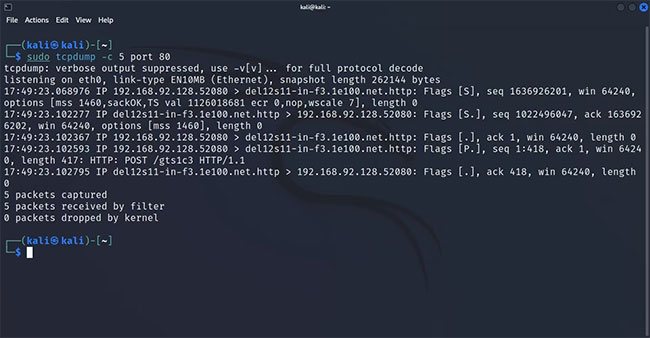
To capture packets coming from a specific port, append the port flag to the tcpdump command and specify the port number next to it. For example, to capture all incoming or outgoing HTTP traffic, specify port 80:
sudo tcpdump -c 5 port 80Tcpdump will listen on port 80, waiting for HTTP transmissions. When it detects HTTP packets in the network, it will capture them.
Combine Filters Together for Advanced Sorting
The previous sections discussed how you can filter traffic based on port, protocol, or host, but what if you want to capture traffic from a specific host's port using a specific network protocol? Well, you're in luck because this is possible, thanks to the ability to use logical operators with the tcpdump command.
To capture packets from an individual host using port 443, use the following command:
sudo tcpdump -c 5 host 192.168.2.1 and port 443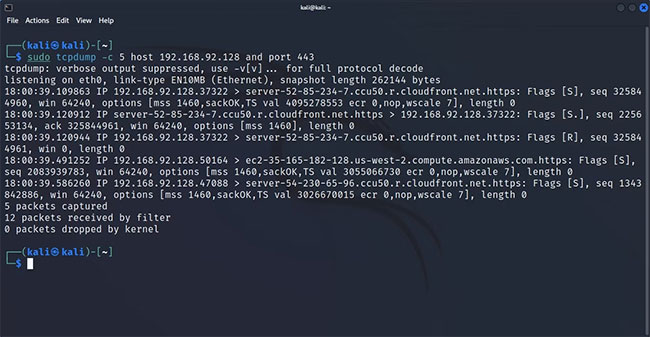
Check the Contents of Captured Packets
By default, tcpdump displays the headers of a packet in its output. While this is more than enough in most cases, sometimes you may want or need to take a deeper look at the captured data. You can pass certain parameters to the tcpdump command to examine the contents of the captured packet.
Here's how to view the contents of the packages:
sudo tcpdump -c 5 -x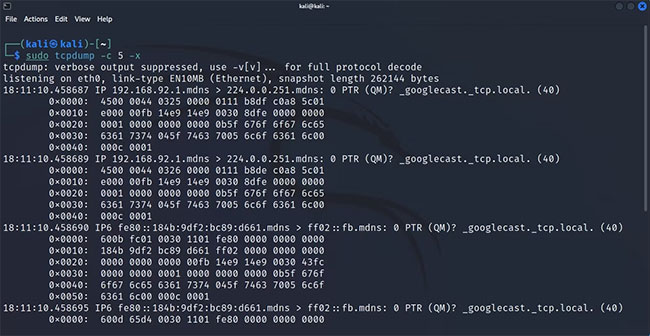
This command returns the hex version of the contents of a captured packet. If you want to see the ASCII form of the data, you can pass the -A Parameter with:
sudo tcpdump -A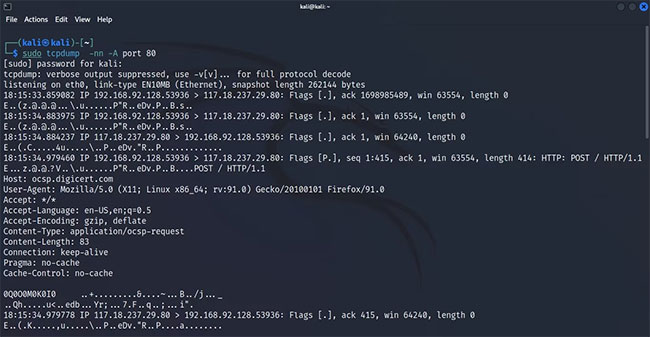
Save Tcpdump Output to a File
Like most other Linux command line tools, you can save the output generated by tcpdump to a file for later reference.
This can be done by adding the -w Flag to the command. Once executed, tcpdump will store the captured data in a.pcap file for later analysis using tcpdump or other network monitoring tools like Wireshark.
Enter this command to save your tcpdump command output to a file:
sudo tcpdump -w capture.pcapTo read the.pcap file, you can use tcpdump with the -r Parameter:
sudo tcpdump -r capture.pcapLinux offers a plethora of networking tools that can solve any networking problem as long as it is on the software side. Knowing how to use some of the best networking tools in Linux will definitely come in handy, whether you are a sysadmin who manages networks for a living or just a daily Linux user.
Since the actual list of available network commands can be overwhelming, here is a list of some of the most essential Linux networking tools you should know.
FAQ
What is using tcpdump for traffic?
It is the main topic covered in this guide, including the relevant tools, settings, features, or steps connected with using Tcpdump to Analyze Traffic.
Why is using tcpdump for traffic useful?
It can make using Tcpdump to Analyze Traffic easier to understand, compare, configure, or troubleshoot by organizing the most important information in one place.
What should I check before using this guide?
Confirm that the instructions match your device, software version, region, and intended use, then back up important data before making major changes.
Related Articles
 20 Tips and Tricks for Mastering Google Analytics Data (Part 2)10 minutes read
 Summary of Penalties for Violations of Traffic Errors3 minutes read
 How to Block and Analyze LAN Traffic with Packet Squirrel and Wireshark12 minutes read
 How to Avoid Traffic Jams with the Latest Google Traffic5 minutes read
 Secedit Analyze: Secedit: Analyze Command in Windows5 minutes read
 5 Ways to Encrypt Internet Traffic: Recommended Choices8 minutes read
Reader Comments 0
Sign in with email or Google to join the discussion.