How to Write to a Text File in C++
Part 1 of 2:
Setting Up the Project
-
 Install Microsoft Visual Studio 2017. To download the Microsoft Visual Studio application, open your Internet browser and go to https://visualstudio.microsoft.com/downloads/, where you will see the Microsoft Visual Studio download page.
- Select Free Download under the Community section and continue with the installation process.
- Open the application from your desktop. After the installation process, locate the Visual Studio application from your desktop and open it. You will be presented with a blank page, displaying the menu bar at the top of the screen.
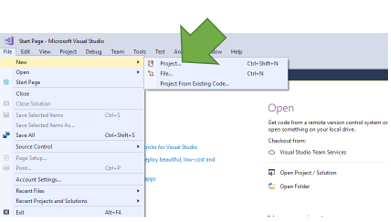
- Select File.
- Create a new project. Click on New and then select Project. A new page will appear requesting the type of project.

- Click on Empty Project.

- Click on Empty Project.
-
 Name your project. Under the dialog box that requests the type of project, you are provided with an option to give your project a name. Give your project a name and click Ok.
Part 2 of 2:
Writing Your Program
-
 Open a source file. A blank screen should appear after your project has been created. To be able to input a code in Visual Studio, you need to create a source file.
- You can do this by right-clicking on Source file located at the right panel of your screen and following the drop-down menu.
- Click Add and then New Item.
-
 Create a C++ file. To begin coding in C++, you will have to indicate it after you have added the item. Make sure the left column highlights "Visual C++" and you click on "C++ file.cpp". As you provided a name for your project, you also have the option to provide a name for this file.
- Microsoft Visual Studio will automatically name files if you don't provide a name.
-
 Navigate to the .cpp file. Your named source file should appear immediately after you created it. If not, refer to the right panel and you should find it under the "source file tab". Your blank source file page should then appear.
 -
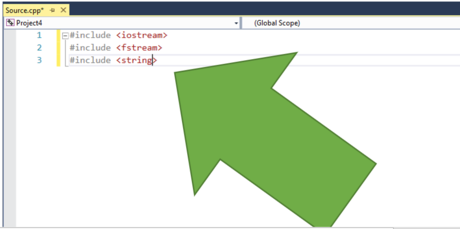
 Determine which libraries to use. For this project, you will only need to include three libraries. A library is simply a pre-packaged code that can be reused in a program. The libraries you will be using are:
- include . This is the main library that includes the main input and output programs. It also allows for the communication between the user and the program. Without it, the rest of the code is void.[1]
- include . This enables us to read and write data to files in a sequential manner.[2]
- include . This allows us to input and output multiple characters
-
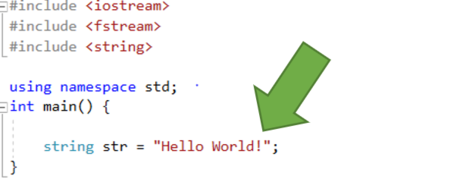
 Determine the type of library to use. In this project, you will make use of the standard library. This simplifies the program as you don't have to specify the type of library for each time you want to make use of it. To include it, just type using namespace std; under the declared libraries.
 - Brainstorm ideas for your output. Do you want to display texts, number, images? The different applications vary, but for this guide, you will output a statement Hello World! into your text file.
-
 Insert int main. The int main() operation is a requirement for every C++ program to allow the operation to run and return an exit status of the operating system. All the code required will go into the curly brackets of "int main".[3]
 -
 Declare needed variables. The only variable you need to declare is the string; "Hello World!".
- To declare a variable you need:
- Type of variable - String
- Name of variable - Str as shown
- The declaration - Here, to declare the variable equal to our string "Hello World!"
- You must end each statement with a semicolon, or else an error will occur.
- To declare a variable you need:
-
 Output file declaration to a non-existing file. To write to a file, you have to provide the interface. You will have to type ofstream and the declaration of the file with a semicolon at the end.[4]. In this tutorial, outfile is used as the declaration of the output file.
 -
 Open the file (). You now use our declared output declaration to perform tasks regarding output to a file. To open the file, you type in your declaration.open("Text.txt");.
- In this article, you will create and open a file "Text.txt". You can alter the name of the file, but make sure that it ends with a ".txt" to ensure you are working with a text file.
- Make sure to use a non-pre-existing file so that there are no errors in computing.
-
 Write to a file. Now that the output file has been created, you can write your declared string to it. You perform this by typing outfile << str <
- << is the symbol for output.
- endl is used to place the next output on another line.
-
 Close file and exit the program. After writing to the file, you have to close the program by typing outfile.close(). You would also need to close your program so that our code can function properly.
- Type return 0; for this task, this is also used to show that the program worked fine as it is returning a zero output file.[5]. Endeavor to save your program along the way until the end.
-
 See your result on Notepad. When you create a project Microsoft visual studio automatically creates a folder with all you programs embedded in it. Locate this folder on your desktop and you should see a text file with the name you provided. Open it and you should get an output of Hello World
 - Brainstorm ideas on further applications. Now that you have learned the basics of creating and writing to a file in C++, you can perform more advanced operations using numbers, special characters, etc. It all depends on the requirement of your desired project.
Share by
Kareem Winters
Update 05 March 2020


