How to use TestFlight: Test beta apps on iOS
In this TestFlight for iOS tutorial, you will learn how to integrate TestFlight into your applications, invite others to use the beta and return software contributions to you.
Table of Contents
TestFlight Beta Testing is an Apple product that makes it easy for users to invite you around to test iOS, watchOS and tvOS app versions before being pushed to the App Store.
This is one of the rare tutorials that does not require coding, just follow these steps and you will be able to use TestFlight easily.
Begin
This tutorial uses Drop Charge, from the 2D iOS and tvOS game guide. Since you will be submitting software tests to Apple for review of beta applications, you should include your project as a whole.
This guide assumes that your app is set up for licensing and has an app ID generated in both the Developer Portal and iTunes Connect .
This setting is out of the scope of this guide, but you can get all the information you need by submitting and pushing the app to the App Store.
Submit the completed version of the app to iTunes Connect
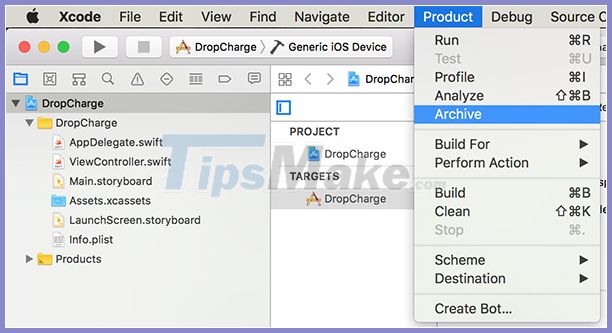
Open the project in Xcode, make sure you have the correct Bundle Identifier, Team ID and Release Code Signing Identity installed properly.
Select Generic iOS Device :

Then choose Product> Archive :
If the application completes well, Xcode will open the Organizer window with your application under the Archives tab. Click Upload to App Store .
Then, Xcode will prompt you for App Store distribution options. Xcode ticks all options by default. Leave them as they are and click Next :

The next window asks you to distribute the login options. You can choose to sign in automatically or choose to manually confirm distribution and licensing profiles. Select the relevant ones and click Next .
Once Xcode completes its work, it will display a summary page for the app you're about to submit. Click Upload .
Your app will start uploading to iTunes Connect. Xcode displays various messages as it compiles, verifies, and authorizes the application. When the upload is finished, you'll see the following message:

Click Done .
That's all there is to it on Xcode. Your beta build is now available on iTunes Connect, and that's where you'll do the rest to set up TestFlight.
Add app testers
Your build is ready for commissioning, but who will test it?
Apple identifies two test suites for TestFlight:
- Internal Tester : This is an iTunes Connect user who can be admin, app manager, legal, developer or marketer for access to the app.
- External Tester : This is any external user who wants to test the application. These people do not have access to the iTunes Connect account in any way, they can only download and install apps. You can add up to 10,000 external testers.
Before an outsider can test an app, you must submit it to Apple for review, the same way you would submit a regular app on the App Store. These reviews are usually faster than normal app reviews, but don't trust too much either. Once approved, you can let outside people test your application.
Internal testers, on the other hand, are immediately notified of new builds as soon as they are uploaded and processed in iTunes Connect. If you want more control over uploaded builds, consider the external testing team.
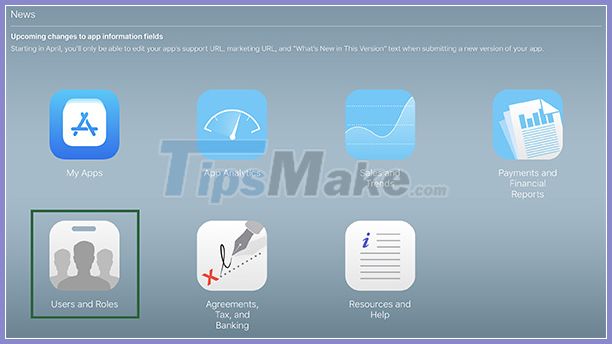
To add an internal tester, go to User and Roles in iTunes Connect:
Click the plus sign + to add a new person:
 Click the plus sign + to add a new person
Enter the new person's information, use an authorized email address and click Next :

Now you need to assign roles to new users. View privileges for each role by clicking the question mark? and choose the appropriate role. You can also limit access to an app through the Apps menu or keep the default All Apps access .
If you're not sure which role to choose, use Application Manager which allows for beta test management and the ability to download apps. After setting up a new user, click Next .
Select the type of notifications you want new testers to receive, then click Save :

iTunes Connect will send an invitation to a new user and notify that user first that he or she needs to verify his or her email address before the account shows up in iTunes Connect. Go to your inbox, find the email called Welcome New iTunes Connect User , click on and activate your account. After completing the process, the new user will be enabled on iTunes Connect and become an internal tester. Creating an internal beta tester is just the first part of the process. The other step is to invite this particular tester to check out your latest build.

Was this article helpful?
Your feedback helps us improve.
Related Articles
 Instructions on using TestFlight to install beta apps on iPhone.7 minutes read
 TestFlight will be updated with a new interface later this year3 minutes read
 Check out iOS 13 beta 1 with iOS 12.3.1, the speed is twice as fast as Apple introduced?2 minutes read
 What is Photoshop Beta? What can Photoshop Beta do?5 minutes read
 iOS 8.2 Beta has appeared and allows programmers to download1 minutes read
 How to use the Outlook.com Beta version6 minutes read
Reader Comments 0
Sign in with email or Google to join the discussion.