How to use AWS DynamoDB in a Node.js application
One of the solutions that Amazon Web Services (AWS) offers is DynamoDB, a tool that revolutionizes data management.
Table of Contents
Let's build this sample app together to see how easy it is to explore the database.
Most modern application development requires a combination of powerful programming languages and databases.
One of the solutions Amazon Web Services (AWS) offers is DynamoDB , a tool that revolutionizes data management. Using it, you can quickly provision a database to handle large amounts of different data.

What is DynamoDB?
AWS provides services for different database needs, such as Amazon RDS for relational databases, DocumentDB for document databases (e.g. MongoDB). DynamoDB is a NoSQL database for storing data in key-value format.
DynamoDB can process large amounts of data across distributed infrastructure without compromising performance, durability, or reliability. It provides a flexible model, allowing you to easily store and query data, whether it is structured or unstructured.
You can use DynamoDB as a database for different types of applications, even directly accessing it from the AWS web console and programming via AWS-CLI, or from a web application using AWS-SDK.
Instructions for using DynamoDB in Node.js
There are many backend API building tools in Node.js and you are free to choose the database for the API when working with any of them. Node.js provides extensive support for external services, including databases like AWS DynamoDB.
All you need to do to access AWS services from your Node app is the aws-sdk client package for this service. For example, to access DynamoDB, you need to install the client-dynamodb package in aws-sdk .
Run this command in the project directory to install the package:
npm install @aws-sdk/client-dynamodbAfter installing aws-sdk/client-dynamodb in your Node.js project, you need to add the DynamoDB table area to the configuration before interacting with it. You will do this when you initialize the DynamoDB client.
If you have installed and used AWS-CLI on your computer before, you may have set up AWS credentials in your programming environment, and the SDK will automatically pull values from this environment.
However, if you don't have one, you can go to the AWS Identity Access Management (IAM) service in the console and create a new user. After creating a user, you can get the access key ID and secret key as personal authentication information.
Add these credentials to the environment by running the following terminal command for your platform:
On Unix, Linux or macOS:
export AWS_ACCESS_KEY_ID='your access key ID' export AWS_SECRET_ACCESS_KEY='you secret access key'On Windows (CMD):
set AWS_ACCESS_KEY_ID='your access key ID' set AWS_SECRET_ACCESS_KEY='you secret access key'On Windows (PowerShell):
$env:AWS_ACCESS_KEY_ID='your access key ID' $env:AWS_SECRET_ACCESS_KEY='you secret access key'Then, go back to the Node.js project, create a new file and name it dynamodb.js. In this file, create an AWS DynamoDB client with the following code:
const { DynamoDB } = require('@aws-sdk/client-dynamodb') const region = "us-east-1" // Khu vực ưu tiên của bạn const client = new DynamoDB({ region })Pretty simple! AWS ensures that you do not reveal any security information in your code, so while the above code tries to create a new client, it first reads the access key and secret key from your environment.
The newly-created client allows you to perform various operations, such as creating tables, reading & writing data.
DynamoDB is a schema-less database, like other NoSQL databases, so you can always add new attributes (fields) to the table at any time. This is why you only need to add the primary key attributes to the DynamoDB table when creating it.
Try the following code to create a new table ( Customer ) in DynamoDB:
const createCustomerTable = async () => { const params = { TableName: "Customer", AttributeDefinitions: [ { AttributeName: "Email", AttributeType: "S" }, ], KeySchema: [ { AttributeName: "Email", KeyType: "HASH" } ], ProvisionedThroughput: { ReadCapacityUnits: 5, WriteCapacityUnits: 5 } }; client.createTable(params, (err, data) => { if (err) { console.log(err); } else { console.log(data); } }); } createCustomerTable();The AttributeDefinitions field is where you define the table's key attributes and their types. The Email property here has type S. That means this field takes a String as its value. The three available attribute types are S , N and B (String, Number, and Binary).
You need KeySchema to identify primary keys, helping to find and organize items quickly. DynamoDB expects the attributes you add when creating the table to be the primary attribute, so Email is the primary key here. You must add it to KeySchema and determine its KeyType (HASH).
The other available KeyType value is RANGE , which is used for categorical keys. Sorting keys are useful in situations where you may have data with the same HASH key in a table. If you want to group them by some additional data like date or color, you can make the additional data a RANGE key .
The third important parameter in the above code is ProvisionedThroughput . This is where you define the number of reads and writes you want DynamoDB to allow to be performed on the table per second.
When running the above code, you will receive the following result:
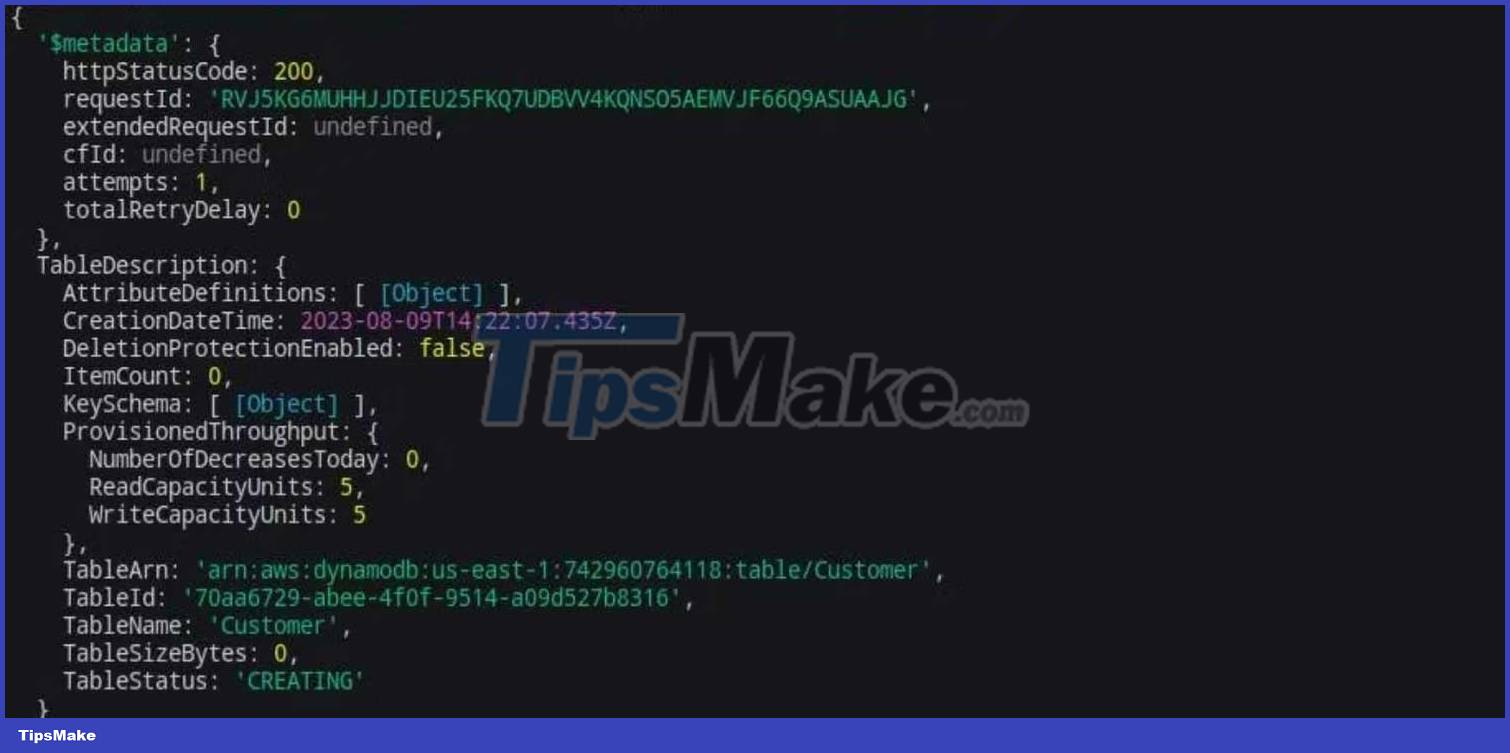
If you check the DyanmoDB panels in the web console, you will see that the panel is still provisioned or in an active state .
After ensuring the table is live, you can proceed with CRUD operations on it.
Here is some sample code, showing you how to write and read data from the Customer table .
1. Add data to the table . To write data to a table, you need the client's putItem method. The code below adds a new customer to the Customer table in DynamoDB .
const createCustomer = async (customer) => { const params = { TableName: "Customer", Item: customer } client.putItem(params, (err, data) => { if (err) { console.error(err) } else { console.log(data) } }) } const customerData = { Name: { "S": "Timilehin O." }, Email: { "S": "timtim@example.com" }, Age: { "N": "18"}, Country: { "S": "Nigeria" } } createCustomer(customerData)The params object contains TableName which is the table you are writing to, the Item field contains the data you are adding with specific types. Notice the new fields are not in the original table, which shows how flexible DynamoDB is. You can view data in the database in the console like this:

2. Read data from the table . DynamoDB allows you to read data in many different ways. The SDK's scan function reads the entire table, while getItem only reads specific data. For example, the code below has all customers:
const getAllCustomers = async () => { const params = { TableName: "Customer" } const customers = await client.scan(params) console.log(customers) }While the following code gets users by email value:
const getCustomerByEmail = async (email) => { const params = { TableName: "Customer", Key: { Email: { "S": email } // the type is always required } } const customer = await client.getItem(params) console.log(customer) } getCustomerByEmail("timtim@example.com")3. Update data in the table . To update existing data in a table, use the SDK's updateItem function . The following code illustrates how to update a specific record:
const updateCustomerLocation = async (email, age) => { const params = { TableName: "Customer", Key: { Email: { "S": email } }, UpdateExpression: "SET Age = :newAge", ExpressionAttributeValues: { ':newAge': { "N": age } }, ReturnValues: "ALL_NEW" } const updatedCustomer = await client.updateItem(params) console.log(updatedCustomer.Attributes) }You can also choose to create functions dynamically by building data update expressions from the update data. DynamoDB 's flexibility allows you to handle any operation as needed.
4. Delete data from table . To delete records from DynamoDB, you need the deleteItem function and the key of the specific record. Here's how to implement it:
const deleteCustomer = async (email) => { const params = { TableName: "Customer", Key: { Email: { "S": email } } } client.deleteItem(params, (err, data) => { if (err) { console.error(err) } else { console.log("Customer deleted successfully") } }) } deleteCustomer("timtim@example.com")Above is everything you need to know about how to use DynamoDB in Node.js, hope the article is useful to you.
Was this article helpful?
Your feedback helps us improve.
Related Articles
 What is Node.js?4 minutes read
 How to compress and decompress files in Node.js6 minutes read
 How to install NVM on Debian7 minutes read
 How to Install Node.Js on Windows3 minutes read
 How to close the application on Android3 minutes read
 How to fix application errors that cannot be opened on iOS 113 minutes read
Reader Comments 0
Sign in with email or Google to join the discussion.