How to uninstall BlueStacks, completely remove the Android emulator from your computer or laptop.
BlueStacks is an Android emulator that allows users to install Android apps and games on their computers. However, for some reason, you might want to uninstall BlueStacks and stop using it, but don't know how? You can refer to the instructions on how to uninstall BlueStacks here.
Table of Contents
Currently, most users install Bluestacks to use applications and games on their computers. This is because computer operations are often faster than on a phone, and the larger screen also provides better display quality. However, if you're tired of Bluestacks and want to uninstall it , please refer to the content below for more details.
How to uninstall/remove BlueStacks
Instructions on how to completely uninstall BlueStacks on Windows
Download Bluestacks software
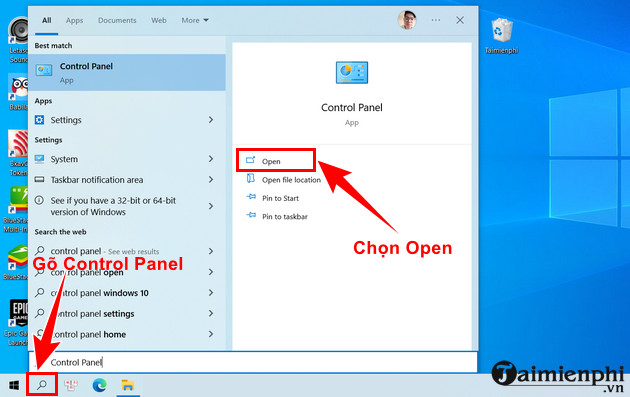
Step 1: Access the Control Panel by clicking the Windows icon or the magnifying glass icon, then typing "Control Panel" and selecting "Open" .
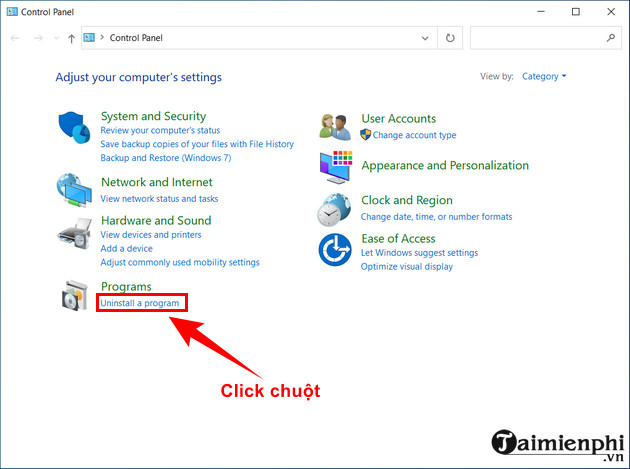
Step 2: Here, find the Programs section => Select Uninstall a program .
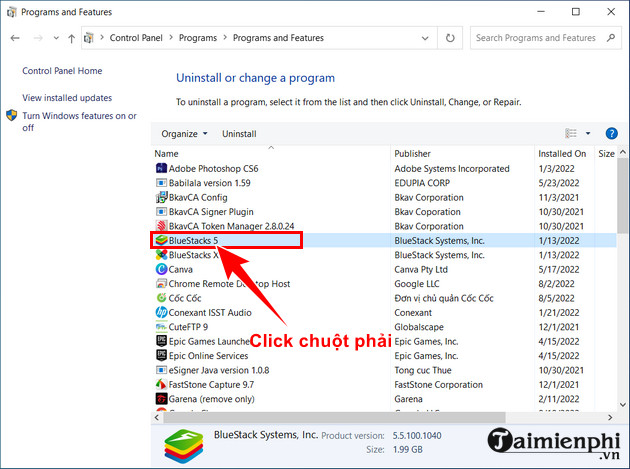
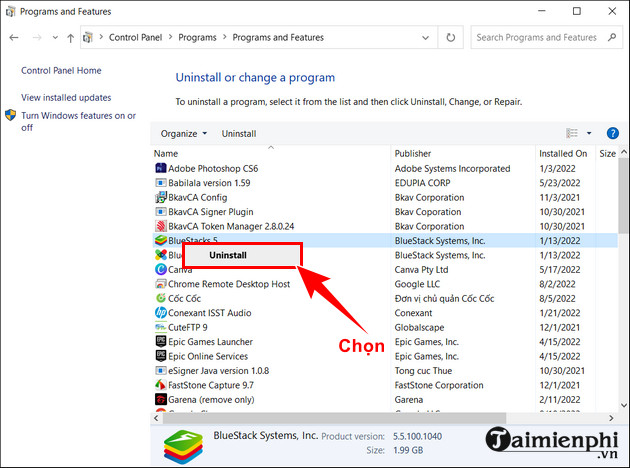
Step 3: When the Programs and Features section appears, find and select BlueStacks, then right-click on the application.
Step 4: Click Uninstall to remove BlueStacks from your computer.
Step 5: Next, navigate to the following paths and delete any files inside (if present).
- C:Program Files (x86)BlueStacks or C:Program FilesBlueStacks
- C:ProgramDataBlueStacks
- C:ProgramDataBlueStacksSetup
Finally, restart your computer to complete the process.
So, with the steps above, you have completely uninstalled Bluestacks on Windows. Actually, after uninstalling it as usual, you can use CCleaner to automatically delete junk files instead of manually searching for the paths as described above. Refer to CCleaner for more details on cleaning your computer .
If you've uninstalled BlueStacks from your computer and want to install another Android emulator, you can consider options like Droid4X, Nox App Player, or Koplayer. These are highly-rated programs (only slightly better than BlueStacks) for emulating the Android operating system on a computer. Droid4X boasts fast application download and installation speeds, as well as professional program processing performance, although it requires a relatively high-end computer configuration. Meanwhile, Nox App Player and Koplayer are newer emulators with their own strengths, such as exclusive support for certain Android games.
Was this article helpful?
Your feedback helps us improve.
Related Articles
 Speed up tips for BlueStacks emulator software4 minutes read
 BlueStacks is what software? Is it safe?4 minutes read
 Official Android emulator application available on Mac OS X2 minutes read
 Bluestacks - Quality Android emulator software on PC11 minutes read
 Link download Bluestacks 4.260.0.1032: Android emulator software on PC3 minutes read
 Steps to root BlueStacks emulator on PC2 minutes read
Reader Comments 0
Sign in with email or Google to join the discussion.