How to specify a CPU core in Linux with Taskset
Sometimes you need to manually assign CPU cores to programs to get best performance. In Linux, the main tool for this purpose is taskset..
Multi-core processing can have many benefits and drawbacks. Sometimes you need to manually assign CPU cores to programs to get best performance. In Linux, the main tool for this purpose is taskset. This may sound intimidating, but we'll break it down into steps to simplify the process.
Basic knowledge of taskset
The use of taskset can be divided into two parts: The CPU's relationship with the programs to be started and with the programs that are run. Launching the program is easier, so let's start from there. The launch command looks like this:
taskset -c number-core-cpu appBefore you enter the number of CPU cores you want to specify, don't forget that the Unix numbering scheme usually starts at 0, so your first core will be 0, the second core will be 1, and so on. Dual core will have cores 0 and 1, while the quad core machine will have cores 0, 1, 2 and 3.
Let's say you want to run Audacity on a dual core system and you want it to run on a second core. The command would be:
taskset -c 1 audacityUses multiple cores
On one of the test machines, Chrome would sometimes experience drop frames while streaming video, but it would be okay if assigned to 2 cores. If you want to try the same thing on a quad core system and want to assign Chrome to cores 3 and 4, the command would be:
taskset -c 2,3 google-chromeYou don't have to specify the CPU in sequence, you can randomly select any core. Let's say you have a 6-core machine and want to use Chrome on cores 2 and 6. You would enter the command:
taskset -c 1,5 google-chromeYou can also use hyphens to spread an application across several cores. For example, many old programs or system functions will default to on the first core. What if you wanted to leave the first core as empty as possible, while spreading a large application across all the other cores?
Let's say you have an 8 core system and want to run Steam from 2nd to 8th core. That command would be:
taskset -c 1-7 steamChange the cores for an already launched program
Taskset isn't just limited to app launch. You can also change the CPU cores for a running program. Before you can change the core of an application, however, you need to know the application's process ID (PID for short) first.
To find out your application's PID, you can try using the desktop's System Monitor tool, but the fastest way is to use the top.
topThe names of all running commands are located on the right side of the screen. The corresponding process IDs are on the left.
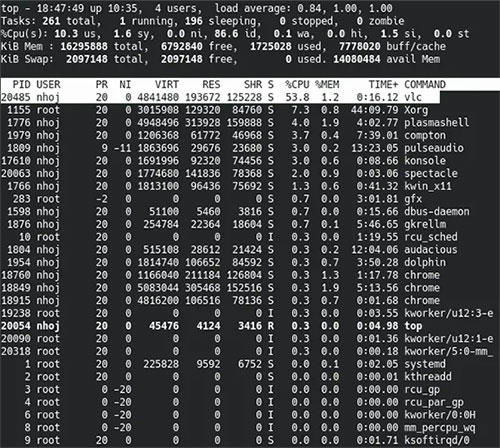
Jot down the PID as you'll use it in a moment. For this example we'll be using VLC, which is playing a high definition Matroska video on an old 6-core PC. Different CPU cores are being tested to get the best performance out of VLC.
To change the core for an existing process, the syntax looks like this:
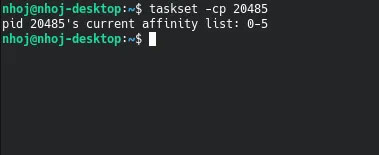
taskset -cp core-numbers PIDAs you can see in the screenshot above, VLC's progress ID is 20485. For example we will try running VLC on 4th, 5th and 6th core, under Unix numbering it would be 3-5. So the command would be:
taskset -cp 3-5 20485But what if you want to test the existing core before changing it? To do that, don't enter any number of cores and taskset will tell you which core is specified. The command changed to:
taskset -cp 20485It shows that VLC is spread across all cores.
Try it again with another program. Suppose the example runs a large Matroska with SMPlayer instead and SMPlayer has been launched. Top said the PID was 16058.
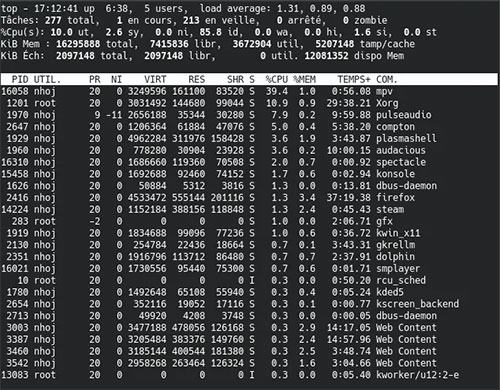
But first we want to know its existing core. Using the command with the -cp switch but without the number of cores, you can see the program is spreading across all cores.
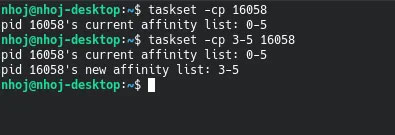
Now, you can try extending SMPlayer on 3 cores just like testing VLC with the command:
taskset -cp 3-5 16058