Table of Contents
This guide explains how to merge Multiple Photos into a Photo Frame in Photoshop, with clear steps, practical tips, and important checks before you begin.

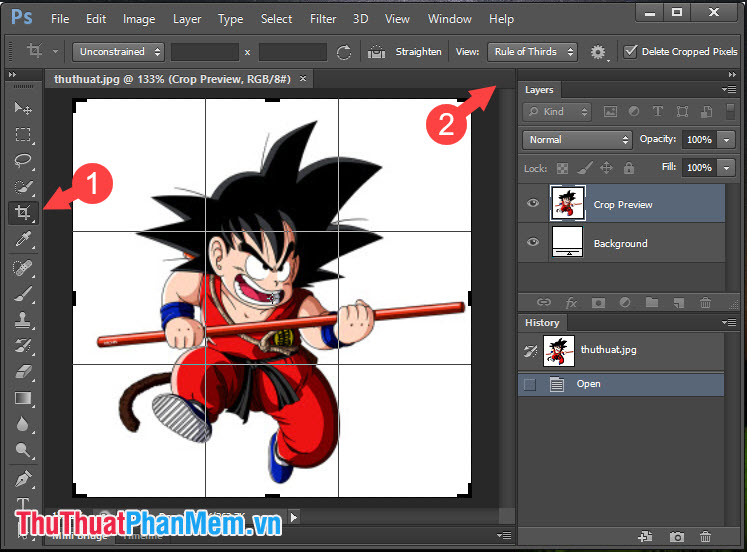
To stitch multiple photos into a Photoshop frame, we use the Crop Tools. Proceed as follows.
Step 1: Open the image you need to stitch in Photoshop and press the shortcut C or click on the Crop Tools (1) . Next, you extend the image area (2) to create more space to insert new photos.
Step 2: You drag and drop the image to be inserted in the image folder into the working screen of Photoshop. If the image is not in the desired position, press Ctrl + T and move the image area to the desired location.

Step 3 : After inserting the image, if there is still space to insert more photos, we just need to drag and drop the image and align. If there is not enough space, use the Crop Tool and expand the area as Step 1 .

Step 4: We continue dragging and dropping to add photos into Photoshop.

And after finishing, we will have a complete picture frame with collages inside. If images are messy, go to each image layer and press Ctrl + T to edit the layout.

By combining multiple photos into one photo frame in Photoshop, we can easily create photos to your liking. Good luck!
FAQ
What should I know about Merge Multiple Photos into a Photo Frame in Photoshop?
Focus on the key features, requirements, limitations, and practical use cases explained in this guide.
How do I get the best results with Merge Multiple Photos into a Photo Frame in Photoshop?
Follow the recommended steps, use current software or information, confirm compatibility, and review settings before major changes.
Are there any risks or limitations?
Potential limitations depend on compatibility, data quality, cost, privacy, support, and how the product or method is used.
Related Articles
 How to Merge Multiple Photos into One Frame in Photoshop7 minutes read
 Merge Multiple Photos into One Common Frame Using GIMP5 minutes read
 How to Make a Photo Frame in Photoshop4 minutes read
 How to Combine Multiple Photos into One Photo Frame on Your Phone4 minutes read
 How to Merge Photos into the Frame on Paint4 minutes read
 How to Combine Photos into the League of Legends Game Rating Frame5 minutes read
Reader Comments 0
Sign in with email or Google to join the discussion.