How to control LED brightness on Raspberry Pi using PWM
If you're interested in making a blinking LED light on your Raspberry Pi, wait until you know how to control its brightness! This tutorial will work with a pair of buttons to adjust the brightness of the LEDs on the Raspberry Pi.
Table of Contents
If you're interested in making a blinking LED light on your Raspberry Pi, wait until you know how to control its brightness! This tutorial will work with a pair of buttons to adjust the brightness of the LEDs on the Raspberry Pi.
If you're just starting your first Raspberry Pi project, here's how to quickly install an operating system for Raspberry Pi on your device.
What does PWM do with LEDs?
PWM, or Pulse Width Modulation, is a method of artificially reducing the output voltage of the GPIO (General Purpose Input/Output) pins of the Raspberry Pi. Dummy means you're not actually reducing the voltage but just turning it on and off so quickly that the overall voltage becomes lower than the actual voltage you're applying.
For LED or Light-Emitting Diode lights, increasing the overall voltage will make the light brighter, while decreasing the voltage will make the light dimmer. But because Raspberry Pi does not have analog output, the article is using PWM to control the brightness of the LED.
Necessary things
- 2 buttons
- 3 resistors (250-550Ω will work. Use lower rating if LED is too dark)
- 1 LED light (any color)
- Jumper wire
- Raspberry Pi (any model except Pi Pico)
How to use PWM to control LED brightness on Raspberry Pi
This tutorial is using two buttons to make the LED brighter or dimmer with PWM. Pressing the 'brighter' button will increase the PWM output, while pressing the 'dimmer' button will decrease the output.
Prepare the circuit
1. Let's start with LED lights. On the breadboard, place the LED and connect a resistor on one side. The side the resistor is placed on does not matter.

2. Connect a jumper to the cathode side. This will point to pin 11 on the Raspberry Pi. Add another jumper leading to the blue line on the breadboard, then add another jumper from that blue line to pin 9 on the Raspberry Pi, which is GND.

Note : To find the correct pin number on the Raspberry Pi, hold the board so that the GPIO pin tray is on the right side. The top left pin should be pin 1, the right one should be pin 2, and the bottom one should be pin 3.

3. You will need to build the buttons. Place the buttons on the breadboard and add a resistor to one pin of each button. The other side of the resistor will lead to the blue line of the breadboard.
4. Add the jumper wire in a parallel connection to the resistor and button. Connect the other end of these pins to pins 13 ('Brighter' button) and 15 ('Dim' button).
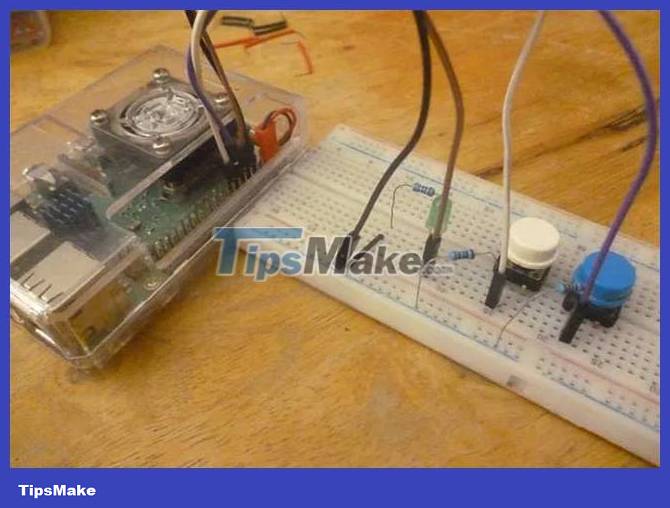
5. Use jumper wires to connect the side buttons to the red line of the breadboard.

6. Connect the red line to the 3.3V source on the Raspberry Pi, like pin 1.
If Python is your programming language, learn how to install and manage multiple versions of Python in Linux.
Prepare code
In your favorite code editor, create a new file and save it as 'rpi-lcdpwm.py'.
1. Start with the code below, which gives you two ways to import modules on Python: The first imports the module RPi.GPIOand allows you to call it just by GPIOand the second only imports functions sleep()from the entire module time.
import RPi.GPIO as GPIO from time import sleep2. Determine the number of pins to make changes easier in case you change your mind later.
ledPin = 11 brightenButton = 13 dimButton = 15 3. Optional : Add a line GPIO.setwarnings(False)so you can avoid the GPIO warning message when starting the script later.
4. Set the pin selection method. BOARDis a good choice for beginners, as it makes finding pins easier without having to refer to pinouts. The other method is BCM, short for 'Broadcom', which uses the Broadcom numbers assigned to each pin, which can vary depending on the model of Raspberry Pi.
GPIO.setmode(GPIO.BOARD)5. Assign GPIO pins as input or output. The article is specifying ledPinas an output pin and will always start in state LOW. The next two lines set BrightButtonand dimButtonmake input pins, listening for your button presses. They must also be set GPIO.PUD_DOWNto specify the use of a pull-down resistor.
GPIO.setup(ledPin, GPIO.OUT, initial=GPIO.LOW) GPIO.setup(brightenButton, GPIO.IN, pull_up_down=GPIO.PUD_DOWN) GPIO.setup(dimButton, GPIO.IN, pull_up_down=GPIO.PUD_DOWN)6. Please declare PWM. pwmLEDPinis a variable that makes it easy to enter GPIO.PWM(ledPin, 100)later and the command .start(0)to start the PWM process. Now, you can change the output of ledPinusing PWM.
pwmLEDPin = GPIO.PWM(ledPin, 100) pwmLEDPin.start(0)7. Duty cycle is the percentage of time that the pin is active during a pulse wave. Here, the example is setting the duty cycle to 100% first.
dutyCycle = 100 GPIO.output(ledPin, GPIO.HIGH)8. As for the loop part, the article is setting up a loop that whileruns almost forever.
while True:9. When this iteration begins, the duty cycle is also updated.
pwmLEDPin.ChangeDutyCycle(dutyCycle)10. Program the function of brightenButton. When the Raspberry detects current flowing through the pin brightenButton, it displays a message stating 'brightenButton is HIGH', adding 5 to the current value of the duty cycle until it reaches 100.
if GPIO.input(brightenButton) == GPIO.HIGH: print("brightenButton is HIGH") if dutyCycle < 100: dutyCycle += 5 sleep(0.25) else: dutyCycle = 10011. When programming functions dimButton, do the opposite, reduce the value by 5 until it reaches 0.
elif GPIO.input(dimButton) == GPIO.HIGH: print("dimButton is HIGH") if dutyCycle > 0: dutyCycle -= 5 sleep(0.25) else: dutyCycle = 0Final code
import RPi.GPIO as GPIO from time import sleep ledPin = 11 brightenButton = 13 dimButton = 15 GPIO.setwarnings(False) GPIO.setmode(GPIO.BOARD) GPIO.setup(ledPin, GPIO.OUT, initial=GPIO.LOW) GPIO.setup(brightenButton, GPIO.IN, pull_up_down=GPIO.PUD_DOWN) GPIO.setup(dimButton, GPIO.IN, pull_up_down=GPIO.PUD_DOWN) pwmLEDPin = GPIO.PWM(ledPin, 100) pwmLEDPin.start(0) dutyCycle = 100 GPIO.output(ledPin, GPIO.HIGH) while True: pwmLEDPin.ChangeDutyCycle(dutyCycle) if GPIO.input(brightenButton) == GPIO.HIGH: print("brightenButton is HIGH") if dutyCycle < 100: dutyCycle += 5 sleep(0.25) else: dutyCycle = 100 elif GPIO.input(dimButton) == GPIO.HIGH: print("dimButton is HIGH") if dutyCycle > 0: dutyCycle -= 5 sleep(0.25) else: dutyCycle = 0Make the code work
First, you will need a terminal. You can use the Raspberry Pi's built-in terminal or control the Raspberry Pi via SSH on a separate computer. Through the terminal, you should go to the directory of the Python script and enter python3 rpi-ledpwm.pyor the filename you used.
Sometimes the LED light looks like it's flashing. The PWM frequency may be too low, if that is the case. You can increase the frequency by increasing the number pwmLEDPin = GPIO.PWM(ledPin, 100)until you no longer see the flicker.
If you find the transitions grainy, reduce the time sleep(0.25)inside the loop while. However, the conversion process will be faster as you lower this time level, so don't lower it too much.
Was this article helpful?
Your feedback helps us improve.
Related Articles
 Top 5 best screen brightness control apps on Android7 minutes read
 Instructions to adjust the screen brightness of Android phones4 minutes read
 6 Best Multi-Monitor Brightness Control Software for Windows8 minutes read
 How to Control the Brightness of Your Computer With Windows 74 minutes read
 7 great ideas using Raspberry Pi as a server6 minutes read
 How to add an ADC to Raspberry Pi: What you need to know9 minutes read
Reader Comments 0
Sign in with email or Google to join the discussion.