How to move Home Assistant server from microSD card to SSD
You can quickly move your existing Home Assistant server from a microSD card to an SSD and boot Home Assistant on Raspberry Pi 3 or 4 from there.
Table of Contents
If you use a Raspberry Pi for a Home Assistant server installed on a microSD card, you may start to experience performance issues as you add more things and install or run multiple add-ons, such as Plex media server or Samba, or use it as an NVR (Network Video Recorder).
However, you can quickly move your existing Home Assistant server from a microSD card to an SSD and boot Home Assistant on a Raspberry Pi 3 or 4 from there. This option will be much faster and more reliable, and SSDs offer greater capacity at a significantly lower price than SD cards of the same performance.
Methods to move Home Assistant server from SD card to SSD
There are two reliable ways to move your Home Assistant server from microSD card to SSD.
1. Backup, reinstall and restore the Home Assistant server.
2. Create a Home Assistant server image and write it to the SSD.
3. You can use an external or internal SSD (in a USB enclosure) of any size. The example is using a Samsung 500 GB SSD to run the Home Assistant server because the server is also used as a surveillance NVR to record CCTV footage from IP cameras based on motion. Both NVMe and SATA SSDs will work as long as they have a USB port to connect to.
Additionally, you must enable USB boot on the Raspberry Pi 3 or 4 that you are using for your Home Assistant server.
Below, the article will guide you in detail on both methods to help you move Home Assistant or any other server or operating system from SD card to SSD completely and without any risk of loss. any data. Make sure to follow either of these methods in the order available.
Method 1: Backup, reinstall, and restore Home Assistant
This is the recommended method to move Home Assistant server from microSD card to SSD. This method includes three steps.
Step 1: Create a backup of the Home Assistant server
On your Home Assistant server, go to Settings > System > Backups and click the Create Backup button .
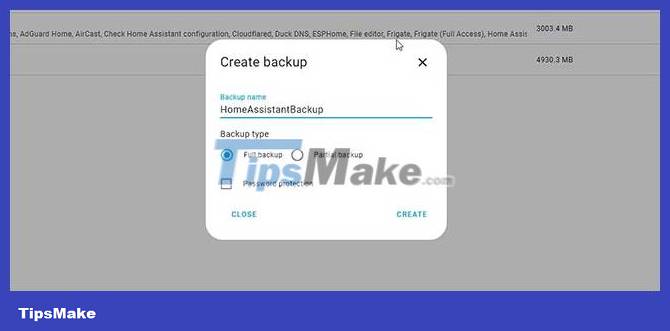
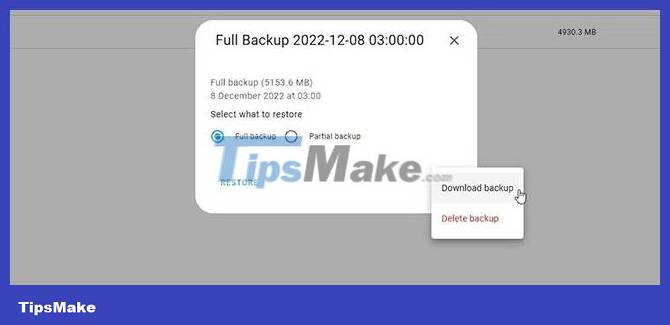
Enter a name for the backup, select the Full backup option and click Create. Wait for the backup to be created. This may take a while to complete. When the backup process is complete, click on the name of the backup and then click on the three dots, select Download backup.
This will download the Home Assistant backup to your local storage.
Step 2: Flash image Home Assistant on SSD
Download the same version of Home Assistant running on a microSD card and use the Raspberry Pi Imager tool to flash the image to the SSD.
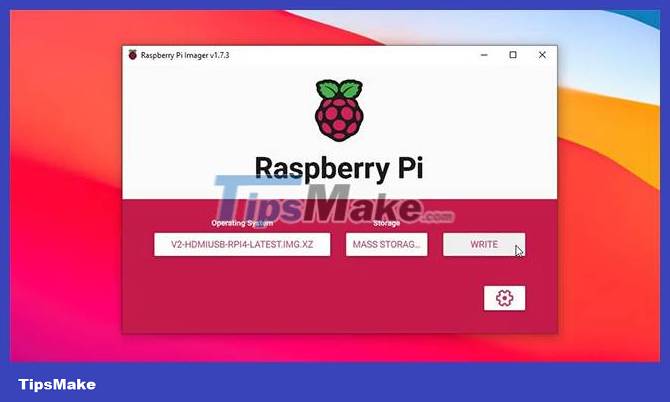
1. Launch the Raspberry Pi Imager tool
2. Select the Home Assistant OS image in Choose OS , the connected SSD in Choose Storage and click Write.

3. Connect the SSD to the USB port of Raspberry Pi 3 or 4 and connect the power source.
4. If you have enabled USB boot on the Raspberry Pi, Home Assistant will boot from the connected SSD. Since it's the first boot, it will take a while to complete.
Step 3: Restore the backup
When the Home Assistant installation is complete on the SSD, you will see the option: "Alternatively, you can restore from a previous snapshot" .

Click on it and then select the backup that you downloaded on your local storage. Click Restore Selected . The backup will upload to your Home Assistant server running on SSD and restore it. During this process, your server will be offline for a while. This process may take a few minutes based on the size of the Home Assistant backup, so sit back and relax.
When the server is restored, the web interface will automatically load. At this stage, you have successfully migrated the Home Assistant server running via microSD card to SSD.
Method 2: Create a Home Assistant image from the SD card and burn it on the SSD
You can copy the current Home Assistant server as an image file from a microSD card using the Win32 Disk Imager tool, then flash this image to the SSD using the Raspberry Pi Imager tool. The steps are as follows:
1. Turn off the Raspberry Pi and disconnect the microSD card.
2. Use a card reader to connect the microSD card to the PC.
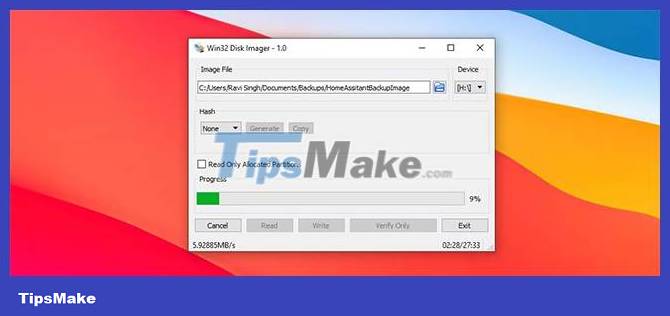
3. Download, install and launch the Win32 Disk Imager tool.
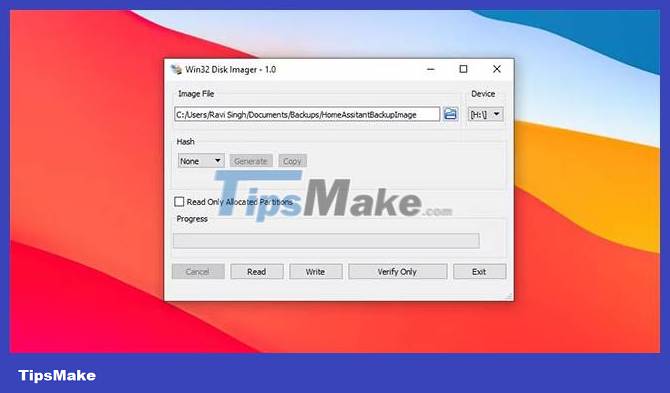
4. Click the folder icon to select the location where you want to save the Home Assistant backup image file. Enter a name for the file and click Open.
5. Select the drive letter in Device options and click Read.
6. The tool will create an image file containing data information and the Home Assistant partition. This process will take a while to complete depending on the size of the microSD card and its reading speed.
7. The estimated time will be displayed in the bottom right corner.
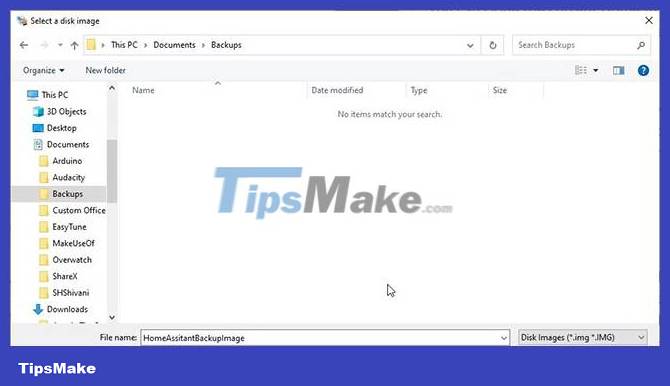
8. Once the image is created, launch the Raspberry Pi Imager tool.
9. Click Choose OS and select the image file you just created.
10. Click Choose Storage and select the connected SSD.
11. Click Write. Confirm if prompted.
12. After the image is written on the SSD, connect the SSD to Raspberry Pi 3 or 4 by activating USB boot and powering on the device.
13. Home Assistant will start and you can continue to use the server normally as if it were running on a microSD card but with larger storage capacity and faster performance.
Was this article helpful?
Your feedback helps us improve.
Related Articles
 7 ways to fix problems with microSD cards10 minutes read
 Top best microSD cards for 2020 devices9 minutes read
 Whoever plays the game is ready to buy HyperX microSD card2 minutes read
 Utilize old computers to build Home Assistant and a free smart home system.6 minutes read
 How to choose the appropriate MicroSD card for Nintendo Switch9 minutes read
 How to choose to purchase microSD card to upgrade Android memory5 minutes read
Reader Comments 0
Sign in with email or Google to join the discussion.