Guide to playing custom maps in Meccha Chameleon
One of the best features of Meccha Chameleon is its player-created maps. Here's how to play custom maps in Meccha Chameleon.
Table of Contents

This process is a bit more complex than simply building a level and hitting the publish button. Custom Meccha Chameleon maps need to be created within the modding toolkit, properly packaged, and prepared in the Steam Workshop before they can be shared with the world.
How to create and upload custom maps to the Meccha Chameleon game.
Open Mod Kit and create a Plugin
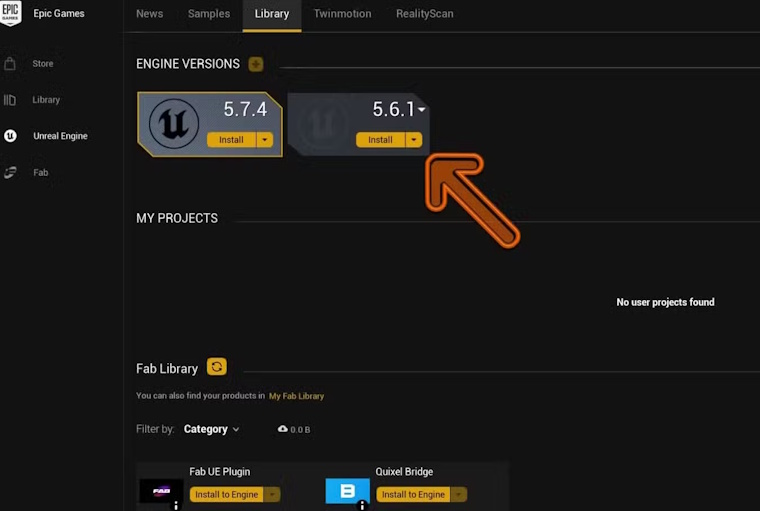
Before you begin, make sure you're using Unreal Engine 5.6.1, as the Meccha Chameleon mod toolkit was built for that version. Open the downloaded plugin. Once you've opened the project, create a plugin that contains only the new content by navigating to Edit > Plugins > Add > Content Only Plugin . Give the plugin a unique name, as you'll need it later during the packaging process.
Create a custom map
Inside your personal plugin folder, create a folder named Maps, then create a new level inside. This level will be the map that Meccha Chameleon loads when the player uses your mod.
Custom maps must use World Partition , and the Enable Streaming option must be disabled in the World Settings menu . These are essential settings for the map to function correctly when packaged.
Go to File > New Level > Basic to start working on a simple grid. Use the Fab plugin to find usable objects and structures.
When designing levels, remember that the player spawns at X=0, Y=0, and Z=100. If you're building a larger environment, it's best to expand outwards from this position. To avoid camera issues, walls and other solid surfaces should use a CameraBlockWall collision profile , so the camera cannot penetrate them.
Map packaging
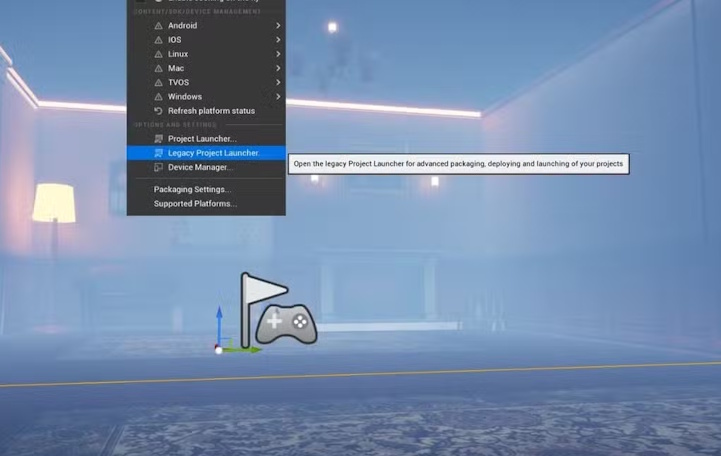
After completing the map, open the Legacy Project Launcher (located on the Platforms button at the top). Here, you need to create two packaging profiles:
- FullGame
- MyMod
The FullGame configuration needs to match the following settings:
- Cook > By the Book > Cooked Platforms : Windows (also select 'Create a release version of the game for distribution' and name it 1.0).
- Package > Package & store locally > Select Is this build for distribution to the public > Select Use container files for optimized loading (I/O Store) .
- Deploy > Do not deploy
For the MyMod configuration, enter the name of the plugin you created in the DLC name field. This tells the project which content should be packaged as a mod.
- Cook > By the Book > Cooked Platforms : Windows (also select Create a release version of the game for distribution and name it 1.0).
- Package > Package & store locally > Select Is this build for distribution to the public > Select Use container files for optimized loading (I/O Store) .
- Deploy > Do not deploy
After configuring, package FullGame first, then package MyMod by clicking Launch this profile . Avoid changing any project settings between these two packaging processes, as doing so may cause packaging errors.
Prepare the Workshop file.
After the packaging process is complete, create a folder to store the files that will be uploaded to the Steam Workshop.
Navigate to the plugin's packaged output folder and copy the .pak, .ucas, and .utoc files generated during the build process. You also need to copy AssetRegistry.bin from the Cooked folder. Finally, create a thumbnail image named Preview.png and place it in the same folder.
After this step, your upload folder will contain the packaged mod files, AssetRegistry.bin and Preview.png . These are the files that Steam Workshop needs to distribute your map.
Set up SteamCMD
Meccha Chameleon uses SteamCMD to upload to the Workshop. Download SteamCMD, extract the files, and launch steamcmd.exe. Once opened, log in using your Steam account credentials.
The modding toolkit includes a Sample.vdf file that serves as the upload configuration. Copy this file and edit the necessary fields. You need to specify the upload folder location, the location of Preview.png, the title of the mod, and its description.
Keep the appid and do not edit the publishedfileid when creating a new upload.
Upload mods to Steam Workshop
After configuring the VDF file, return to SteamCMD and run the command ` workshop_build_item`, pointing to the newly created VDF file. SteamCMD will package the information and upload it to Steam Workshop.
If the upload is successful, your mod will appear on the Steam Workshop and can be registered like any other item on the Workshop. If the upload fails, double-check that all the necessary files are present.
After successfully uploading the mod, your custom Meccha Chameleon map is ready for players to download and enjoy.
How to play custom maps in Meccha Chameleon
From the main menu, click Maps in the bottom left corner of the screen. This will open Meccha Chameleon's Steam Workshop page, where you'll find all the community-created maps.
Browse the list and find a map you like, then click Subscribe on that map's Workshop page. Steam will automatically download the map. Once the download is complete, create a server as usual in Meccha Chameleon, and the new map will be available for you to choose from.
Was this article helpful?
Your feedback helps us improve.
Related Articles
 MECCHA CHAMELEON: PC Control and Shortcut Guide6 minutes read
 The best hiding places in Meccha Chameleon4 minutes read
 How to play Meccha Chameleon for beginners8 minutes read
 Meccha Chameleon: Gameplay Tips for Seeker - Meccha Chameleon Seeker tips6 minutes read
 Meccha Chameleon: Hider Tips - Meccha Chameleon Hider tips6 minutes read
 Meccha Chameleon Hide-and-Seek Game Tips for Beginners - Meccha Chameleon tips6 minutes read
Reader Comments 0
Sign in with email or Google to join the discussion.