Guide to DD-WRT - Part 2: Extending scope with WDS
Network administration - There is a slogan for Vista saying that they will be "wherever you want". However, the experience in the real world is not so .
In the real world, signal propagation may be different, and usually in a multi-room home or a corporate office there are many small rooms that may have weak signal points, or dead spots in tracing. Wireless access.
A wireless distribution system (Wireless Distribution System, or WDS for short), is an easy and economical solution that can expand your wireless coverage. Savings, because you can set up a pair of two inexpensive routers with open source DD-WRT software, including Linux-equipped Linksys WRT54GL and other compatible routers. Easy, because you only need to apply some configuration settings to your routers, creating a repeater to extend the wireless network.

In a fictional house above, 'router 1' is connected to broadband service. It distributes strong wireless signals to a computer on the same floor. However, due to the construction structure and size of the house, its signal is rapidly attenuated on the lower floor. So we have to design a WDS router on the lower layer to raise the signal level for people on the lower floor.
On the second floor, 'router 2' works as a wireless client and access point to receive and replay signals from router 1. There is a bid for WDS - clients associated with router 2 will only receive half of the bandwidth as clients related to router 1.
You can add a third or fourth router to extend WDS even further - but the more routers, the more bandwidth the client will have for the clients.
WDS principles and adjustments
There are several rules for implementing a WDS network. With optimal compatibility, you need to use the same router - or, in this case, the same software, run DD-WRT v23 on both routers.
Both routers must communicate on the same wireless channel. Both must be configured to have the same 802.11 network, B, B / G, or G. A unique G network must use channels 1, 6, or 11.
If you use WPA security, you must set up both routers as the unique G network. DD-WRT does not support WPA2 in WDS. WEP security can be used in an 802.11 B network.
WPA security also requires standards to identify SSIDs for both routers. If you use WEP or are not secure, you can assign different SSIDs to each router. It is possible to control which APs your clients connect to if it has a different SSID - some client managers, such as Wireless Zero Configuration of Windows XP, does not merge APs sharing the same SSID and not the strongest signal roamming.
You need to know.
Before diving into and changing the router's software settings, you need to know some useful information in future use. First, log into the DD-WRT administration interface on router 1, the router is connected to the broadband service.
- DNS address : Click on the Status / Router menu and scroll down to find the Internet section. Here you will see DNS 1, 2, and 3 provided by ISPs. Note that other addresses appear here.
- LAN IP for your Internet-connected router : click Status / LAN and note the IP Address listed below the Local Network .
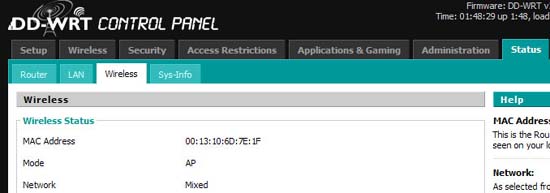
- Wireless MAC ID for each router : click Status / Wireless and note the MAC address at the top of the page. This unique address will distinguish the router. Note this address for each router in your WDS.
Backup settings
Before performing complicated setup steps on the router connected to the Internet, we need to backup its current settings - the setting is currently working properly in case of a new configuration problem. You can then restore the saved settings and access the web again to study your problem.
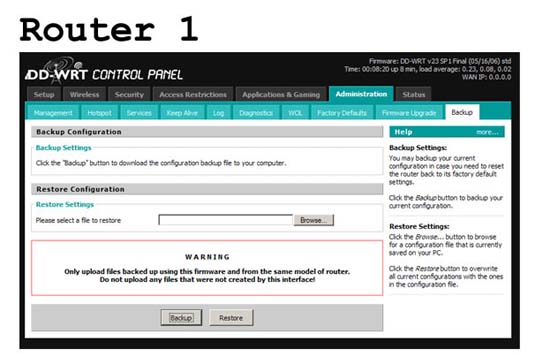
Click Administration / Backup, and then click the Backup button at the bottom of the page. Your browser will save a file. When a problem occurs, you can restore the settings, revisit this page and provide the backup file for the Restore Settings dialog box.
Tips with routers
The easiest way to follow this tutorial is to configure both routers at the same time. Ideally, connect a manual computer or a secondary computer to the second router's administration interface while accessing your main router from the LAN computer.
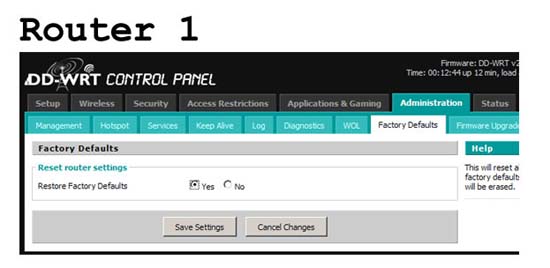
Ideally, you should reset both routers to their original state - just in case a setting somewhere can interfere with WDS. You can restore your routers to factory defaults by clicking Administration / Factory Defaults, and then clicking Save Settings .
Implementation steps
Step 1 : Set the LAN IP address for each router. Click Setup / Basic Setup and navigate to the Network Setup section. Local IP Address for the router, after setting the factory default, will be 192.168.1.1. (The example here uses 192.168.0.1, but it's no different: the first three octets of the IP address must match the network communication nodes.)
Assign a new internal IP address to the second router. The logical option would be 192.168.1.2, or as shown below, 192.168.0.2.
Set up Gateway address for router 2 as Local IP Address for router 1. Here is 192.168.0.1.

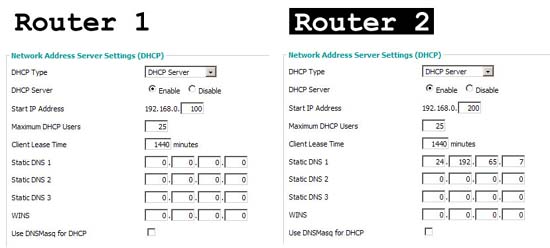
Step 2 : In the same configuration page, go to Network Address Server Settings (DHCP) . We have enabled DHCP servers on both routers, but set them to assign addresses in different ranges. Router 1 will assign addresses starting from 192.168.0.100 to 25 users. Router 2 starts at 192.168.0.200 with 25 other users.
However, you can set these parameters to your liking as long as your address range is not overlapped. With this setting, you can instruct from any client that is related to the access point, based on the current IP address. This is very useful when troubleshooting.
Router 2 needs DNS entries assigned by your ISP. You saved them from before reading the 'You need to know' section above.
Step 3 : Disable Internet connection only on router 2. Click Setup / Basic Setup and under Internet Setup, set the Connection Type to "Disable."
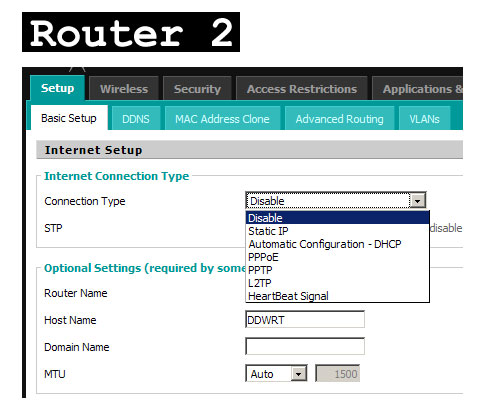
Step 4 : Disable the firewall only on router 2. You don't need to be active now because your second router only circulates traffic to the main router, the main router's firewall will be enabled by default. Running both firewalls at the same time will cause unreliable behavior. So click Security / Firewall and click Disable next to SPI Firewall . Click "Save Settings" at the bottom of the page to save your settings.
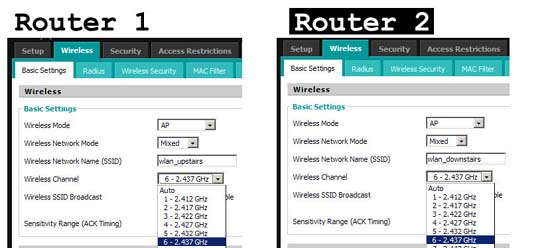
Step 5 : Set up wireless network mode, SSID and channel for both routers. Click Wireless / Basic Settings. Set the Wireless Mode to "AP" for both routers.
Select 'G' network mode if you do not need to support B mode clients. Remember that if you choose B / G or B network only, you cannot use WPA security with WDS, and therefore must use WEP security or skip.
Set the SSID for each router. Remember that if you select G network and use WPA security, the SSID must be the same for both routers. On the contrary, choose different SSID, see shown here. This ensures you can specify exactly which AP - upstairs or downstairs - to connect.
Set up the same wireless channel for both routers - do not select "Auto." If you select the 'G' network, you must use non-overlapping channels: 1, 6 or 11. If there are other non-related wireless networks nearby, you must select a channel that does not conflict with them.
Step 6 : Disable wireless security, even if only temporarily. It is best to launch your WDS and run without security first - few factors need troubleshooting. Click Wireless / Wireless Security and select Security Mode "Disable."

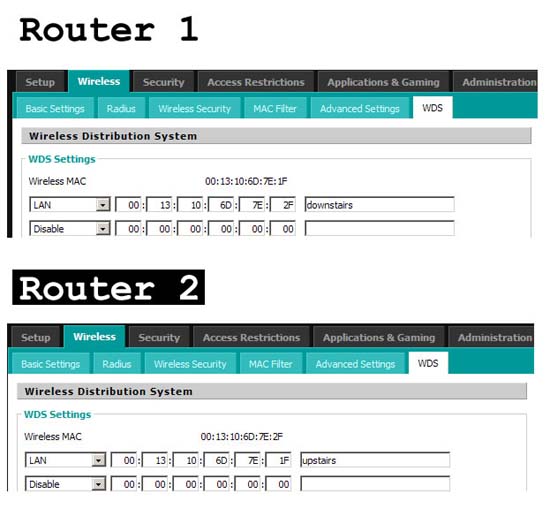
Step 7 : Now we can define WDS associations between two routers. Click Wireless / WDS. This page will display a series of blank items for WDS relationships.
On router 1, define the relationship with router 2. Select "LAN" from the drop-down menu. Enter the wireless MAC address for router 2, the address you saved earlier in the 'You need to know .' section. Optionally, enter the label for this WDS association.
On router 2, repeat the procedure above, enter the MAC address for router 1 and the appropriate label.
Click "Save Settings" at the bottom of the page.
Launch
Your WDS is now ready to work. In the first test, the positions of the two routers are close to each other so there will definitely be good signal strength. Using another computer or mobile computer, you will be able to pair with two routers and access the Internet.
Next, the second router is directed to the farther corners within the scope of the first router. It may need some testing, moving to find the best location for the second router. Ideally, it needs to be close enough to the first router to receive a strong signal, but it must be far enough to extend the coverage of the network.
When confirming that your WDS is working, you can enable wireless security. Need to select the same security protocol parameters for both routers. Remember that WDS on DD-WRT software does not currently support WPA2 but only supports WPA in the 'G' network.
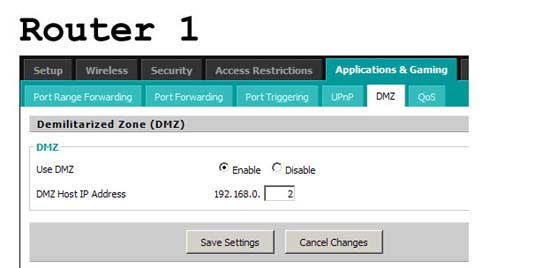
Some users have shown that there is a problem with port forwarding from their main router to wireless clients associated with their second router. If you use port forwarding and experience this problem, try adding a second router to the main router's DMZ. Click Applications & Gaming / DMZ and enter the IP address of the second router, click Enable and "Save Settings".
That is all. Good luck.