Fix problems in shared networks - Part 1
Network Administration - From the urgent issue of not being able to share files between network computers or some simple problem, this two-part series will also cover all aspects of troubleshooting in shared networks. In this article, I will show you how to refresh your network device and verify the shared settings, firewall and router are configured.
Computer problems can sometimes cause frustration - especially network problems and data sharing. Many aspects of network connectivity can cause problems. For example, the settings that you or someone else may have been accidentally but made other users unable to see the files on the network.
Some settings are as simple as not configured correctly. Besides the Windows operating system and the underlying network technology can sometimes generate problems.
No matter what the problem is, in this two-part tutorial, we will summarize the troubleshooting and technical tasks that make computers able to share data with each other. .
We will start by refreshing the network and restarting computers and network devices. Next you need to make sure that the sharing settings, firewalls and routers are properly configured.
Start with the basics
As with other computer problems, problems can be resolved when the device is refreshed . Depending on the problems you are having, restarting the computers and routers can fix your sharing problems.
If you have problems sharing in all networked computers, first try restarting the Router. If the problem only occurs with some computers, restart these computers and see if your operation will make them work again.
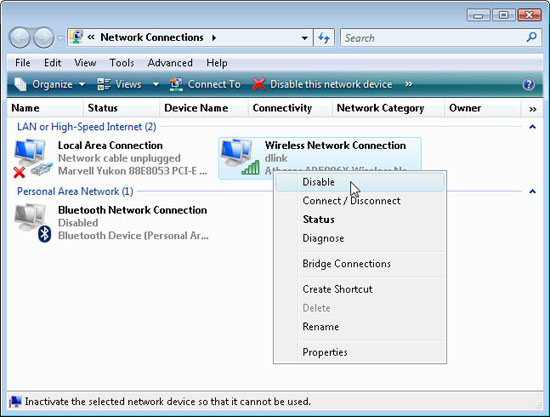
Restarting the router is a simple task, just unplug the power from the wall socket, wait a few seconds then you can plug it back in. With computers, reboot them as you do every day. If you don't like to wait to reboot, you can refresh the network adapter. From the Control Panel or network interface, open the Network Connections window. Right-click your network adapter / connection icon and select Disable (see Figure 1), wait a few seconds, right-click the icon again, then select Enable. This approach can also help you fix the problem in data sharing.

Figure 1
Make sure that the File and Printer Sharing option is enabled
On Windows computers, protocols that share network connections or adapters must be enabled for a certain computer to host and access shared networks. However, firewall configurations and other settings can also be enabled, sharing will not be possible when these protocols are not enabled.
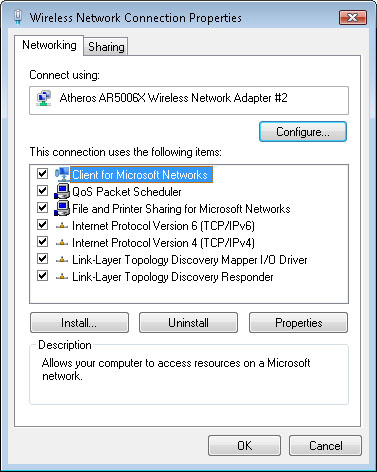
The File and Printer Sharing protocol for Microsoft Networks allows remote users to share on the computer. Client for Microsoft Networks protocol allows computers to have access to other network-sharing data.
You can double-click to see if the sharing protocols are enabled from the network connection properties dialog box, see Figure 2.

Figure 2
From the Control Panel , click Network Connections , right click and a connection and select Properties .
If you get the following error message when trying to activate these protocols, uninstall the adapter from Device Manager, reboot and if required, reinstall your adaper:
"Chọn hiện thời của bạn sẽ gỡ bỏ những phần sau: Client cho Microsoft Networks. Bạn có chắc muốn gỡ bỏ các phần này (s)?"
'Your current selection will disable the following components: Client for Microsoft Networks. Are you sure you want to disable these components? '
Check the firewall
Computers use firewall software to control the type of traffic coming in and out of the network adapter. In addition, to prevent hacking, firewalls can also prevent you from sharing data. Windows Firewall, a Microsoft tool, is automatically configured by Windows when sharing is enabled, but the settings can be changed manually.
If you have any problems sharing on a certain computer, you should re-evaluate its firewall configuration. In addition to Windows Firewall, you need to check the third-party firewall utilities installed with anti-virus and Internet security solutions.
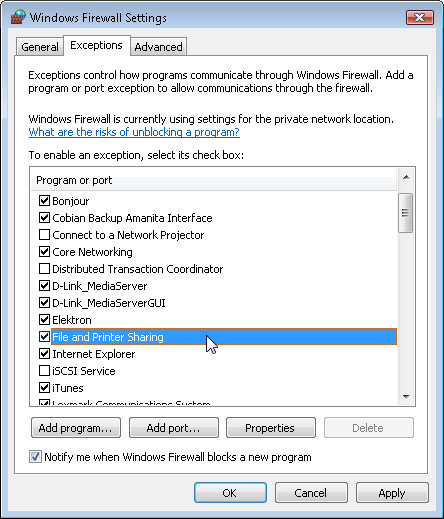
In Windows Firewall, you can access it via the Control Panel (or Network and Sharing Center in Vista), then you will see File and Printer Sharing (see Figure 3). When viewing the Exceptions list, make sure this item is checked.

Figure 3
The exact configuration options for third-party utilities may vary. Some may ask you to define how secure the network is. Some may have the same sharing settings as Windows Firewall. If it requires entering the port number, you need to open UDP 135–139 ports and TCP ports 135–139.
Check sharing settings in Windows Vista
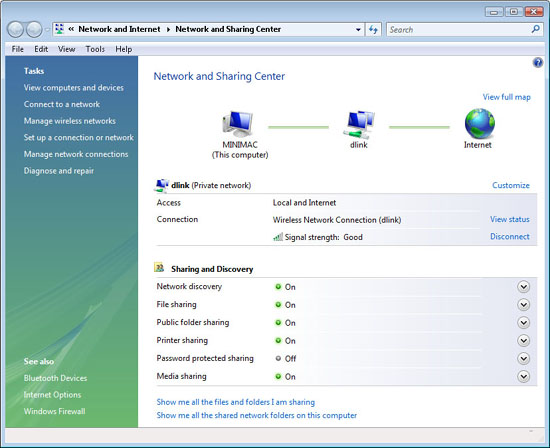
Microsoft has introduced new network settings in Windows Vista, which allow for better management of sharing and connection preferences. You can access these features from the Network and Sharing Center (see Figure 4). To open it, right-click the network icon in the system tray and select Network and Sharing Center .

Figure 4
First you need to make sure that the network is properly classified. Network type (Public or Private) is displayed next to the network name in the Network and Sharing Center.
Please select the network type you want to connect; However, you can change this type of network later by clicking the Customize link.
By default, when in a public network (public), Vista disables sharing. If on a private network, Vista will use the settings you define, which are the Sharing and Discovery settings that you can see below the network connection information. To ensure sharing is possible, at least need to activate the first two options: Network Discovery and File Sharing .
Check the Router settings
Most routers have a feature so you can prevent user-to-user communication, which is very effective in a public network. Hardware vendors produce routers that can use different names for this feature, such as AP isolation, layer-2 isolation and WLAN partition. If this feature has been enabled, the sharing feature will not work.
If you cannot share between computers on the network, check the status and existence of this feature. Start by logging into the Router's page using the IP address. If so, you need to find the feature in advanced or basic wireless settings.
Here we end part one, in part two of this series, we will verify sharing privileges and files (NTFS); Introducing how to manually share and reinstall the adapters and restore the router to its original state when shipped.
( Also )