Common Auto-GPT installation errors and how to fix them
You have an error when installing Auto-GPT on your computer? Here are common Auto-GPT installation errors and how to fix them..
You have an error when installing Auto-GPT on your computer ? Here are common Auto-GPT installation errors and how to fix them .
Installing Auto-GPT on a computer can be a daunting task. Although the installation instructions are simple, the fact that this project is still in development can cause problems during the installation process. In addition, because the logs and documents are quite long, it can confuse non-programmer users when they encounter problems while installing Auto-GPT.
Therefore, the article will summarize for you common errors and ways to fix them when using Auto-GPT on your computer.
Invalid Git executable
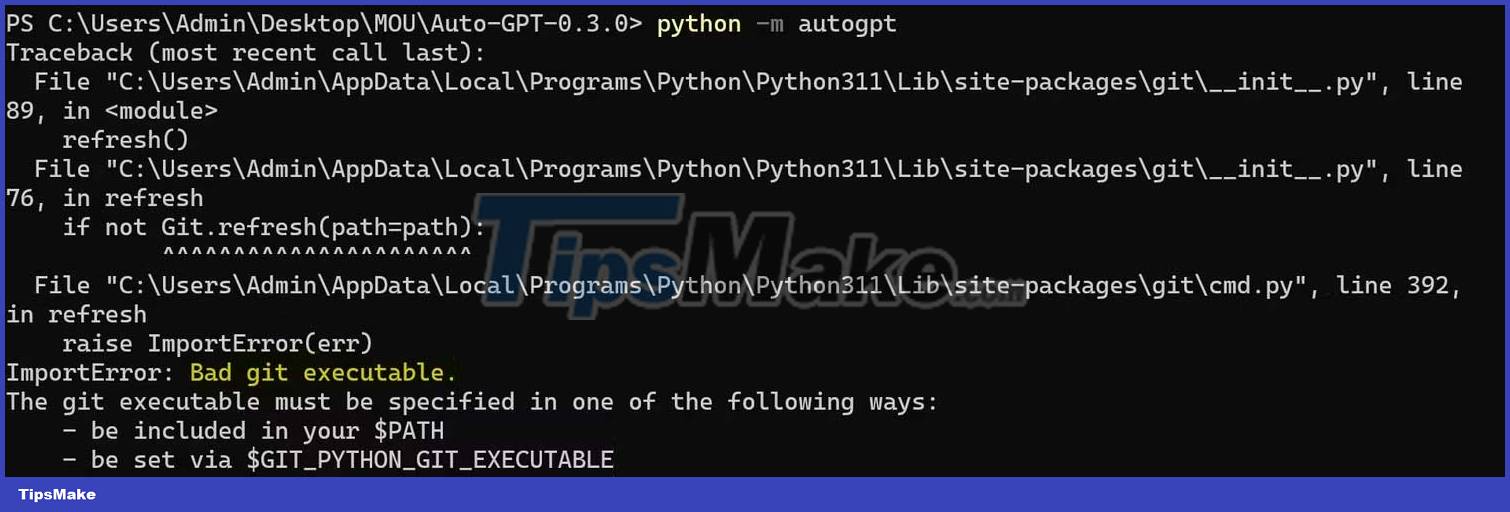
Git is a version control system that manages and tracks code changes in a project and is used to collaborate with other developers. When trying to install something from GitHub without having to install Git on the local device, you may get an import error, called Bad git executable .
Bad git executable error occurs because the computer is trying to run a Git executable without Git capability.
You can easily fix this problem by downloading and installing Git on your local machine. To install Git, you can visit their official website to download the software and run the installer.
Alternatively, you can open a terminal by right-clicking on the desktop and selecting Open in Terminal . After opening the terminal, you can install Git with the following command:
winget install --id Git.Git -e --source wingetAfter installation, restart the computer and run Auto-GPT as usual. If the error persists, you will have to download the Auto-GPT source code and repeat the installation process.
Missing auto-gpt.json

JSON is a popular data format used in web APIs like Auto-GPT. It is used to transfer and manage structured data between the client and the server. You may receive a warning about the missing auto-gpt.json file because Auto-GPT tries to save the data locally but cannot locate the JSON file.
The auto-gpt.json file is created during the installation process, but, if this fails, you can create the JSON file yourself. The simplest way to solve this problem is to copy any JSON file in the source directory and format it as your auto-gpt.json file.
To get started, you need to open the source code folder and go to autogpt >> json_utils . Copy llm_response_format_1.json , then paste it in the root folder (Auto-GPT-XXX).

Now open this file with Notepad and delete all the contents, then save. You should now see an empty JSON. All you have to do is rename it autogpt.json.
Although you can create a new text file and save it as autogpt.json , its file type will still be reported as a text document instead of a JSON file. Therefore, to make sure the file works, you must copy the tagged file as a JSON file.

No module named autogpt

Auto-GPT runs on an environment located in the source code directory. If you try to run Auto-GPT anywhere, you will be prompted for No module named autogpt . This usually happens when people try to run Auto-GPT a second time without knowing that Auto-GPT needs to be navigated to the right path to work.
You can easily fix this by opening a terminal inside Auto-GPT's source directory. To do that, right click on the source code folder and select Open in Terminal .

Auto-GPT stuck at Thinking stage (Bad Gateway)

When running the AI assistant, Auto-GPT goes through the process of thinking, reasoning, planning, criticism and execution. It doesn't take long for the AI assistant to complete the cycle. However, in case the AI is stuck at the thinking stage, it may be because you don't have the credentials to use OpenAI's GPT template.
Since anyone can generate an OpenAI API key without setting up a payment method, people may think it is optional. Unless your free credit expires, you need to log into your account and set up a payment method.
Remember, Auto-GPT is different from ChatGPT. Although both use the same GPT template, Auto-GPT needs a separate OpenAI payment method in your ChatGPT account.
API Key Not Set in ENV

Auto-GPT uses API keys to use OpenAI's GPT technology. If you don't have an API key, you won't be allowed to use GPT. If you've made sure to add the API key in the .env file but still get this error, you need to hard-code the API key into a configuration file in the Auto-GPT folder.
To hard-code the API key, go to Auto-GPT >> autogpt >> config , then open the config.py file with Notepad or another code editor. Once opened, you will see various API keys and service configurations. You can then manually scan the OpenAI API key variable to set the API key. Alternatively, you can hold CTRL + F , and type self.openai_api_key > press Enter .
Once the API key variable has been defined, delete all elements after =the OpenAI API key. Since the variable is a placeholder for a string, you'll want to add quotes at both ends of the API key. You can now save the file and run Auto-GPT as usual.
Since the OpenAI API key from the .env file doesn't work, it's possible that the other API keys you added to the .env file won't work either. Therefore, if you are combining Auto-GPT with other web API services, you must also hard-code them into the config.py file .
Above is how to fix common Auto-GPT errors. Hope the article is useful to you.