What is Microsoft Power Automate? how does it use?
Microsoft knows that many common tasks can easily be automated, and that's where Power Automate comes into play. This app comes pre-installed with Windows 11, but it sucks if you don't even know it's there.
Table of Contents
Analyzing your daily clicks, mouse movements, or file copies, you might be surprised at how boring many of these tasks are. If you've ever thought that there must be a better way to perform repetitive tasks in Windows 11, you're in luck. Microsoft knows that many common tasks can easily be automated, and that's where Power Automate comes into play. This app comes pre-installed with Windows 11, but it sucks if you don't even know it's there.
What is Power Automate?
According to Microsoft, Power Automate is a platform that aims to 'extend existing RPA (Robotic Process Automation) capabilities to automate all common tasks'. But that's an extremely vague and confusing statement that underestimates the tool's potential.
In simpler terms, Power Automate is a desktop application that you can use to schedule and run repetitive and uncomplicated tasks. For example, if you want your Internet browser to open certain websites in the morning, you can create a Flow.
Flows require little to no coding experience, making them perfect for anyone looking to automate tasks. View Flow as a shortcut to actions in apps, such as Excel, Word, or PDF files, in addition to desktop, cloud, and text automation.
A good example of Excel Flow is the one explained in the application's tutorial. Following the steps, you create a Flow that automatically launches Excel and extracts data from the entire table or specific rows and columns. For desktop automation, there are startup Flows that launch specific applications, automatically copy files and folders, or print documents.
How to create Flow
Flows are created via a drag and drop system, eliminating the need to write complex code or adjust system processes. All you need is a rough idea of what you want to achieve, then go through the options to make it happen.
However, keep in mind that using the app can be quite difficult at first as you will need a basic understanding of how the processes work and what the technical terms mean. When you're ready to try, start with the steps below:
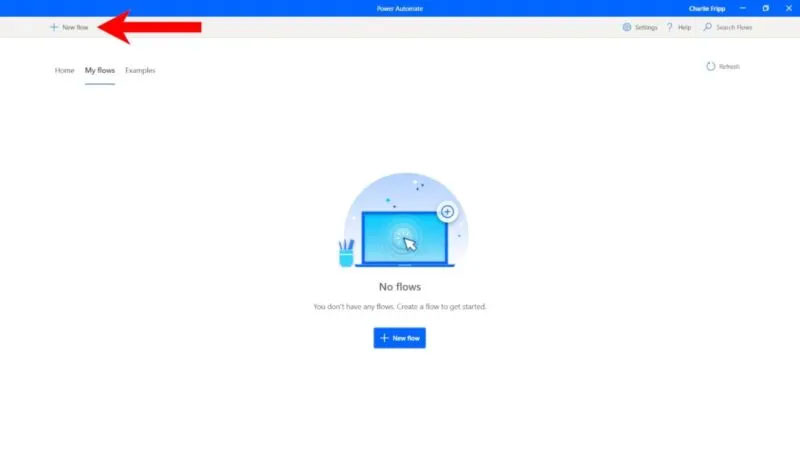
1. Open the Power Automate app and click New flow .
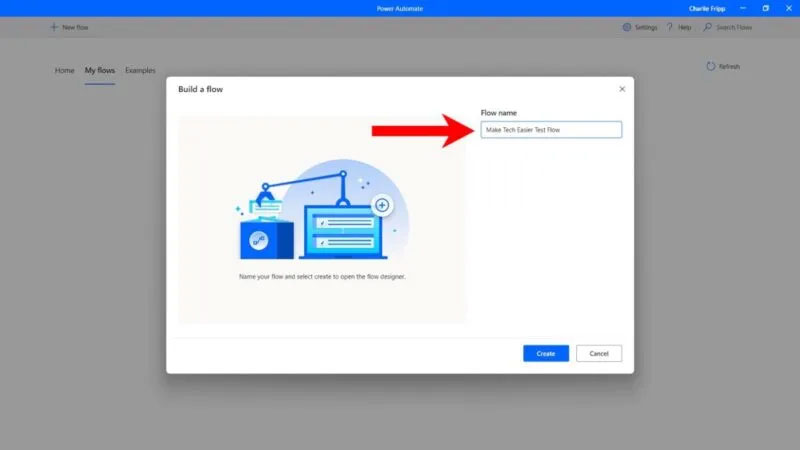
2. Name the Flow and click Create.
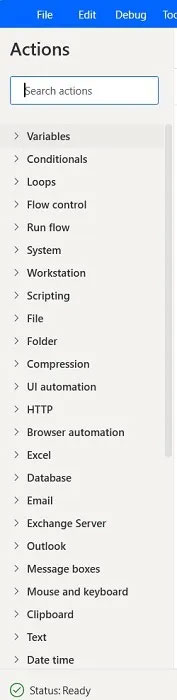
3. The next window might look a little intimidating, but it's easy to understand if you already know what type of automated action you want to create. The left panel is all possible actions. You can click on each one to expand it further. This example is creating a simple Flow that opens Spotify when you press a certain key combination.
Automate your first task
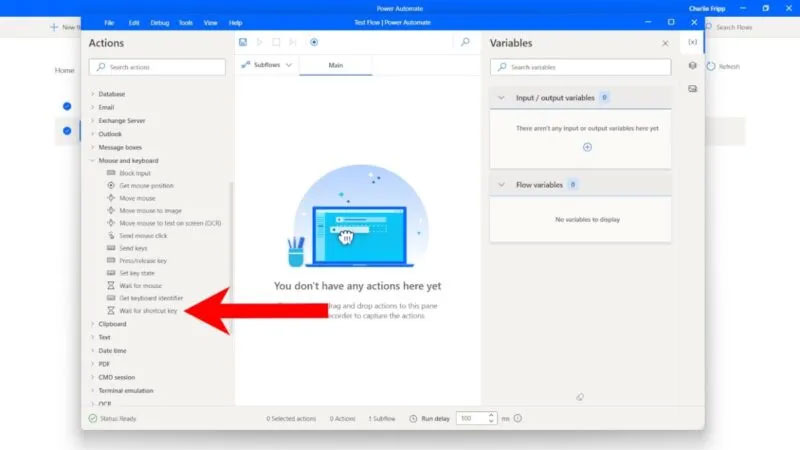
1. In the left panel, scroll down and click Mouse and Keyboard to expand the list, then click and drag the Wait for shortcut key option into the main Flow box. This is conditional and only triggers the actions below it when pressed.
2. As soon as you release the mouse button, a configuration window will appear. Select modifier and key to activate Flow. This example uses Ctrl + Num1 . When finished, click Save.
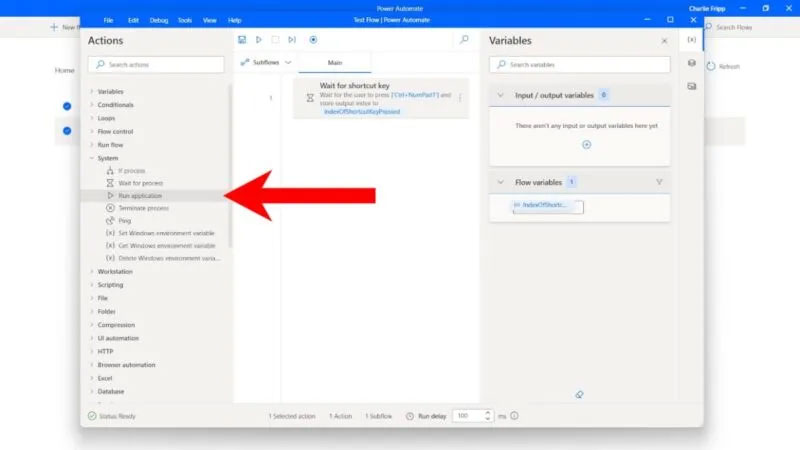
3. You will see that the first action has been added to the main tab on the right and you have to link it to another action. In the left panel, click System and drag Run application down under Wait for shortcut key .
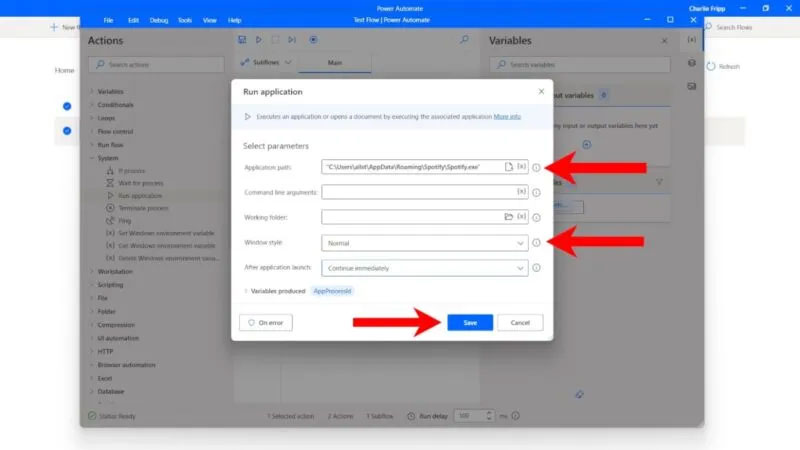
4. As soon as you release the mouse button, a configuration window will appear. In the first line, enter the location of the application you want to run. There is no need to change the Command line arguments and Working folder parameters , but you can choose the size of the opened application from the drop-down menu in Window style . Click Save.

5. Both actions will be displayed in the main tab. To check if everything is running as planned, click Run in the top ribbon.
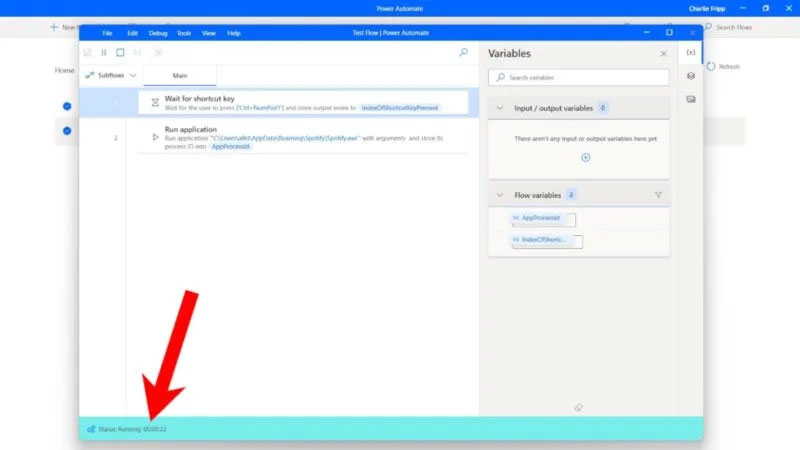
6. The actions and variables will disappear from the left and you will see a counter at the bottom showing how long the Flow has been running. If there are no errors, your Flow is set up correctly. Click Save.

Get the most out of Flow
There is one note you need to keep in mind. The app only opens when a Flow key combination is pressed, but Flow itself does not start automatically or on a set of conditions, because the version of Power Automate that comes pre-installed in Windows 11 is actually a free version and there are many limits.
However, if you sign up, you can create desktop shortcuts for your Flow, then run the shortcuts by double-clicking them. This saves you time because you don't have to open Power Automate and manually start a Flow.

Furthermore, the app is (currently) limited to browser integration with Microsoft Edge. But for Google Chrome, check out these 7 extensions that automate boring web browsing tasks.
Was this article helpful?
Your feedback helps us improve.
Related Articles
 Microsoft Power Automate is officially launched to users2 minutes read
 How to clean up your desktop using Power Automate workflow5 minutes read
 Top best alternatives to Microsoft Power Automate8 minutes read
 How to use Power Automate on Windows 11 to automate tasks6 minutes read
 3 Little-Known Microsoft Apps You Should Use Every Day4 minutes read
 How to Sync Microsoft Forms with Excel4 minutes read
Reader Comments 0
Sign in with email or Google to join the discussion.