Use GPU-Z to analyze graphics card parameters
If you are a professional gamer or a 'electronic money digger', you will probably realize the importance of a powerful, ideal graphics card system with a combination of multiple GPUs (Graphics Processing Units).
A suitable graphics card can dramatically improve the overall performance of your computer system, and of course everyone wants to buy the most suitable equipment for themselves.But how can you be sure that the specifications of the graphics card you have purchased match the manufacturer's description?In other words, how can we check if the parameters given by the manufacturer are correct?
The latest version of GPU-Z will allow you to accomplish both goals.This article will show you how to download and install the GPU-Z utility, as well as read and analyze the data related to drivers, speed and temperature. Specifications of a graphics card.

Download GPU-Z
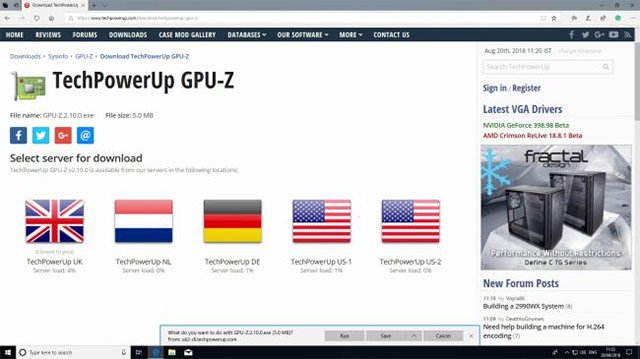
You download GPU-Z to your computer.GPU-Z has good compatibility with all Windows versions from XP onwards.
The TechPowerUp website will now list many servers to download from around the world, find the closest location, for example: TechPowerUp UK , then click to have the browser automatically download the GPU-Z installation file.
Next, open the Download folder on your computer to find the file named GPU-Z.2.10.0.exe .This utility can be run from any location and system, but if you want to measure the specifications for the graphics card on different computers you can copy it to a USB storage drive for convenience. Install and do not have to repeat the download process.
After the installation is successful, double-click the GPU-Z icon to launch the software.On the first launch, you need to click Yes to allow the utility to change the settings according to your device.
When GPU-Z is launched, it will give you the option to install GPU-Z as the main application on your system.This option adds an item of GPU-Z in the Start menu and a shortcut to GPU-Z on the desktop.

Analysis of graphics card parameters
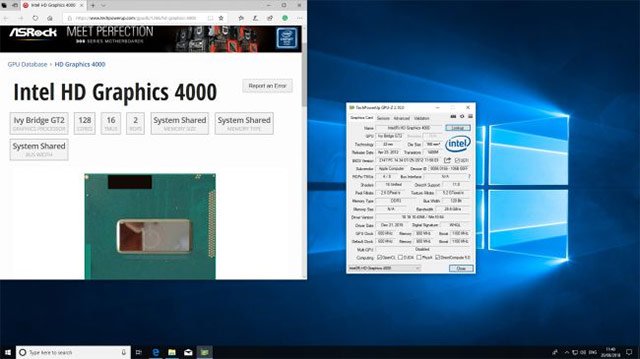
By default, GPU-Z will launch with the Graphics Card tab displayed on the screen.There will be a lot of information displayed on this tab, but arranged in a very logical way.
You can find specific graphics cards running on the system under Name . Click the Lookup button to look up information about the specifications that the manufacturer has provided, which is taken according to the database on the TechPowerUp website.This is a useful way to compare how your graphics card works from the manufacturer's theory versus the actual usage.
The GPUs will be listed below.The utility can only display one GPU at a time.If your system has multiple GPUs, the Memory Size section will list the size for each GPU, not the total memory size of the graphics cards on the system.
Note that the GPU listing name will be the internal code name used by the manufacturer, for example: GK104, so if you search by the commercial name of the graphics card it won't be.
Some items like Memory type will contain quite a bit of complicated information. If you are unsure of the meaning of any of the terms used, such as Revision , hover over the item GPU-Z will display the explanation tools. Notice the Driver Version and Driver Date sections.For the graphics card to have maximum performance, you should check it regularly and if necessary, contact the manufacturer to make sure you are up to date with the latest version.

Data collection sensor
Although information about the GPU's overall parameters will be displayed in the Graphics Card tab, you can also see performance data in real time in detail by clicking the Sensors tab.
Item GPU Core Clock will display your current GPU frequency. If you have multiple GPUs, you can switch back and forth to see the current frequency information of each device. You can also see the GPU frequency displayed visually in the chart on the right-hand side of the window. This is especially useful if you are trying to overclock your GPU. Be sure to double-check the information about GPU Temperature and Fan Speed while overclocking to make sure everything is on the right track.
If you want to analyze your GPU data over time, GPU-Z can save GPU data to the log file.First click on the checkbox with the Log to File content at the bottom left of the window, then GPU-Z will prompt you to choose the location to save the file.Saved log files will be in TXT format but tabulated and separated by commas.This means you can open these files with spreadsheet programs such as Microsoft Excel or LibreOffice Calc.

Advanced features
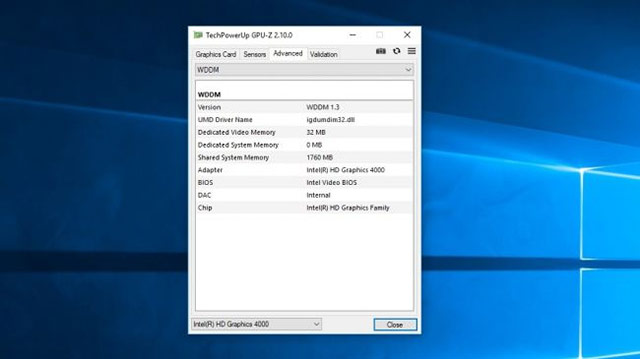
The latest version of GPU-Z will have an Advanced tab to give users more detailed information about their graphics card.When you click on this tab, by default you will see a menu with the name General, which will display information about the driver version.Then you click on ASIC Quality, this item is extremely useful if you plan to use your device to dig electronic currencies like Ethereum, Bitcoin . GPU-Z will list ASIC quality of the graphics card below. Percentage and determine if it is high or low.
If you are using Windows from Vista or above, WDDM (Windows Display Driver Model) will display more information about your graphics adapter, video memory and display driver.This information will be useful if you have previously experienced problems with system performance when using graphics cards for Windows system and desktop applications managed by WDDM.

Support
GPU-Z has built-in tools for downloading graphics card settings on TechPowerUp's website.The main purpose of this is to let users share information about overclocking their device. However, you can also choose to upload your settings to request support from the provider. develop or share solutions for a specific technical problem.
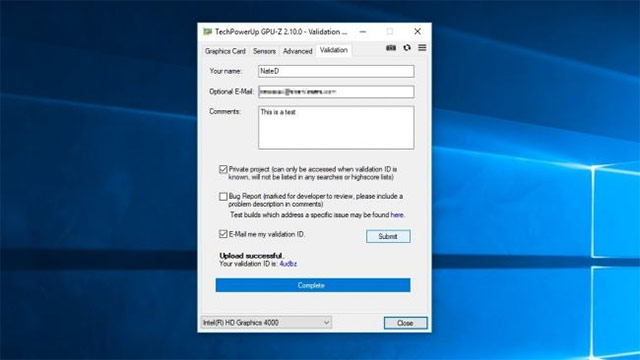
First, select the Validation tab in GPU-Z, then enter your name and add your email address. The email address will be useful if you want to keep a permanent record for your authentication ID by clicking on the E-mail me my validation ID option below.
If there is something special about setup or you need technical support, write down your information and questions in the Comments section.
For users who do not want to share their graphics card settings publicly, click on the Private Project item .Here, users can still send their authentication ID to others if desired.
If you require technical support, check the checkbox called Bug Report . After completing the required information, click the Submit button, GPU-Z will automatically display your authentication ID.Click that ID to display your graphics card settings on the TechPowerUp main website.
Good luck!
See more:
- List of the best graphics cards according to the price segment
- Experience upgrading computer graphics cards
- Which graphics card is good for gaming laptops
- 7 things you need to know about integrated and dedicated graphics cards
You should read it
- ★ 7 things you need to know about integrated and dedicated graphics cards
- ★ How to fix the NVIDIA graphics card error is not displayed in Device Manager
- ★ How to check the type of graphics card (GPU) on the computer
- ★ How to speed up onboard graphics card on window
- ★ Is the Intel HD Graphics 620 graphics card strong? What games can you play?