Instructions on how to quickly install Ghost Win 7 using USB
How to ghost Windows 7 to fix errors caused by viruses or software errors on the computer is of interest to many people.
Table of Contents
In today's technological age, computers have become an important tool, serving users for study, work and entertainment. How to ghost Windows 7 to fix errors caused by viruses or software errors on the computer is of interest to many people. If you still don't know how to ghost using USB on Win 7, please refer to TipsMake's article below.
What is Ghost Windows?
Ghost Windows is derived from the norton ghost software used as a hard drive repartition in an emergency. Simply put, this is when you copy data areas from your computer's hard drive to other storage devices. When you Ghost Windows, the data you copy to your hard drive will immediately be copied as a .GHO file or Ghost file.
Ghosting via USB will help you easily back up and restore drive data in the system back to its original state. Besides, ghost win from USB also helps you recover data as quickly as possible in case the hard drive has problems due to virus intrusion.

With the USB ghost method guided by TipsMake in the next content, you will be able to ghost multiple Windows 7 computers at the same time without having to create a Windows ghost set multiple times.
So how to ghost using USB on Win 7? Please follow the content below to find the answer!
Prepare before Ghost Win 7 using USB
Before performing ghost Windows 7 with USB in 3 steps , TipsMake wants you to note that you need to prepare the following things to make the process of Ghost using USB go more smoothly:
- You should use a USB device with at least 1GB of memory or more.
- Before performing the instructions on how to ghost from USB , you must download two USB Format tools and grub4dos.zip tool to your computer. These two tools help format the USB to FAT 32 and create the ability to boot the USB.
- Download Hiren's BootCD tool to your computer to boot and edit more quickly.
- Follow instructions to create Windows 7 ghost file using USB with .GHO format to create ghost.
Instructions on how to use Ghost Win 7 using USB
After fully preparing as above, you can perform ghosting using USB by following these simple steps:
Step 1: First, you need to use Hiren's BootCD tool to create a bootable USB .

If you don't know how to create a USB boot, you can refer to articles with specific instructions on the steps with the keyword 'Instructions for creating Hiren's Boot USB'.
Note: To be able to ghost Win, no matter what version of Windows you are using (not Win 7), you must create a USB ghost to be able to install ghost win.
Step 2: With this USB way to ghost Windows 7 , the next step is that you need to access the BIOS interface on the computer.

For each type of computer, using a different operating system, there will be different ways to access the BIOS. If you still don't know how to open the BIOS interface on your computer, please visit Google to search. The operations are extremely simple.
Step 3: After the BIOS interface is displayed on the computer screen, click the Boot tab to change the interface, then select Removable Devices as shown below and press F10 on the keyboard.

Wait a few seconds, you will see the Setup Confirmation window appear on the screen , click to select Yes and then go to the next step.

Step 4: Now you have set up boot mode from USB. Continue clicking Dos Programs .

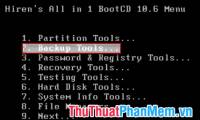
The interface on the computer screen will change, press number 2 on the keyboard to select Backup Tools or Custom Menu with some other versions.

Step 5 : At this step, the interface screen will display a list of Norton Ghost as shown below. Press number 6 on the computer keyboard to select Norton Ghost 11.5.1 *. then go to the next step.

Step 6: The screen interface continues to change with 9 other options, press key 8 on the keyboard to select Ghost (Normal).

Step 7: Then you wait a few minutes for the system to run. When the About Symantec Ghost window appears on the computer screen as shown below, click OK .

Step 8: The interface changes again and you choose in the following order: Local > Partition > From Image.

Step 9: After the folder window appears on the screen, use the up and down arrow keys on the keyboard to search for the Win 7. GHO file folder , select Open to open this folder.

Step 10: The system will automatically switch to a new window for you to select the drive to install data. TipsMake recommends that you choose a drive with a capacity smaller than the capacity of your current drive to perform Ghost using USB on Win 7. Because the normal capacity of the USB will be smaller than the capacity of the drive.
After selecting the appropriate drive to install, click OK.
Step 11: Then, select the partition to run Ghost Win 7, select OK.
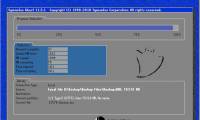
Step 12: The Question dialog box will appear on the screen as shown below, click Yes and then wait a few minutes for the system to automatically ghost the computer using USB .
Epilogue
TipsMake recently shared with you the steps to safely install ghost Windows 7 using USB . If you have any questions related to ghost operation using USB , please leave a comment below! Our experts will answer you as soon as possible.
Was this article helpful?
Your feedback helps us improve.
Related Articles
 Instructions on how to ghost Windows 7 using USB5 minutes read
 Instructions to use Onekey Ghost to create and extract Ghost files quickly3 minutes read
 How ghost Windows 7/8, Windows 10 with OneKey Ghost4 minutes read
 Instructions to create Ghost files with Boot disk3 minutes read
 How to create Ghost files on your computer using Norton Ghost4 minutes read
 Download Ghost win xp, win 7, 8, 10 32 and 64bit Link Google Drive2 minutes read
Reader Comments 0
Sign in with email or Google to join the discussion.