Table of Contents
This practical guide walks through install and use auto-tune - voice tuning software, explains the main requirements, and highlights common issues that may appear along the way.
With the development of technology, it is very necessary to use software to edit the voice to make it better. So, this guide I will show you how to install and use Autotune software to change your voice, feel free to share it with friends and family.
I. What is Auto-tune?

Auto-tune is a specialized software, used for audio management and music tuning. It will automatically change your voice or vocals to the correct standard. For example, if you sing wrong, it will automatically adjust your voice to the correct pitch, if you sing a little weak, it will adjust your voice to become louder and better.
In 2018, music critic Simon Reynolds pointed out that Auto tune is a revolution for the music world.
Therefore, the software is very widely applied, can be used to record, sing live or install on the computer to sing karaoke online better. In addition, famous singers may also need software to adjust their voices better and in tune.
Auto tune software was developed by Andy Hindebrand an oil worker. After a girl challenged him to make her sing better, he created this voice and sound editing tool himself.
II How to install Auto tune on the computer
1. Install Auto tune on your computer
In this section, I would like to guide you how to install Auto tune on your computer. The steps are as follows.
Step 1: Visit the link here to download the software.
Step 2: After the download is complete, you proceed to extract, then click on the installation icon of the software to start the installation process.

Step 3: The dialog box below appears, click Next to continue.

Step 4: Choose 32-bit or 64-bit version, depending on your computer,
Here I choose 64 bit, then click Next to continue.
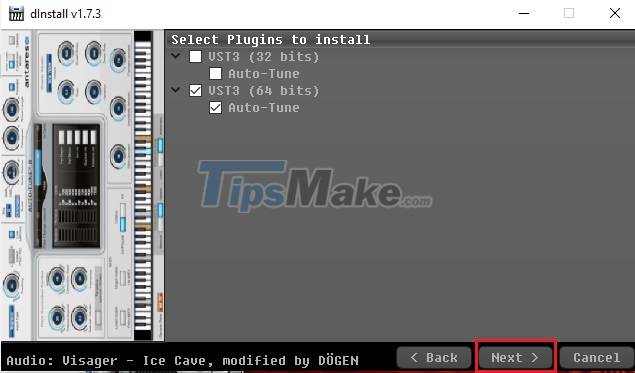
Step 5: Click Finish to complete.

2. Install Auto-tune plugin into Cubase
In part 1, I guided to install Auto-tune software successfully. Next, you need to install Cubase software on your computer, the link to download this software is here.
Then you proceed to add the plugin to Cubase software. The steps are as follows.
Step 1: Find the path as shown below and copy the file Auto-tune_81.vst3.
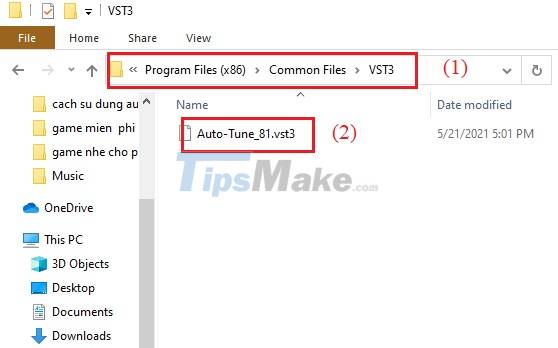
Step 2: Find the path as shown below and paste the file you just copied in "step 1" into the VSTPlugins folder.

Step 3: Open Cubase software => Open audio file => select the "e" icon, as shown below.

Step 4: Then a list appears, click Pitch Shift => Auto-tune 8.1
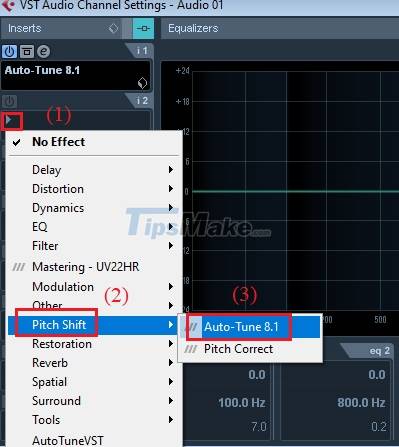
Step 5: The working interface of Auto-tune software will appear, as shown below. Success!
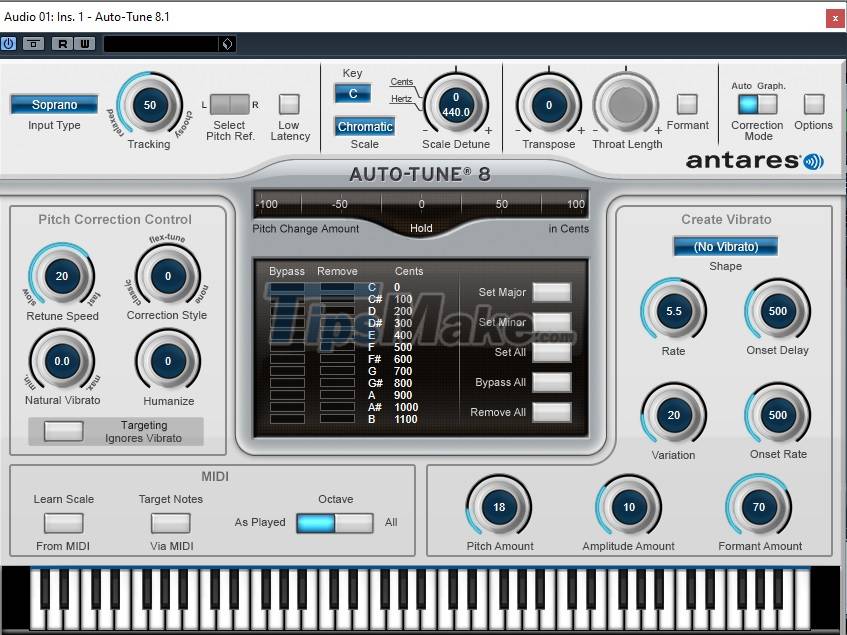
So in this part, I showed you how to install Auto-tune software and Cubase software on your computer, Review and follow the instructions.
III. Auto-tune's commonly used modes
In this part, I will show you how to use Auto Tune software to change your voice and voice on your computer.
Before you start editing your voice and vocals, you should familiarize yourself with two modes in the software, the first is Auto Mode, the second is Graphical Mode. Let's learn how to set up each mode.
1st: Auto Mode
Auto Mode is the software's default mode, it runs in real time and analyzes the sound, adjusting the notes as they pass through it.
Adjusting this Auto Mode setting helps you produce a better recording and a better voice.
I nput Type: This is the basic setting, which helps it focus on a specific type of sound.
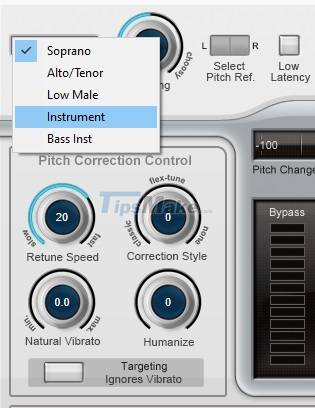
- Soprano: Tuned for female, high-pitched voices.
- lto/Tenor: Adjusts for normal, low, and treble voices.
- Low Male: For Barry White.
- Instrument: For violin, viola and other monophonic instruments.
- Bass Inst: For lower end instruments, suitable for guitar tuning.
Scale: Set this setting to create a key for a song or voice to minimize errors that occur when the software automatically adjusts.

Retune Speed: This is a fast or slow speed setting for the audio, if the speed is set too fast, the result will be unnatural. So you have to adjust this option carefully.
Humanize: Usually this setting allows notes that try to maintain a slower Retune speed than short duration notes. Usually, you will set the Retune speed to zero to ensure all the notes need to be adjusted.
Natural Vibrato: This setting is to adjust the vibration of the sound, you should leave it at position 0.
In addition, there are still a few other settings, please refer to it.
Second: Graphic Mode.
This is the more used mode and gives better results, it allows you to specify which notes are tuned and which are not.
If you are someone who cares about sound quality, you should choose this mode to set up your recording. And This guide explains the settings in this mode.
Step 1: In the Correction Mode section, click the Auto edit mode to Grap, as shown below.
In the Options section, click the Options button

Step 2: After clicking Options, the window below appears.
Enter buffer seconds: Allows you to adjust how long the recording is to be cached, and defaults to 240 seconds.
Default Retune speeds: This item you can leave the default.

So I have finished instructions on how to download and install Auto tune software on your computer, combined with Cubase software. This is a duo often used to tune the vocals.
Key Takeaways
Use the information above as a practical reference for install and use auto-tune - voice tuning software. Review each step carefully, confirm any requirements, and choose the option that best fits your situation.
FAQ
What does this guide explain about Install and Use Auto-tune - Voice Tuning Software?
It explains the main concepts, practical considerations, and useful steps related to install and use auto-tune - voice tuning software without requiring advanced knowledge.
Who can benefit from learning about Install and Use Auto-tune - Voice Tuning Software?
This information is useful for readers who want a clear overview, practical guidance, and reliable steps related to install and use auto-tune - voice tuning software.
What should I check before applying this information?
Review the requirements, confirm that your device, software, or situation matches the instructions, and back up important data before making major changes.
Related Articles
 The Best Autotune Software11 minutes read
 How to Download and Install Auto Tune on Your Computer4 minutes read
 How to Install Auto Tune on Your Computer for Vocal Editing4 minutes read
 How to Install Gsnap Audio on Audacity5 minutes read
 How to Install RTX Voice on a GTX Card in Windows5 minutes read
 5 Real-Time Voice Changing Software for Discord, Skype, Steam6 minutes read
Reader Comments 0
Sign in with email or Google to join the discussion.