How to use Optical Out (S / PDIF) port on a PC
In this article, we will learn how to use the Optical Out (S / PDIF) port on the PC to establish a connection with a discrete audio system for the best quality.
( Note : for this feature to work, both your PC and audio system must be equipped with an optical port.)
How to use the Optical (S / PDIF) Audio port
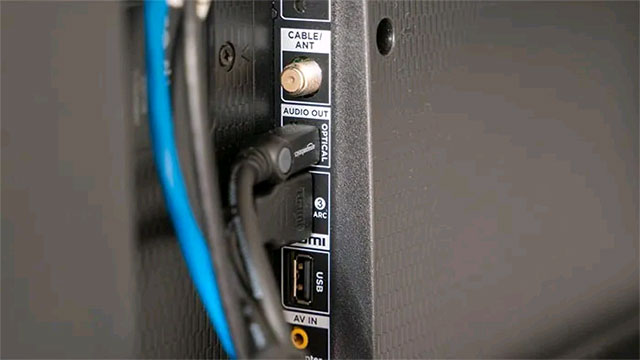
First of all, make sure that both your speaker and PC have optical ports (S / PDIF). For now, just plug your PC into the speaker using an optical cable.
( Note: if you are using a comprehensive sound system that includes an amplifier (amplifier) instead of a stand-alone speaker, double-check the optical connection you are using. You can provide separate options for the optical-IN and optical-OUT ports. In this case, connect the cable from the PC's optical-OUT port to the optical-IN port on the amplifier, speakers.) .
As for cables, in general, optical cables work in a similar way to HDMI in that they can transmit digital signals without any loss of quality. The main difference is that the audio data uses less bandwidth than HDMI, so even if the quality of the cable is not good, the sound quality is not affected much.

Once the optical cable is connected, click on the speaker icon in the bottom right corner of the Windows taskbar, then click on the speaker name above the volume slider to see whether the audio output is' Optical 'or'. Digital display or not. If so, just click to activate it.
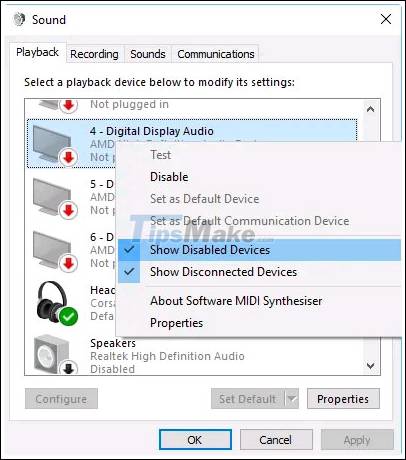
If the speaker doesn't show up in the cord, right-click the speaker icon in the taskbar, click Sounds , then click the Playback tab .
Next, right-click anywhere in the Playback tab list, then click ' Show Disabled Devices '.

At this point, a device called ' digital output ' or ' optical output ' will be displayed. Right click on it and click ' Enable ' to enable it. Then right-click on this device again and click ' Set as default device '. Now the optical audio connection has been activated.

How to enable 5.1 Optical surround sound on PC
Analog audio may be fine with regular stereo setups. However, when you enter the world of 5.1 and modern audio formats like DTS, you will need a digital connection. Otherwise, the audio decoding will take place on your PC instead of the dedicated hardware of the external audio system. The sound is then transmitted to the external system in a lower quality analog format.
In general, you should use an independent optical connection for your audio system instead of the HDMI port. HDMI audio can be a bit easier to set up but comes with significant limitations.
HDMI has limited bandwidth and is mainly used for video transmission. The HDMI port might not have enough bandwidth to transmit uncompressed 5.1 digital audio to your speaker system.

By using two dedicated cables for video and audio, you'll have an audiovisual setup for the best possible quality. However, there are some caveats.
First of all, is your motherboard capable of generating 5.1 surround sound signals? Having only an optical output port does not guarantee that you will get surround sound on all games, movies, etc. The optical port on your motherboard should support 5.1 audio.

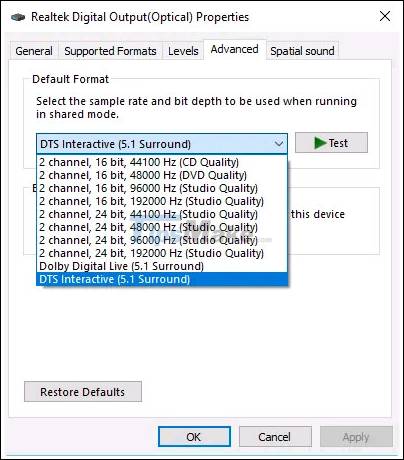
You can check if your setup supports one of the Dolby 5.1 formats by navigating to the Sound -> Playback window . Right-click your device, click Properties , and then click the Advanced tab . Next, click the drop-down menu, choose ' DTS Interactive ' or whatever surround sound settings you want to use, then click OK .
In addition, you should also click the ' Supported Formats ' tab to make sure that the formats your receiver can handle are checked.
You should read it
- ★ Researchers use computer vision to better understand optical illusion
- ★ AAG cable has been repaired earlier than 4 days, Vietnam Internet has gone 100% to international recovery.
- ★ After completing the sea cable line SMW3, the Internet returned to normal
- ★ The Eee PC with the first optical drive was released in April
- ★ How to enable the front audio port of PC case in Windows 10