How to use 'Create a GPT' to create a custom ChatGPT instance
OpenAI has released Create a GPT , a ChatGPT Plus tool that you can use to create your own version of ChatGPT.
Since ChatGPT launched in November 2022, users have been wanting to tweak it into a custom AI built for a specific purpose. Now, OpenAI has responded to this wish and launched "Create a GPT", a ChatGPT Plus tool that you can use to create your own version of ChatGPT.
Although it is the first version of GPT Builder, it is a very promising premise. It has a lot of capabilities, has options to share your GPT with the public, and only takes a moment to get your custom GPT up and running.
1. Access Create a GPT from My GPTs
The first thing you need to do is sign up for ChatGPT Plus if you haven't done so already. You will find the button to do this in the left menu of the ChatGPT interface. Once you've paid the $20 fee, follow the instructions below:
1. Click Explore on the left menu. This will take you to the My GPTs page containing OpenAI's custom GPT instances.
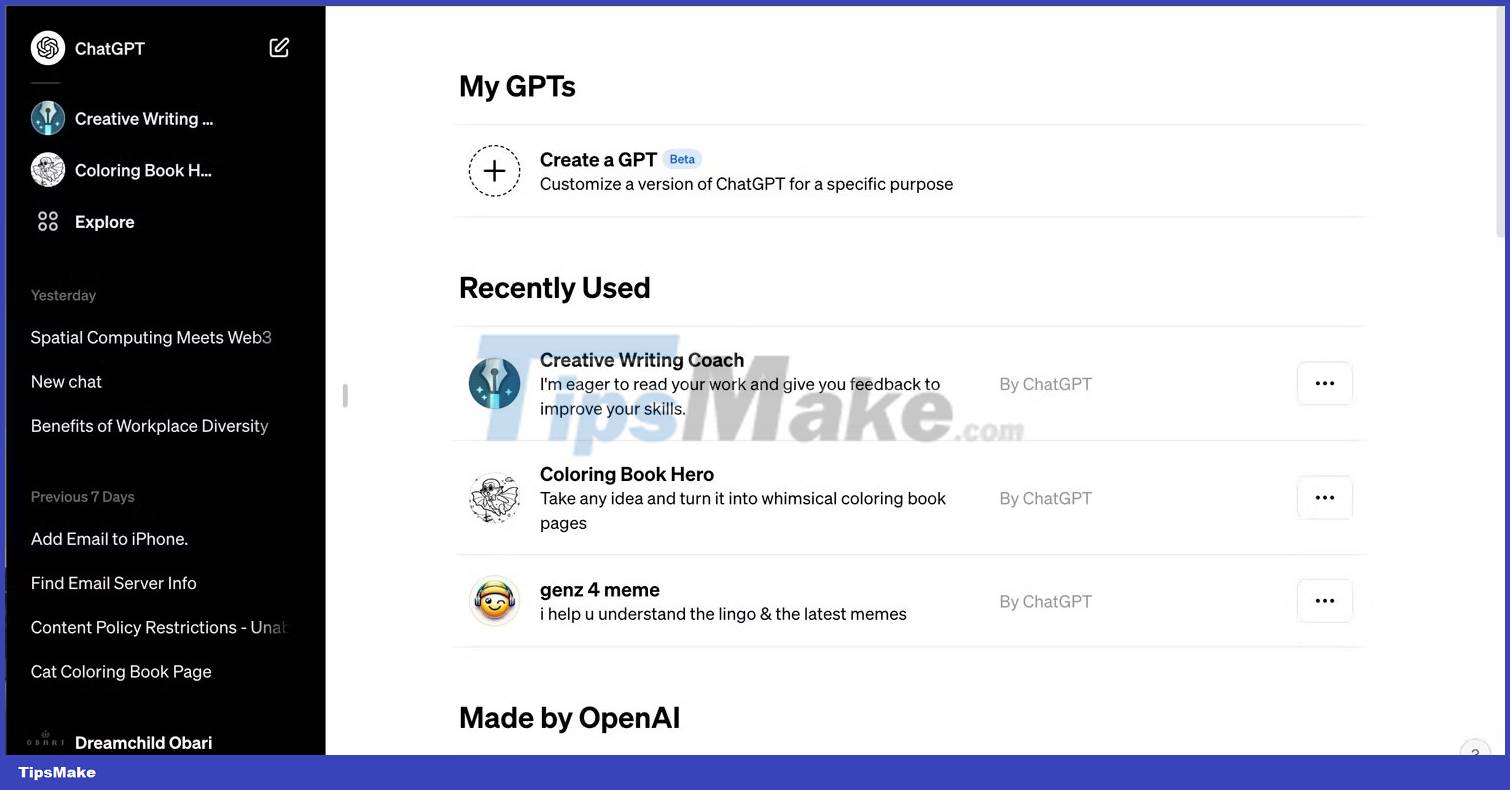
2. Select Create a GPT to open the GPT Builder interface.
At the time of writing, "Create a GPT" is still in beta. This means that not all features are fully online and the product is not yet complete. Keep this in mind when building your GPT and be prepared for problems. Additionally, it is possible that your completed GPT may be removed when a future update becomes available.
2. Provide GPT with key descriptions and images
1. Now that you're in GPT Builder, the first question you get is what you want to do. You can keep this first section short and sweet by entering a single sentence. In this case, the author requested: "Make a Dungeons & Dragons 5e dungeon master who oversees D&D campaigns".
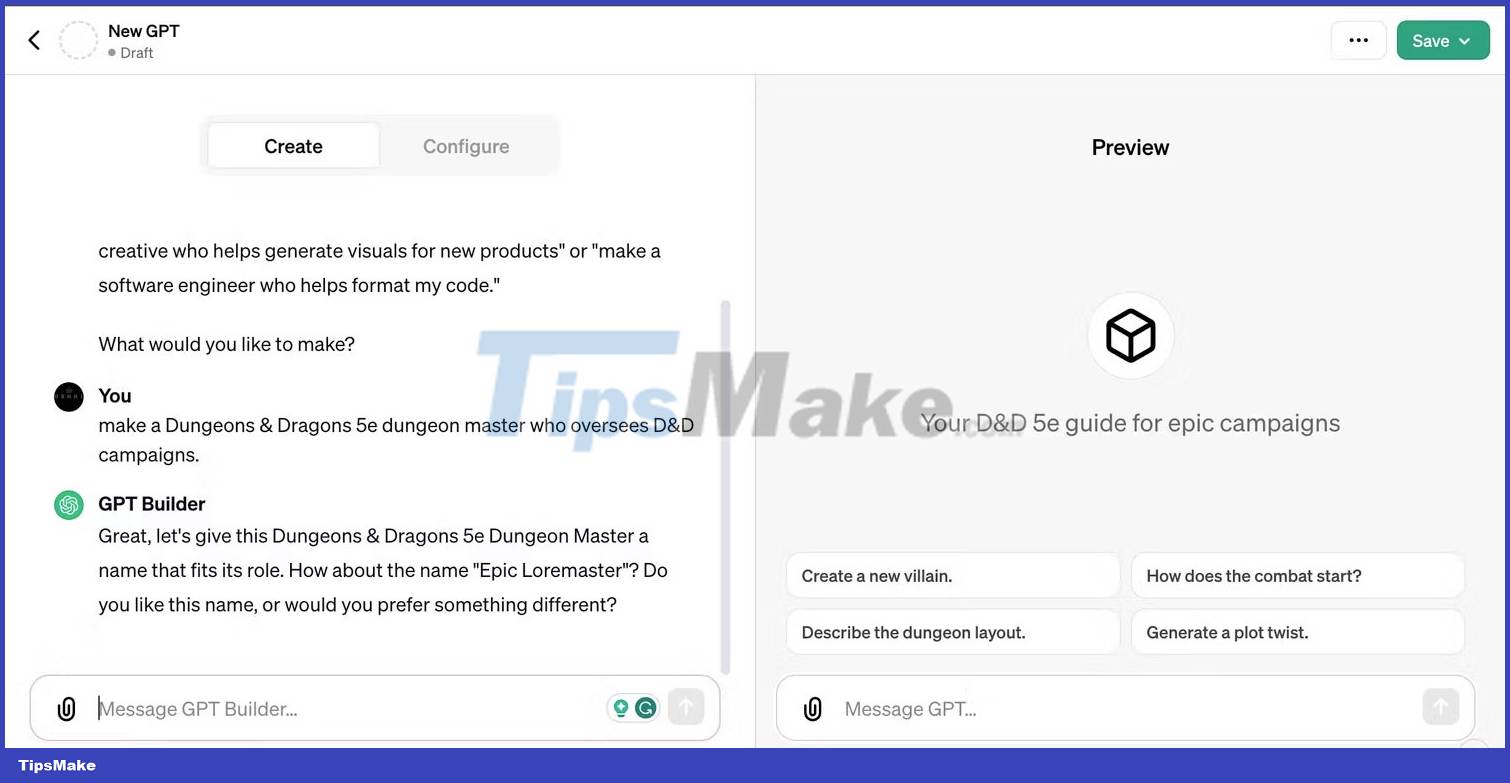
2. Next, name your GPT. ChatGPT will suggest one for you, but you can still enter whatever you want.
3. After you name GPT, GPT will automatically create a profile image in the next step. Thanks to ChatGPT's DALL-E integration, the images are usually quite good. Ask the tool to regenerate more images if you are not satisfied. You can prompt the tool to create the exact image you want with some instructions.

Tip : You can manually change the image, name, description, and instructions for your GPT by clicking Configure . Click on the profile picture to change and edit the details in the Name Description and Instructions fields to change them without entering a prompt.
3. Set up principles and rules for GPT
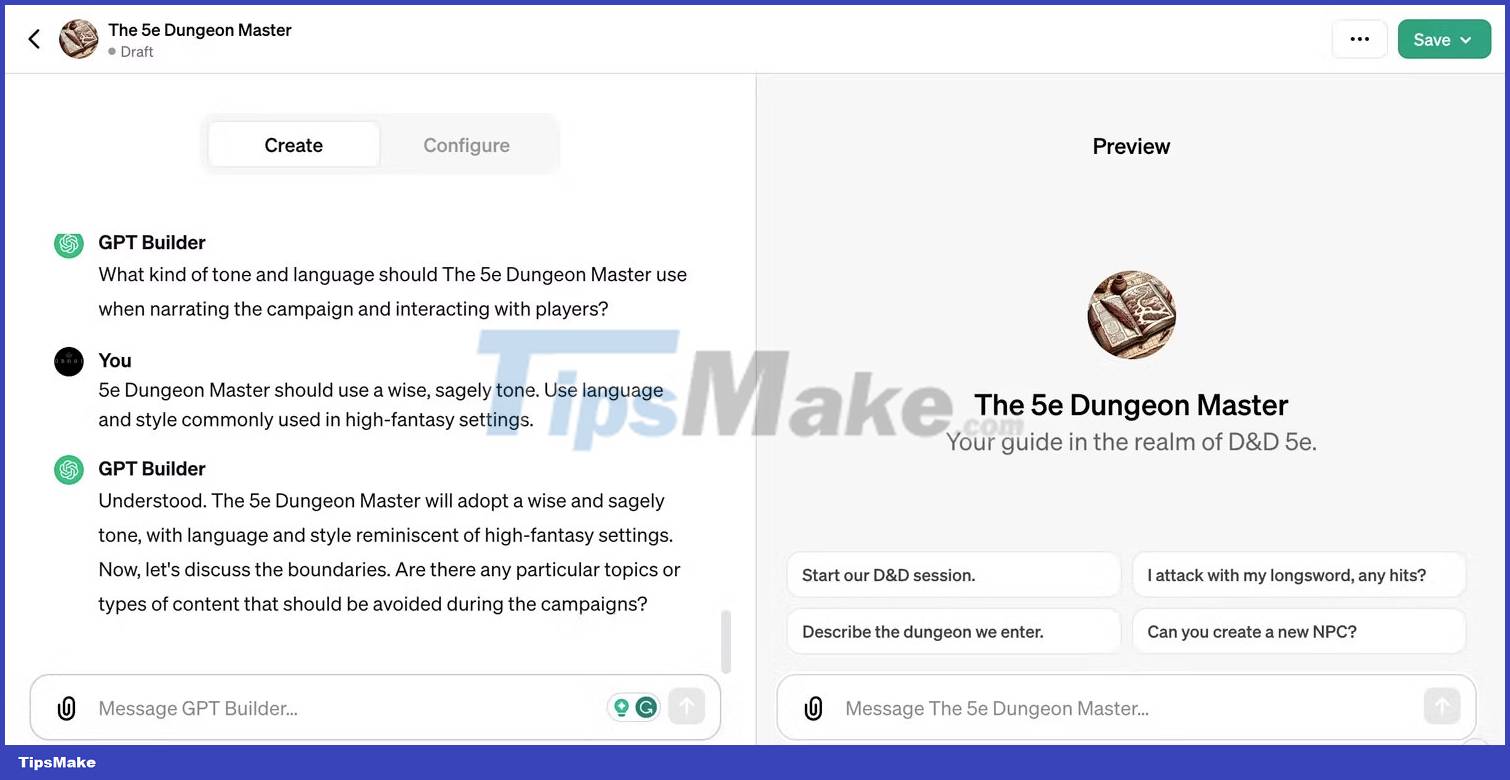
At this stage, your GPT wants to know how it will handle the user. Aim it for the style you want the tool to apply. The example used here is, "5e Dungeon Master should use a wise, sagely tone. Use language and style commonly used in high-fantasy settings", quite suitable for the fantasy nature of D&D.
Of course, if you're creating a more professional GPT, make sure it uses professional language.
Now that your custom GPT has an accent, you should tell it how to behave. In the case of the example, the author wanted kid-friendly Dungeons & Dragons campaigns that fit the PG-rated theme. The author also lets it take an approach towards understanding the player's actions instead of assuming what the player will do.
To better understand the rules, you can open a new ChatGPT tab in your browser and study the rules for your GPT. When finished, compile them into a note-taking app, number them, and paste them into GPT Builder.
It's impossible to know how effective the rules you've set up are without testing them. Issue a rule violation prompt and see if your GPT prevents it from happening. This part of your GPT creation process will involve tweaking and testing.
For example, The 5e Dungeon Master must strictly follow the rules of the D&D manual (PHB).
If you find that your instructions aren't working as expected, go back to the Create tab and add instructions.
4. Upload files as a knowledge base
In addition to backing up your GPT with rules, you can also upload files that you want GPT to pull information from. For example uploaded copies of Jeremy Crawford's Player's Handbook and Dungeon Master's Guide. Both are essential D&D books.
Here's how to upload source documents to your custom GPT:
- Once in GPT Builder, click Configure .
- Scroll down to the section titled Knowledge .
- Click Upload files and add files from your computer.
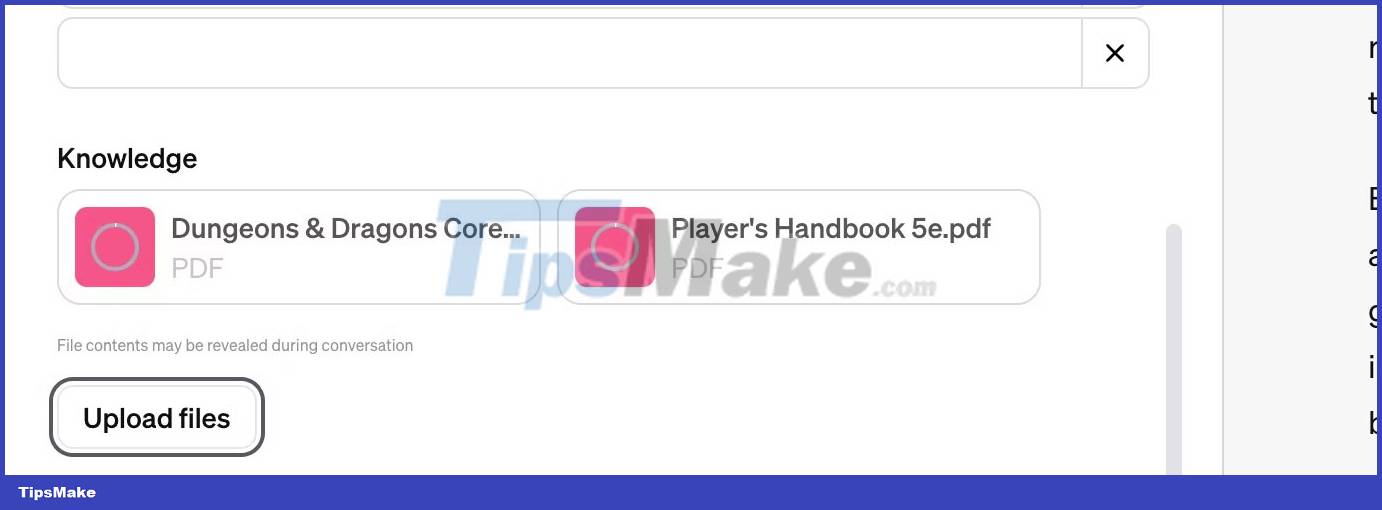
Wait for the upload process to complete and you will have documents as a knowledge base for your GPT.
For example, if you are trying to create a GPT that specializes in Florida tax law, you will get all the Florida tax legal documents that you can find and upload them here to form the knowledge base that the GPT Yours may work.
5. Add or remove capabilities
With ChatGPT Plus, you get a truly enhanced AI experience. These additional features include web browsing, code interpreter, and DALL-E 3 integration. Better yet, your custom-built GPT also enjoys all of these features. However, GPT Builder gives you the option to add or remove functions that you don't need.
All of these are enabled by default. Where the example requires all 3. DALL-E 3 can create images of your characters and game scenes, a code interpreter helps it understand uploaded documents and character sheets, and you may need to browse the web to search for some current information.
However, GPT acting as a hypothetical Florida tax attorney may not need the imaging functionality. That might be a useless feature.
Here's how to adjust your GPT's capabilities:
- Click Configure and scroll to Capabilities .
- Enable or disable Web Browsing, DALL-E Image Generation and Code Interpreter.

6. Add APIs for third-party services
If you're interested in using the API to access other third-party services in GPT, you'll be happy to know that it's possible.
1. Go to Configure in GPT Builder.
2. Click Add actions .
3. Copy and paste your OpenAPI scheme into the input box.
4. Optional: Scroll down and enter authentication method and privacy policy.

5. Come back when you're done.
Note : If you do not enter a valid privacy policy, you will not be allowed to share your GPT with the public.
Currently, it seems you can only add one action at a time. If you click on the Examples drop-down menu , you will see some scheme examples that OpenAI has added to help create your own schemes.
7. Configure conversation starters
You are now almost done building GPT. You can add or remove conversation starters. They help you and others using your GPT get into the flow of things.
- Click Configure and scroll to the Conversation starters section . You will notice that AI automatically creates 4 conversation starters.
- Go to the last empty field and enter the prompt to add a new conversation starter.
- Click the X next to the conversation starter block to remove it.
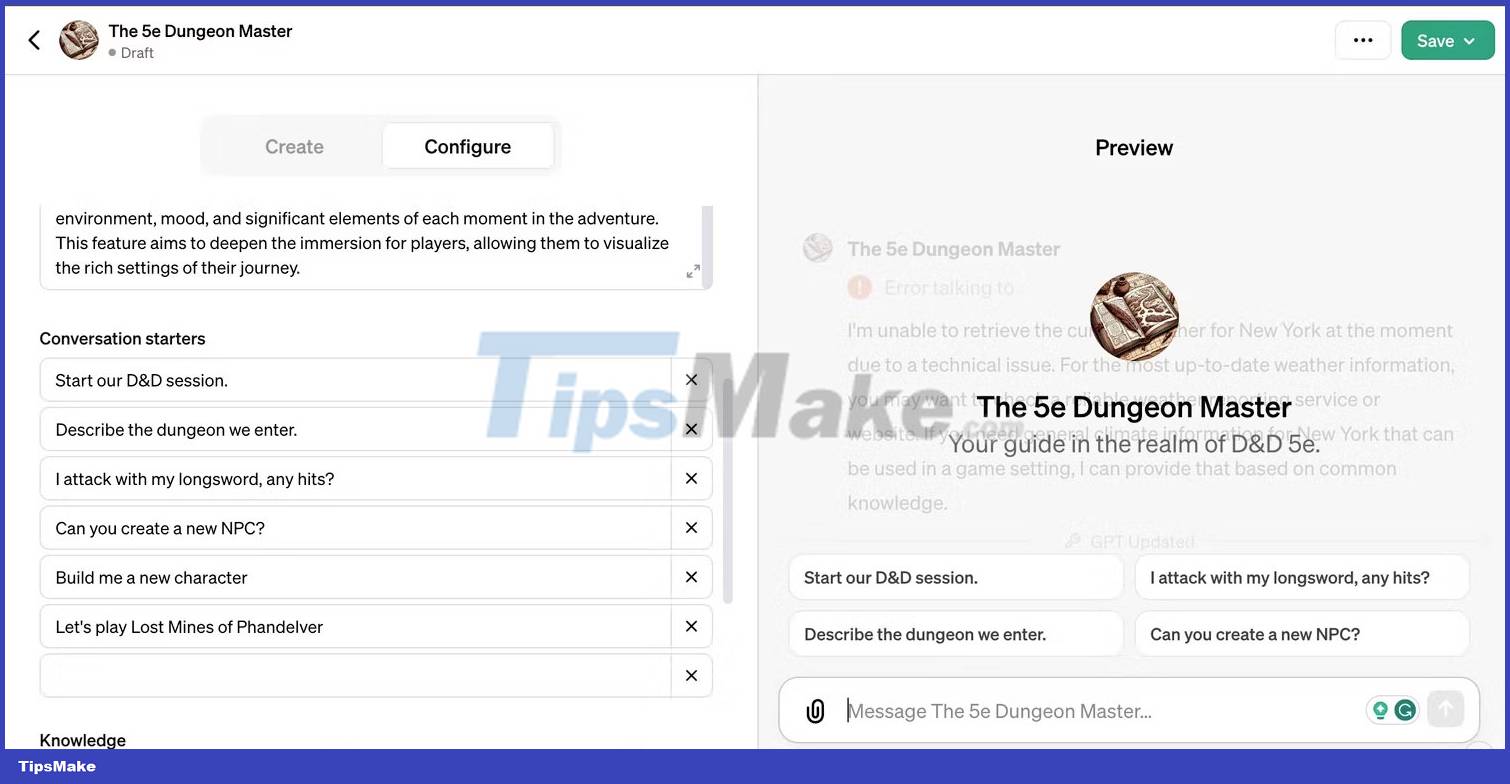
You can add more conversation starters if needed.
8. Save and publish your GPT
You can save your GPT and view your builder profile by clicking the Save drop-down menu in the top right corner.
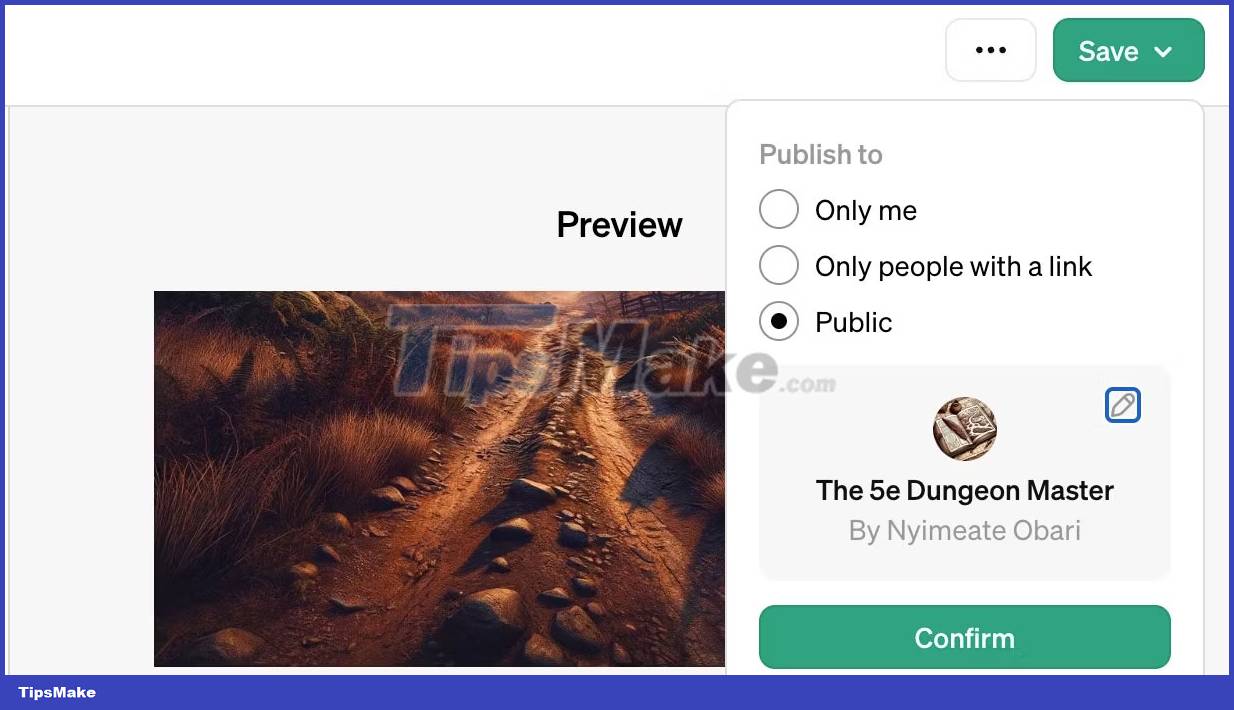
While it won't make any difference, you can now choose whether you want to publish to the public, via a link, or just for yourself. By the way, none of the sharing options work. We have to wait for future updates to do this. However, if you want your friends to use your AI, go back to the ChatGPT home page, open GPT's chat, and copy the URL into the browser address bar.
If you click the pencil icon in the share menu, you'll see your builder profile, where you can change GPT and profile options when the feature is fully released.
- How to build a custom ChatGPT with your own data
- 10 Custom GPTs That Really Make ChatGPT Better
- Can cybercriminals use ChatGPT to hack your bank or PC?
- The latest ChatGPT update allows for the creation of completely custom GPT models
- Custom GPT is the least noticed feature of ChatGPT
- ChatGPT's Custom GPT Can Reveal Your Data: Here's How to Stay Safe!
- How to use the ChatGPT API: A complete guide from A to Z.
- How to create custom shortcut keys for Raspberry Pi
- Instructions on creating quizzes on ChatGPT
- Learn about Class, Object and Instance in object-oriented programming
- How to Shut Down or Restart Another Computer Using CMD
- How to Set the Default Audio Track in VLC
- How to Make It Look Like You Are Hacking
- How to Write a Fan Letter
- How to Open Mobi Files on iPhone or iPad
- How to Save Videos on Telegram on PC or Mac
- How to Change the Icon for an Exe File
- How to Recover Typed Text in Chrome on PC or Mac
- How to Do Literate Roleplay
- Top dishwasher Bosch serie 2, series 4, series 6 are the most popular today
-
 What is OpenAI? Things you need to know about OpenAI.
-
How to enable and use the GPT-5.5 Codex in Cursor (detailed instructions)
-
Convert MBR to GPT on your hard drive without losing data using Aomei Partition Assistant.
-
Comparing GPT-5.4 Mini and GPT-5.4 Nano: Features, benchmarks, and use cases.
-
What is GPT-OSS?
-
The difference between ChatGPT and GPT
 What is OpenAI? Things you need to know about OpenAI.
 How to enable and use the GPT-5.5 Codex in Cursor (detailed instructions)
 Convert MBR to GPT on your hard drive without losing data using Aomei Partition Assistant.
 Comparing GPT-5.4 Mini and GPT-5.4 Nano: Features, benchmarks, and use cases.
 What is GPT-OSS?
 The difference between ChatGPT and GPT