How to tie a standard, beautiful and simple tie
When you wear a elegant Veston, an indispensable accessory is a caravat. The caravat is considered an important accessory for men, especially for business people or office workers, in addition it is also very important when you attend parties, festivals or conferences . etc. The way you tie your caravat sometimes also creates your own accent and assesses your personality. There are actually 18 different ways to tie caravats, but none of us will use all of them, in this article, TipsMake.com will introduce to you some common, standard and the most beautiful. Invite you to refer.

1. Traditional ligation type
If you're a beginner, this is the type you definitely must know. This is the simplest and fastest button, suitable for everyday office environment. It is also suitable in case you are in a hurry because of fast operation and no time to elaborate.
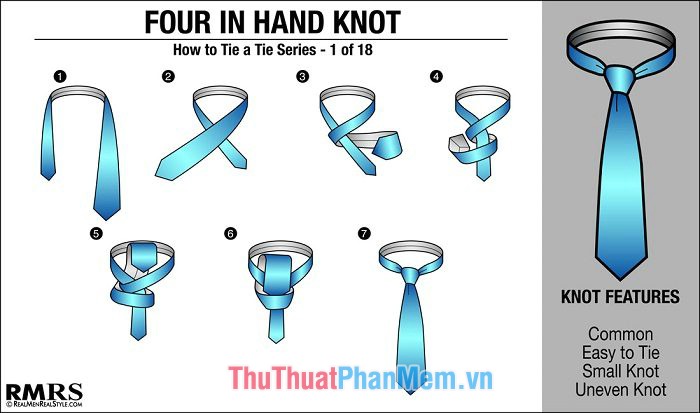
Manipulation details:
- Place tie on collar: large piece on the left, small piece on the right
- Start by placing a large piece on a small piece of tie.
- Fold large pieces behind.
- Fold a large piece through a small piece
- Drag the large piece currently below the top of the collar.
- Thread a large piece down the knot.
- Pull the knot to make sure and closer to the collar.
2. Full Windsor style tie
This is an ideal way for formal occasions to be polite. The knot is thick, wide, triangular and perfectly proportioned.
This type of tie is extremely suitable for the style of a wide-necked dress and often appears in weddings, speeches and important meetings.
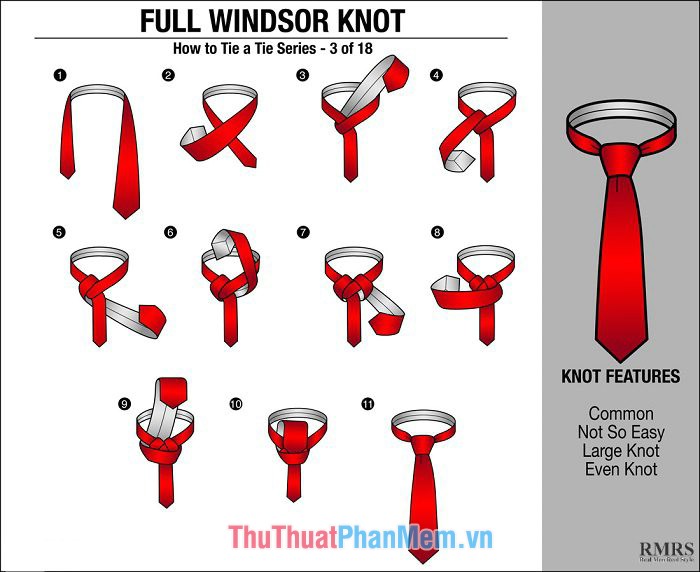
Manipulation details:
- Place tie on collar: large piece on the left, small piece on the right
- Place the larger piece on the smaller piece.
- Pull the large piece back, thread it up through the gap around the neck.
- Drag the large piece over the small piece in the first direction in step 2.
- Fold large pieces behind small pieces.
- Drag the larger piece up as shown.
- Then slip it down the gap around the neck.
- Fold large pieces through small pieces.
- Drag the larger piece up through the slot again as in step 3.
- Pass it through the knot.
- Recalibrate the knot.
3. Half Windsor style
Half Windsor version is a lot easier than Full Windsor version. Once you become a 'master' with this type of tie, the original one will not be difficult for you.
Although this type of carat tie requires a lot of technique, it is still known as a great knot that men prefer.
Although it has been reduced quite a lot compared to the original style, but with the style, Half Windsor seems only suitable for the office environment.
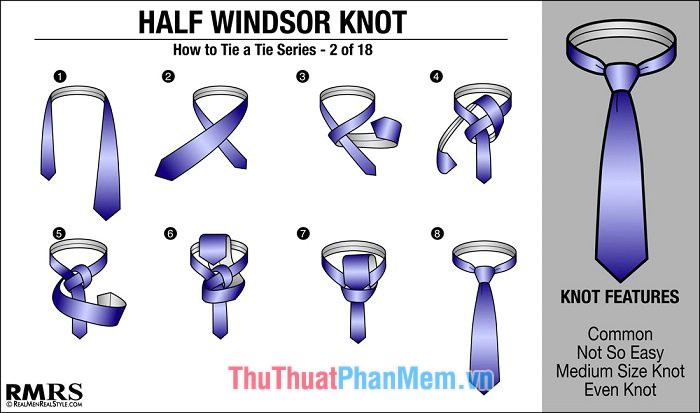
Manipulation details:
- Place tie on collar: large piece on the left, small piece on the right
- Like the first step of Four in Hand, drag the larger piece onto the smaller one.
- Fold large pieces behind small pieces.
- Drag the large piece upwards and then thread it down.
- Move large piece through small piece as shown
- Thread a large piece behind the small piece and then thread it upwards.
- Put big piece on button
- Tie and adjust the tie
4. Nicky style
How to tie this caravate is not known by many people. In fact, this type is not mentioned in addition to books or websites that tie a tie.
However, it seems to be a 'bad reputation' for this type of tie because actually, the type of Nicky tie is more versatile and flexible than you imagine! And believe it, this is definitely one of the tie ties you should try.
With Nicky ties, ties are tied with thicker buttons Four-in-hand and look more symmetrical. It is very useful for men who tie small, thin and tight ties.
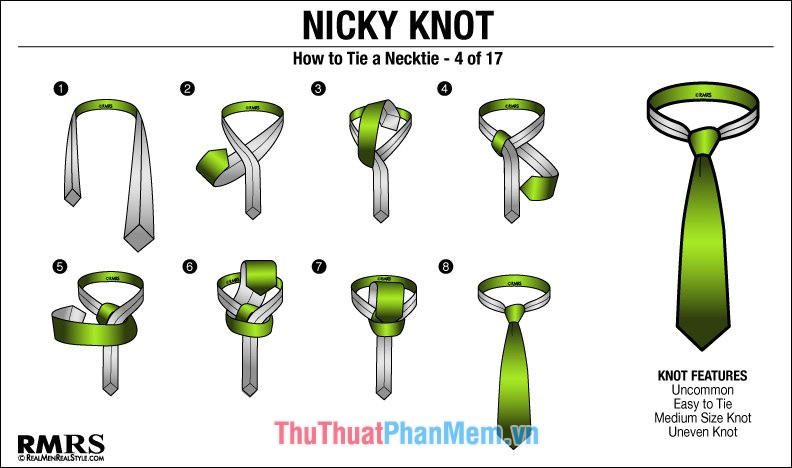
Manipulation details:
- Place tie on collar: large piece on the left, small piece on the right
- Fold large pieces behind small pieces
- Drag the larger piece up
- Insert the large piece into the knot between the collar and tie
- Fold the big piece up and then round it to the smaller one
- Put the big piece on the button again
- Insert large piece into small button as shown in Figure 7
- Tie and adjust the tie
5. Tying Balthus
Balthus tie is known as the 'monster' of tie because it takes 9 steps and 4 knots to complete. That is why this type of tie requires a relatively long tie. Besides, the knot of the Balthus style is bigger than the knots in many conventional ways.
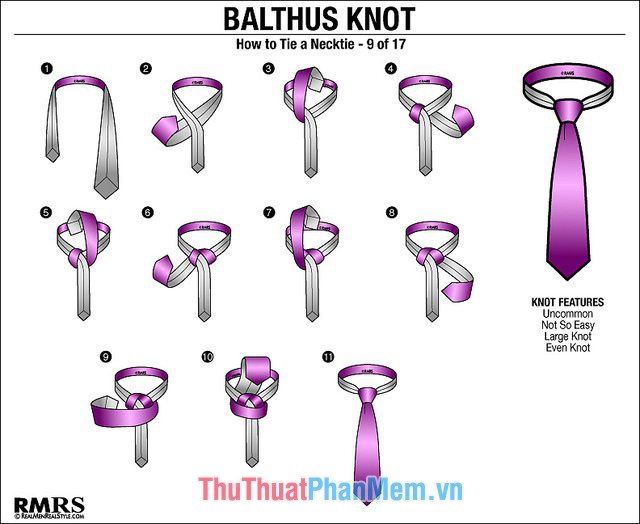
Manipulation details:
- Place tie on collar: large piece on the left, small piece on the right
- Fold large pieces behind small pieces
- Drag the larger piece over and insert it into the button
- The slender ring grows to the left front
- Drag the larger piece and enter the button as shown in Figure 5
- Drag the large piece to the front to the right
- Drag the large piece over and insert it into the button as shown in Figure 7
- The slender ring grows to the left front
- Drag the large piece to the right and fold onto the small piece
- Insert a few large pieces of a button as shown in Figure 10
- Tie and adjust the tie
6. Type of Cafe tie
As the name implies, this type of tie is the type favored by frequent visitors to the Café in the early 20th century. This style is quite stylish and complex, aiming to attract attention. Italy. This type of tie is better suited for Casual-style suits or a sports jacket or even a short-sleeved T-shirt. It is not suitable for office or similar formal events.
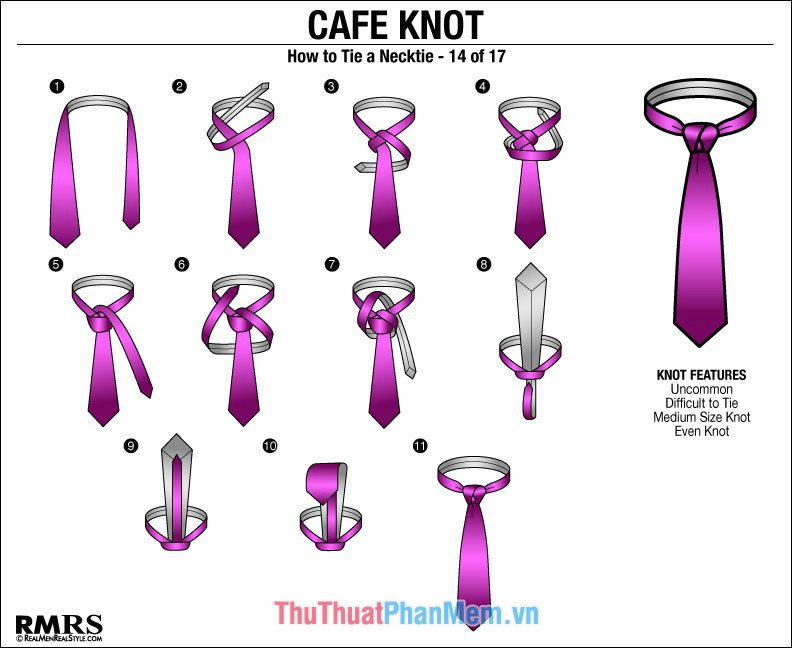
Manipulation details:
- Place tie on collar: large piece on the right, small piece on the left
- Fold the small piece over the larger piece and round it back into the knot
- Pull the smaller piece forward and fold it behind the large piece
- Round the small piece up and pull up for the button
- Pull the small piece out and to the left
- Small round piece behind big piece
- Pull up the piece and put it on the button
- Insert small pieces into small buttons behind tie
- Pull the small piece down
- Swipe to deflect large pieces
- Tie and adjust the tie
7. Eldredge belt type
This is one of the ways to tie a tie quite nicely and is difficult because it creates many different angles on the knot instead of the smooth knot you often see in other ways of tie.
You should only use this method if you want to impress and stand out in events.
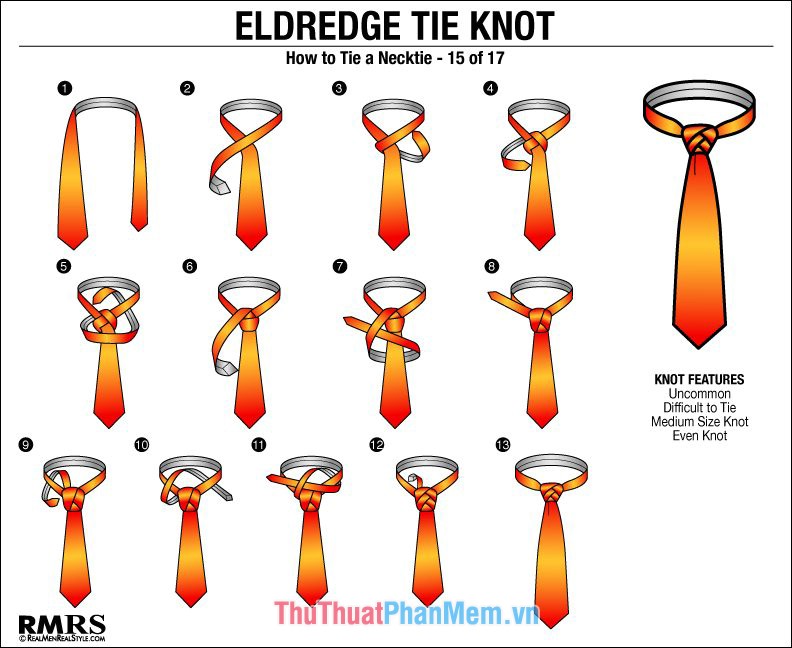
Manipulation details:
- Place tie on collar: large piece on the right, small piece on the left
- Fold the small piece over the larger
- Small round piece behind big piece
- Drag the small piece over and for the button, drag to the right
- Fold the small piece over the larger piece, pull it back and insert it into the knot
- Pull the small piece out and to the right
- Round the small piece back and nest it over the button as shown in Figure 7
- Drag the small piece to create a knot
- Place the small piece on the bottom and pull up
- Drag the small piece below the button
- Drag the small piece to the right through the nts
- Drag the small piece to create a knot
- Tie and adjust the tie
8. Trinity knot type
Just like the Eldredge style, the Trinity tie is also unique in shape when it creates 3 symmetrical angles instead of a straight corner like normal knots. When you finish tying, you will see that the knot is quite large.
You should also use this method in daily events instead of formal places.
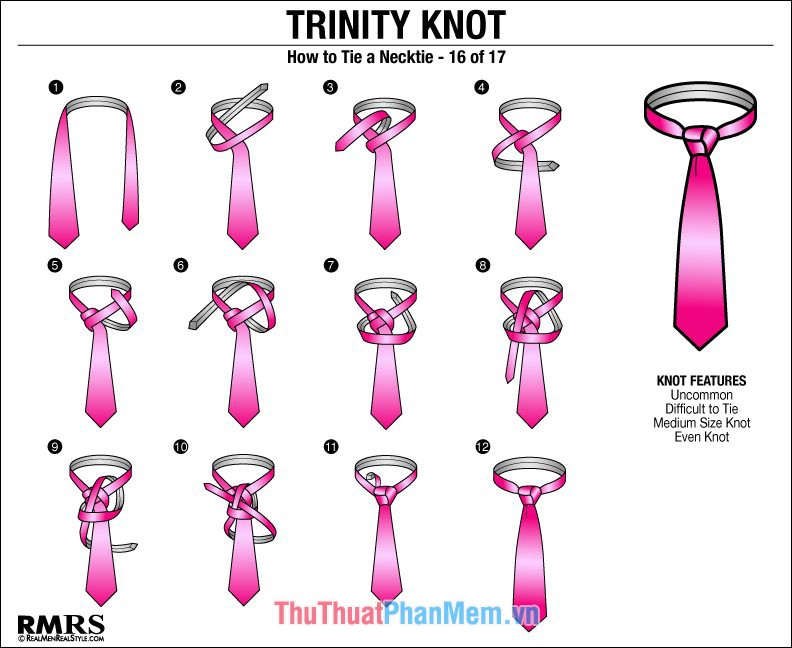
Manipulation details:
- Place tie on collar: large piece on the right, small piece on the left
- Fold the small piece over the larger piece and thread through the button from the bottom
- Drag the small piece outside to the right
- Fold the small piece behind the debris
- Drag the small piece over
- Drag the small piece over the button and bring it to the right
- Fold the small piece over the larger piece and pull over the button from the bottom
- Pull the small piece out and put in the button
- Take the small piece behind the big piece
- Drag the small piece over the button as shown in Figure 10
- Drag the small piece to create a knot
- Tie and adjust the tie
Above TipsMake.com introduced to you some ways to tie a standard and beautiful tie in accordance with different events and environments in life. Hopefully the article will help you, wish you success!
You should read it
- Take beautiful photos on the plane with the following tips
- Instructions on how to align beautiful margins for A4 paper size in Word
- New USB 4 standard specifications: 8 times the speed of USB 3.0, 5GB / s data transfer
- Download app for animation 2D CrazyTalk Animator 2 Standard is priced at $ 49.95, free of charge
- Alignments in Word 2007 standard and fastest
- 10 simple photography techniques for impressive photos
 What is ASCII? The ASCII code is standard and complete
 How to press the network cable according to standards A and B
 100+ Best Birthday Cake Model 2020
 What is UEFI and Legacy standards? Differences between UEFI, Legacy, BIOS
 What are MBR, GPT? Compare the differences between MBR and GPT when partitioning drives
 Guide to using gas stoves economically and safely, avoiding explosion