How to prevent DDoS attack with Nginx
Distributed Denial of Service (DDoS) attacks, through abusive digital communications tactics, overload server resources..
Distributed Denial of Service (DDoS) attacks, through abusive digital communications tactics, overload server resources. These types of attacks are organized raids in the computer world. Countless nasty opposing actions come together to create a threat of tremendous power, forcing a server to pause.
Worst of all, there are many means to conduct guerrilla web wars against such servers. Fortunately, servers can be configured to resist such attacks.
Nginx, a very popular server system for Unix machines, comes with enough integrated functionality to significantly limit the effectiveness of DDoS attacks.
Here are a few effective options to handle such threats with Nginx.
Backup configuration file
Before you change any settings, make sure you make a quick backup of the server's configuration. The following command works for this purpose:
sudo cp /etc/nginx/nginx.conf /etc/nginx/nginx.conf.backup-original

Once completed, you are ready to continue.
Check traffic
Tracking traffic (traffic) on the server makes it easy to optimize security and implement additional tactics. Nginx has a module created specifically for this purpose.
Set status page
Nginx usually comes with a module called 'stub status' (http_stub_status_module), which allows this type of functionality to be integrated into your server environment quite easily. First, test it using the following command:
nginx -V

Or use the following command to find it faster:
nginx -V 2>&1 | grep -o with-http_stub_status_module

If your output looks like the output above, everything is fine. If not, you will need to install or recompile your Nginx installation with the included module.
Setting up the status page you can check is very simple, but you also need to limit the access to a minimum (only your computer) to maintain security. Start by opening the server's main configuration file found at /etc/nginx/nginx.conf.
Open it and add the following code to 'http directive' to activate the module, replace your own information into 'localhost,' '/ status_page' and '127.0.0.1'.
server { listen 80; listen [::]:80; server_name localhost; ## # Status Page Settings ## location /status_page { stub_status on; allow 127.0.0.1; allow ::1; deny all; } }
Note : You will need sudo privilege to modify this file.

Now, check your configuration:
sudo nginx -t

If all goes well, send your server a reload signal:
sudo systemctl reload nginx

To access your status page, visit server_name location , followed by '/ status_page' in the web browser or by using the command line tool like curl. (This is useful if your browser cache does not automatically update). The following is the curl command to access the page in the examples:
curl localhost/status_page

In the browser, the above command results look like the following image.

Check access logs
If you notice unusual traffic when checking the status page configured above, you may want to check the server's access logs. Server access logs can be found at '/var/log/nginx/access.log'. The log lists the HTTP methods used, the date / time of the access attempts, the user agent, and the visited pages.

Limit connections
Among the many useful tactics that prevent DDoS attacks are worth a try, one of the simplest and most effective ways is to limit the speed of incoming traffic.
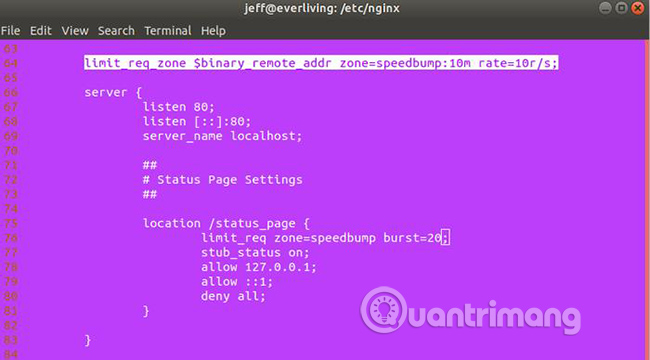
Ideally, you should restrict access to just enough to prevent malicious bots from overwhelming your server, while maintaining reasonable prices. In Nginx, this can be done with directives (directive) limit_req_zone and limit_req. The following code sets the memory and speed constraint conditions to use at any location your server is configured to display:
limit_req_zone $binary_remote_addr zone=speedbump:10m rate=10r/s;
The 'Zone' specifies the name and capacity (in Megabytes in this case) of the memory space, where the user's request is stored. 'Rate' sets the total number of requests that Nginx will accept per second (10 requests in this example). Consider this code as a rule and the following is the use of that rule:
limit_req zone=speedbump burst=20;
The above code actually does a bit more than just implementing the limit rule. It also adds a small queue of up to 20 requests to gently handle legitimate connections, displaying a bit faster than normal, exceeding both rules and queues leading to 503 errors for the client. Both directives look like the following in nginx.conf:
Blacklist IP address
If you have an IP address that is executing your server DDoS attack, you only need to blacklist it and remove any connections originating from this IP address.
Add the following code to your server directive:
location / { deny 123.123.123.0/28; # . }
Block requests for certain files
If the DDoS attack is targeting certain files on your server - for example, the xmlrpc.php file on WordPress (this is a file that is often targeted in most WordPress servers), you can block all requests for it. Add this code to your server directive:
location /xmlrpc.php { deny all; }
Follow the above process and you will be able to restrict most DDoS attacks. Be sure to check the Nginx documentation for additional security options that you can apply.
Hope you are succesful.