How to Install Eclipse and Setup ADT
The Android market is booming, and anyone can create the next big app. All it takes is a good idea and some free development tools. Installing the tools is a fairly straightforward process. In just a few minutes you can be working on your...
Table of Contents
Part 1 of 2:
Installing Eclipse
-
 Install the Java Platform. Eclipse and ADT are built on the Java platform, so in order to run them you will need the latest version of the Java Development Kit (JDK). The JDK is available for free from the Oracle website. Make sure to download the version appropriate for your operating system.
- If you don't have a Java Runtime Environment (JRE) installed, Eclipse will fail to open.
-
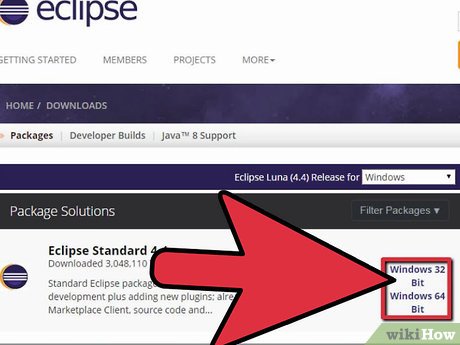 Download the Eclipse Platform. Before you can install your Android-specific tools, you will need to download the Eclipse IDE, which is what the Android tools are built on top of. Eclipse is available for free from the Eclipse Foundation.
- For most Android developers, Eclipse Standard package will contain everything you need.
-
 Unzip the Eclipse file. Eclipse will be downloaded as a ZIP file. Simply extract the ZIP file into a folder of your choosing, such as C:. The ZIP file contains a subdirectory called 'eclipse', so extracting the file into the C: drive will result in the folder 'C:eclipse'.
- Many users report issues with using Windows' built-in unzipping program. When extracting the file, use an alternative program such as 7-Zip or Winzip.
-
 Create a shortcut to Eclipse. Since Eclipse isn't 'installed' in the traditional sense, you might want to create a shortcut to it so that you can quickly access the program from your desktop. This will also allow to easily specify the Java Virtual Machine (JVM) that you will be working with.[1]
- Right-click on eclipse.exe and select Send To. Click 'Desktop (create shortcut)'. This will create a new shortcut on your desktop that will point to the eclipse.exe file.
-
 Specify the Java Virtual Machine. If you have multiple JVMs installed on your computer, you can set Eclipse to always use a specific one. This can prevent errors from occurring if your machine switches default JVMs through other programs.
- To specify your installation of the JDK, add the following line to your Eclipse shortcut, replacing the path with the location of your javaw.exe file:
-vm C:pathtojavaw.exe[2]
- To specify your installation of the JDK, add the following line to your Eclipse shortcut, replacing the path with the location of your javaw.exe file:
Part 2 of 2:
Installing the ADT Plugin
-
 Download and install the Android Software Developer Kit (SDK). This is available for free from the Android website. Select the 'Use an Existing IDE' option to download just the SDK. You can download an ADT bundle that includes Eclipse and comes preconfigured, but this method ensures that you have the latest version of Eclipse.
- After installing the SDK, the SDK Manager should open automatically. Leave it open for the next step.
-
 Add packages to your Android SDK. Before you can begin using the SDK for development, you will need to add the packages you want to use to your Android SDK. In the SDK Manager, you should see a list of all the available packages for download. For basic development, be sure to grab the following:
- The most recent Tools package in the Tools folder.
- The most recent version of Android (This is the first Android folder in the list).
- The Android Support Library, which can be found in the Extras Folder.
- Click Install when finished. The files will be downloaded and installed.
-
 Open Eclipse. You will be installing ADT from within the Eclipse program. If Eclipse won't start, ensure that you have specified your JVM (see previous section).
 -
 Install the ADT plugin. The ADT plugin will need to be downloaded within the Eclipse program directly from the Android developers' repository. You can quickly add that repository to your Eclipse installation.
- Click Help. Select Install New Software. This will open the Available Software screen, with a list of your available software from the repository you have selected.
-
 Click the 'Add' button. This is located to the right of the 'Work with' field. Clicking this button will open the 'Add Repository' dialog box. Here you will enter the information to download the ADT plugin.
- In the 'Name' field, enter 'ADT Plugin'
- In the 'Location' field, enter 'https://dl-ssl.google.com/android/eclipse/'
- Click OK.
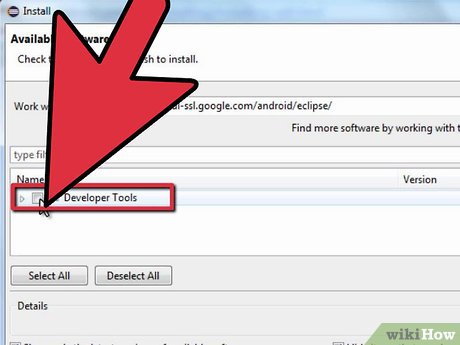
- Check the 'Developer Tools' box. Click Next to display the list of tools that will be downloaded. Click Next again to open the license agreements. Read them and then click Finish.
- You may get a warning that the validity of the software cannot be established. It is OK to ignore this warning.
-
 Restart Eclipse. Once the tools have finished downloading and installing, restart Eclipse to complete the installation. Upon restarting, you will be greeted with the 'Welcome to Android Development' window.
 -
 Specify the location of the Android SDK. IN the Welcome screen, click 'Use existing SDKs' and then browse for the directory of the SDK you installed at the beginning of this section. Once you click OK, your basic ADT installation is complete.[3]
Was this article helpful?
Your feedback helps us improve.
Related Articles
 What is a lunar eclipse? Lunar eclipse occurs when?3 minutes read
 3 super computers create eclipse eclipses that help you preview the total eclipse tonight3 minutes read
 The strange object appeared in the picture of the lunar eclipse in Hanoi2 minutes read
 What is a solar eclipse? When does a solar eclipse take place?2 minutes read
 How to Download Eclipse2 minutes read
 Amazing phenomenon - the 'annular eclipse' glows in the sky today7 minutes read
Reader Comments 0
Sign in with email or Google to join the discussion.