How to fix the latest laptop Wi-Fi connection problem.
Is your laptop unable to connect to Wi-Fi while other devices are connecting normally? In this article, TipsMake will suggest 9 ways to resolve this issue.
Table of Contents
Besides advantages like compactness and portability, laptop users frequently encounter wireless connectivity issues. One of the most common problems is that the laptop cannot connect to Wi-Fi while other devices can connect normally. So, how should you handle this situation?
Fixing the problem of a laptop not connecting to Wi-Fi.
Table of Contents:
I. Causes of Laptop Wi-Fi Connection Issues .
II. How to Fix Laptop Wi-Fi Connection Issues . Method 1: Restart your laptop and related devices . Method 2: Uninstall and reinstall the network driver . Method 3: Refresh (renew) the IP and DNS addresses . Method 4: Set the frequency to 2.4 GHz instead of 5 GHz for dual-band Wi-Fi . Method 5: Change Power Settings . Method 6: Temporarily disable antivirus software . Method 7: Turn off IPv4 and IPv6 internet protocols .
I. Reasons why your laptop cannot connect to Wi-Fi
If your laptop is unable to connect to Wi-Fi, the reason could be:
- Modem or router malfunction, or incorrect configuration.
- Incorrect laptop settings.
- Compatibility issues, or outdated network drivers.
- Antivirus software, etc.
II. How to fix the problem of a laptop not connecting to Wi-Fi
Method 1: Restart your laptop and related devices.
Try the simplest solution: restart your router, modem, and laptop. IP address conflicts are quite common, often caused by too many devices connecting to the same router, and two of them having the same IP address.
Additionally, try restarting your laptop, as some system errors can interfere with the Wi-Fi connection.
Method 2: Uninstall and reinstall the network driver.
To uninstall and reinstall the network driver, follow these steps:
Step 1: Right-click the Start button and select Device Manager from the menu to open the corresponding window.
Step 2: In the Device Manager window, navigate to Network adapters .
Step 3: Right-click the Wi-Fi device and select Uninstall device .
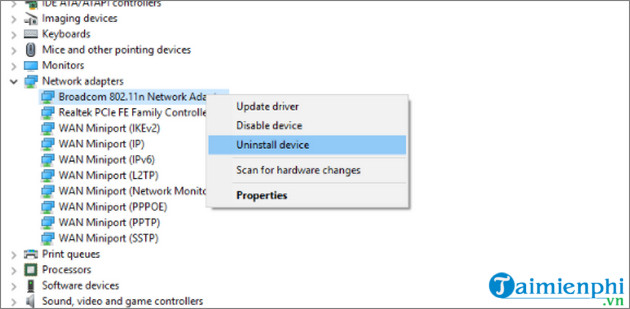
Step 4: Finally, restart your computer to save the changes.
Or if your laptop can't find any Wi-Fi networks to connect to, or the networks you're using aren't showing up, you can find the causes and solutions here.
Method 3: Refresh your IP address and DNS.
DNS translates hostnames into IP addresses and vice versa. All this data is stored in the DNS cache, and when it's full, it can cause connection loss. To resolve this, follow these steps:
Step 1: In the search bar, type cmd , and in the search results list, right-click on Command prompt and select Run as administrator .
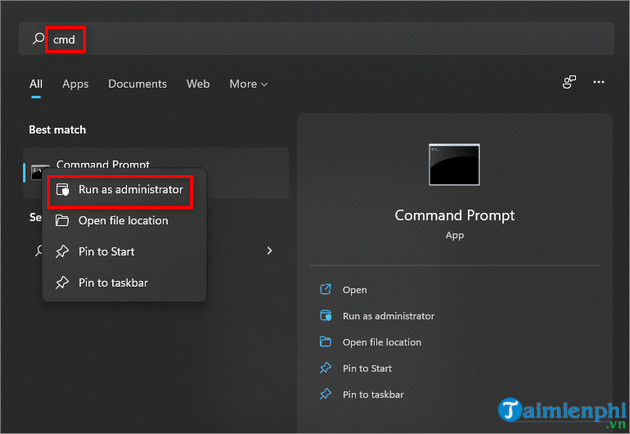
Step 2: Enter the following commands one by one and press Enter after each command:
ipconfig /release
ipconfig /renew
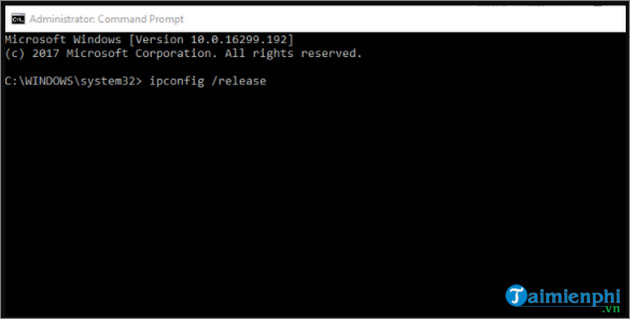
Step 3: Wait a moment and then type the following command and press Enter :
ipconfig /flushdns
Step 4: Finally, simply close the Command Prompt window and try reconnecting to Wi-Fi to see if the problem of your laptop not being able to connect to Wi-Fi has been resolved.
Method 4: Set the frequency to 2.4 GHz instead of 5 GHz for dual-band Wi-Fi.
Although 5 GHz is faster and more stable, 2.4 GHz transmits signals further, can bypass firewalls, and is compatible with many older wireless devices. Therefore, if other devices in your home are using 5 GHz and can connect smoothly to Wi-Fi, you should reset your Wi-Fi settings to 2.4 GHz, matching your laptop's settings.
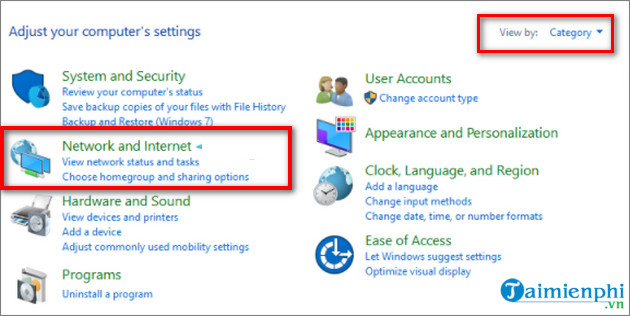
Step 1: First, press the Windows + S key combination and type "Control" to open the Control Panel.
Step 2 : Set the "View by" option to "Category" , then find and click on "Network and Internet".
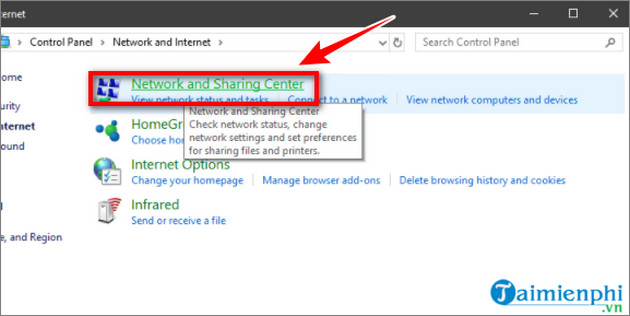
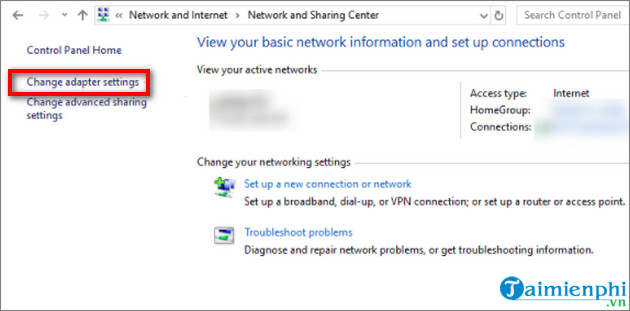
Step 3: Select Network and Sharing Center . In the left pane, select Change adapter settings.
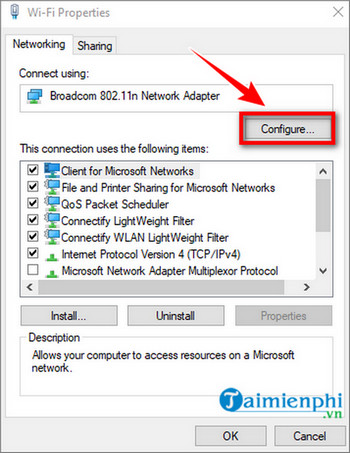
Step 4: Right-click on the name of the faulty Wi-Fi network and select Properties .
In the dialog box that appears on the screen, select Configure.
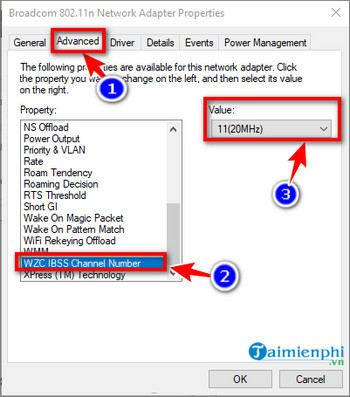
Step 5 : Open the Advanced tab , then select WZC IBSS Number Channel in the left pane. In the Value column , select 1, 6, or 11.
Method 5: Change Power Settings
Step 1: Right-click the battery icon in the bottom right corner of the Taskbar and select Power options.
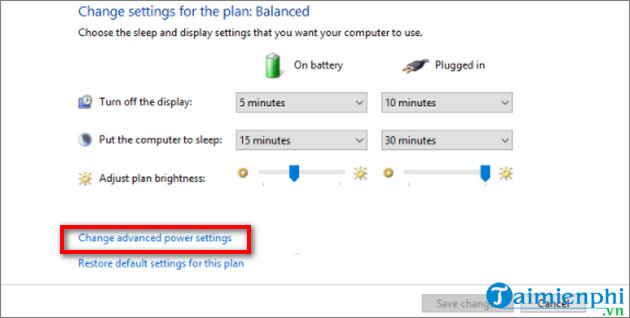
Step 2: In the next window, under Preferred power plan , select Plan setting . Then click Change advanced power settings .
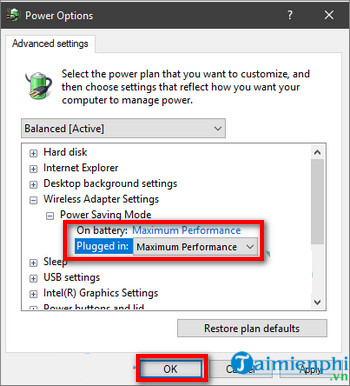
Step 3: Expand the Wireless Adapter Settings and Power Saving Mode sections.
Step 4 : Set the Power Saving Mode value to Maximum Performance when using battery power and when plugged in .
Step 5: Click OK to save the changes and close the Power Options window.
Method 6: Temporarily disable your antivirus software.
Sometimes antivirus software can block internet connections due to certain firewall or network protection features. Therefore, try disabling it to see if that helps resolve the issue of your laptop not connecting to Wi-Fi.
Method 7: Disable IPv4 and IPv6 Internet protocols
Step 1: Press the Windows + I key combination to open the Settings window, then select Network & Internet.
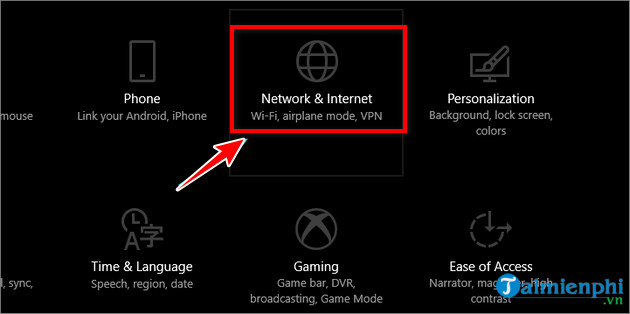
Step 2 : Find and click on Change adapter options.
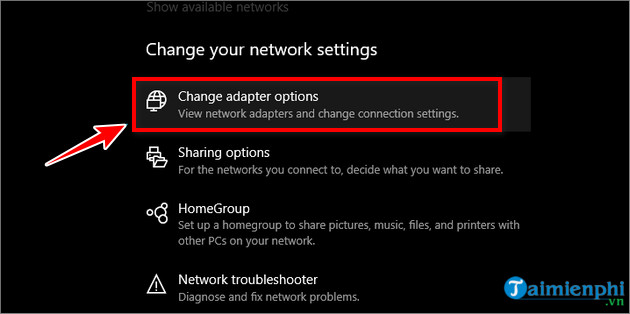
Step 3: Right-click on the Wifi adapter and select Properties . Uncheck IPv4 , then confirm to complete.

Step 4: Now try reconnecting to Wi-Fi. If you still can't connect, select IPv4 again and deselect IPv6.
Step 5: Click OK to complete.
Taimienphi.vn hopes that the methods above will help you resolve the issue of your laptop not connecting to Wi-Fi. Good luck!
Was this article helpful?
Your feedback helps us improve.
Related Articles
 Install laptop to prioritize wired network connection2 minutes read
 How to fix slow or unstable Wi-Fi connection8 minutes read
 How to fix the problem of not connecting to WiFi in Windows 104 minutes read
 How to Share your phone's Internet connection to your laptop10 minutes read
 Steps to fix charging laptop not to power7 minutes read
 Fix the problem of unstable WiFi on laptop with Windows 8.1 installed3 minutes read
Reader Comments 0
Sign in with email or Google to join the discussion.