How to Create an Equilateral Springs Pattern in Microsoft Excel
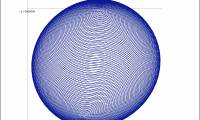
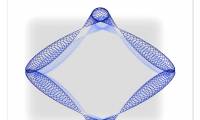
You will learn to make the 'equilateral springs' pattern and image below, and the dozens of variations the file permits therefrom. Become familiar with the basic image to be created: === Previous Lessons Learned ===
Table of Contents
Part 1 of 4:
Previous Lessons Learned
-
 This article relies on the previous accomplishment of the eight articles preceding it:
- How to Create Artistic Patterns in Microsoft Excel
- How to Create a Flower Pattern in Microsoft Excel
- How to Create a Tornado Screw Pattern in Microsoft Excel
- How to Create a Uniform Spiral Pattern in Microsoft Excel
- How to Create an Insectoid Pattern in Microsoft Excel
- How to Create a Skewed Spheroids Pattern in Microsoft Excel
- How to Create a Floral Glassware Pattern in Microsoft Excel
- How to Create a Squiggly Frame Pattern in Microsoft Excel.
- Please complete those first before attempting this one.
Part 2 of 4:
The Tutorial
-
 Start a new workbook by saving the previous workbook from How to Create a Squiggly Frame Pattern in Microsoft Excel under a new name. Save the workbook into a logical file folder.
 -
 Enter the new Equilateral Triangle Data Table.
- Enter into cell AB4 the note, 1440 points/3 legs = 480 pts/Leg. Font bold red.
- Enter Equilateral to cells AB5 and AC5.
- Enter Triangle x to AB6 and Triangle y to AC6. Format Cells cell range AB5:AC6 Alignment horizontal center and Font Bold Underline Single.
- Edit Go To cell range AB7:AB486 and enter -1.8138 into cell AB7 and .001 into cell AB486, Edit Fill Series Columns Linear Proposed Step Value should be 0.0037866388308978 or so. OK.
- Enter .001 into cell AB487. Edit Go To cell range AB488:AB966 and enter 0.0037866388308978 into cell AB488 and 1.8138 into cell AB966, Edit Fill Series Columns Linear Proposed Step Value should be 0.0037866388308978 or so. OK.
- Edit Go To cell range AB967:AB1447 and enter 1.8138 into cell AB967 and -1.8138 into cell AB1446, Edit Fill Series Columns Linear Proposed Step Value should be -0.00757327766179561 or so. OK. Copy cell AB1446 to cell AB1447.
- Edit Go To cell range AC7:AC486 and enter -1.5708 into cell AC7 and 1.5708 into cell AC486, Edit Fill Series Columns Linear Proposed Step Value should be 0.00655865084502816 or so. OK.
- Enter 1.5708 into cell AC487. Edit Go To cell range AC488:AC966 and enter 1.56423767594987 into cell AC488 and -1.57079742797353 into cell AC966, Edit Fill Series Columns Linear Proposed Step Value should be -0.00655865084502816 or so. OK.
- Edit Go To cell range AC967:AC1447 and enter -1.5707963267949 into cell AC967 and Edit Fill Down.
- Edit Go To cell range U1446:AA1446 and copy it and paste it to U1447.
-
 Complete all changes in the upper Defined Variables section.
- Enter On=0,Off=1 cell A4 = 1
- Enter Adjuster = 1
- Enter TURNS = 9
- Enter S's Count = 2
- Enter Var = 12
- Enter Divisor = 360
- Enter top = "=ROUND((-B4*PI())+(Adj),0)" 968061
- NEW: Enter 28.6470945405378 into cell D4 and Format Cell Number Number Custom "(FFF)" 0.000000 with parentheses and quotes. Go to cell AA7 and enter "=D4" and Insert Name Define name FFF to cell $AA$7.
- Enter YN = Y
- Enter Power = 1
- Enter AAA = 20
- db = 4.5
- All the rest are the same as they were before.
-
 Complete all changes in the upper Columnar Formulas section.
- NEW: Enter to B7 the formula "=IF(EVEN(S_COUNT)=S_COUNT,ROUND((-B4*PI())+(Adj),0),0.0000000000001)"
- c = -312555 as the result of "=ROUND(-EXP((PI()^2)+(Cc*-(db))),0)+Designer"
- NEW: Enter to D7:D1447 w/ D7 active "=X7/IF(Divisor=0,S_COUNT,Divisor)+(IF(COS((ROW()-7)*PI()/180*Factor)<0, ABS(COS((ROW()-7)*PI()/180*Factor))^Power*-1,COS((ROW()-7)*PI()/180*Factor)^Power)*IF(AAA=1,0,1))+IF(AAA=0,0,AB7)"
- NEW: Enter to E7:E1447 w/ E7 active "=Y7/IF(Divisor=0,S_COUNT,Divisor)+(IF(SIN((ROW()-7)*PI()/180*Factor)<0, ABS(SIN((ROW()-7)*PI()/180*Factor))^Power*-1,SIN((ROW()-7)*PI()/180*Factor)^Power)*IF(AAA=1,0,1))+IF(AAA=0,0,AC7)"
- Check that F7:F1447 with F7 active contains "=IF(A7=0,F6,((PI())*((SIN(B7/(C7*2))*GMLL*COS(B7)*GMLL*(COS(B7/(C7*2)))*GMLL)+D7)))"'
- Check that G7:G1447 with G7 active contains "=IF(A7=0,G6,((PI())*((SIN(B7/(C7*2))*GMLL*SIN(B7)*GMLL*(COS(B7/(C7*2)))*GMLL)+E7)))"
- Check that Sync1 refers to H2 and Sync2 refers to J2. Check the H2 formula, "=H1/GMLL" abd check the J2 formula, "=J1/GMSL".
- Check the H7 formula, "=F7*GMLL*Sync1" and the I7 formula, "=G7*GMLL*Sync1".
- Check the J7 formula, "=F7*GMSL*Sync2" and the K7 formula, "=G7*GMSL*Sync2".
- Check that the lookup tables are unchanged, except as done above.
Part 3 of 4:
Explanatory Charts, Diagrams, Photos
- (dependent upon the tutorial data above)
-
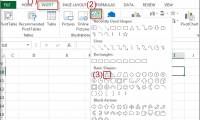
 Create the Chart.
- Edit Go To cell range F7:G1446 on the Data worksheet and using Chart Wizard or the Ribbon, select Charts All/Other, Scatter, Smoothed Line Scatter. Copy the Chart to the Chart worksheet and expand it with the double-headed arrow via the bottom right corner.
- Select Chart Layout and get rid of the axes and grid lines and legend; select Data Series 1 and make Line Weight 1 color Navy Blue (default) or as you please, perhaps from the Color Wheel.
- Select the Chart Area and Format Selection under Chart Layout Current Selection Fill red.

Part 4 of 4:
Helpful Guidance
- Make use of helper articles when proceeding through this tutorial:
- See the article How to Create a Spirallic Spin Particle Path or Necklace Form or Spherical Border for a list of articles related to Excel, Geometric and/or Trigonometric Art, Charting/Diagramming and Algebraic Formulation.
- For more art charts and graphs, you might also want to click on Category:Microsoft Excel Imagery, Category:Mathematics, Category:Spreadsheets or Category:Graphics to view many Excel worksheets and charts where Trigonometry, Geometry and Calculus have been turned into Art, or simply click on the category as appears in the upper right white portion of this page, or at the bottom left of the page.
Was this article helpful?
Your feedback helps us improve.
Related Articles
 How to Create a Floral Glassware Pattern in Microsoft Excel1 minutes read
 How to draw an equilateral triangle in Excel2 minutes read
 How to Create a Flower Pattern in Microsoft Excel7 minutes read
 How to Create a Tornado Screw Pattern in Microsoft Excel2 minutes read
 How to Create the One Sphere Pattern in Microsoft Excel4 minutes read
 How to Create an Insectoid Pattern in Microsoft Excel6 minutes read
Reader Comments 0
Sign in with email or Google to join the discussion.