How to Change a File Extension
File extensions tell your computer what kind of file it is and what types of software programs on your computer should open the file. The easiest was to change a file's extension is to save the file as a different file type from within a....
Method 1 of 4:
Changing a File Extension in Nearly Any Software Program
-
 Open a file in its default software program.
 -
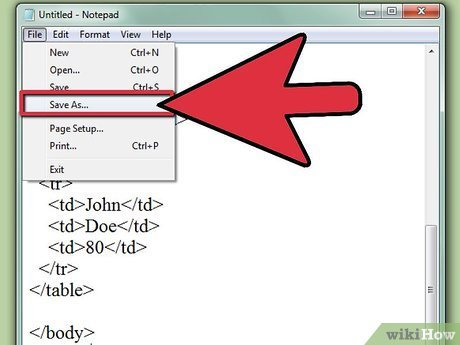 Click the File menu, and then click Save As.
 -
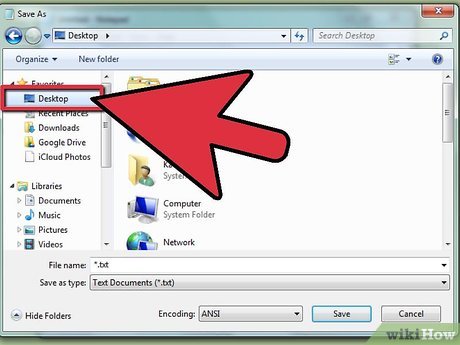 Choose a location for the file to be saved.
 -
 Name the file.
 -
 In the Save As dialog box, look for a dropdown menu labeled Save As Type or Format.
 -
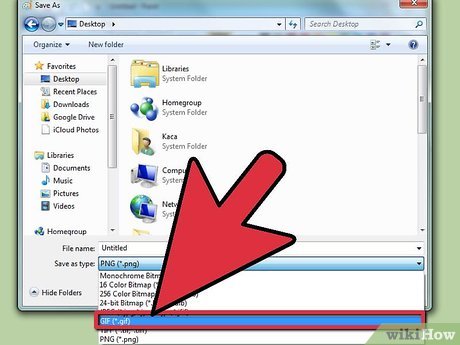 Choose a new file type for the file from the dropdown menu.
 -
 Click the "Save As" button. The original file will still be open in the software program.
 -
 Find the new file where you chose to save it.
Method 2 of 4:
Making File Extensions Visible on Windows
-
 Open the Control Panel. Click the Start menu, and then click Control Panel. If you're using Windows 8, click here.
 -
 Click Appearance and Personalization. You xan find this in the Control Panel.
- On Windows 8, in the ribbon, click Options.
-
 Click Folder Options.
 -
 Click the "View" tab, in the Folder Options dialog box.
 -
 Make file extensions visible. In the Advanced settings list, scroll down until you see Hide extensions for known file types. Click the box to uncheck it.
 -
 Click on Apply, and then click OK.
 -
 Open the Windows Explorer file browser to see the file extensions.
Method 3 of 4:
Making File Extensions Visible on Windows 8
-
 Open Windows Explorer.
 -
 Click the View tab.
 -
 Check the File name extensions box in the View/Hide section.
 -
 Observe the location of file extensions. When you open a new Windows Explorer window, file extensions are visible.
Method 4 of 4:
Making File Extensions Visible on Mac OS X
-
 Select a Finder window or open a new Finder window. You can also click the Desktop to switch to the Finder.
 -
 Click the Finder menu. Next, click Preferences.
 -
 Click "Advanced" in the Finder Preferences window.
 -
 Click the Show all filename extensions box to add a check.
 -
 Close the Finder Preferences window.
 -
 Open a new Finder window. The files will now show their file extensions.