How to build a CRUD to-do list app and manage its state in React
When managing complex state in the Next app, things can get tricky. However, you can overcome it by learning the fundamentals of React and managing state through this classic app.
Table of Contents
Prepare before you start
Before you start making a to-do list app, you must prepare:
- Basic knowledge of modern JavaScript operators and React's useState hook.
- Understand how to destructure arrays and objects in JavaScript.
- Node 16.8 or later is installed on the local machine and knows how to use a package manager like npm or yarn.
Understanding application status and management
Application state refers to the condition of the current app at a given time, including app management & information, such as user input and fetching data from a database or an API (Application Programming Interface).
To understand application state, consider possible scenarios of a simple counter app, including:
- Default state when counter is at 0.
- The state is incremented when the counter is incremented by 1.
- The state drops when the counter is decremented by 1.
- The reset state when the counter returns to the default level.
A React component can subscribe to state changes. When the user interacts with such a component, actions such as clicking a button can update this state.
The following code shows a simple counter application that, by default, is used to manage the state of clicks:
const [counter, setCounter] = useState(0); return ({counter}
);Setup and install
The project's repository contains two branches: starter and context. You can use the starter branch as a base to build the project from scratch or the context branch to preview the final demo.
Starter App Cloning
The starter app provides the UI you need for the final app, so you can focus on implementing the core logic. Open a terminal and run the following command to clone the starter branch of the repository to the local machine:
git clone -b starter https://github.com/makeuseofcode/Next.js-CRUD-todo-app.gitRun the following command, in the project directory to install the dependencies and launch the development server:
yarn && yarn devOr:
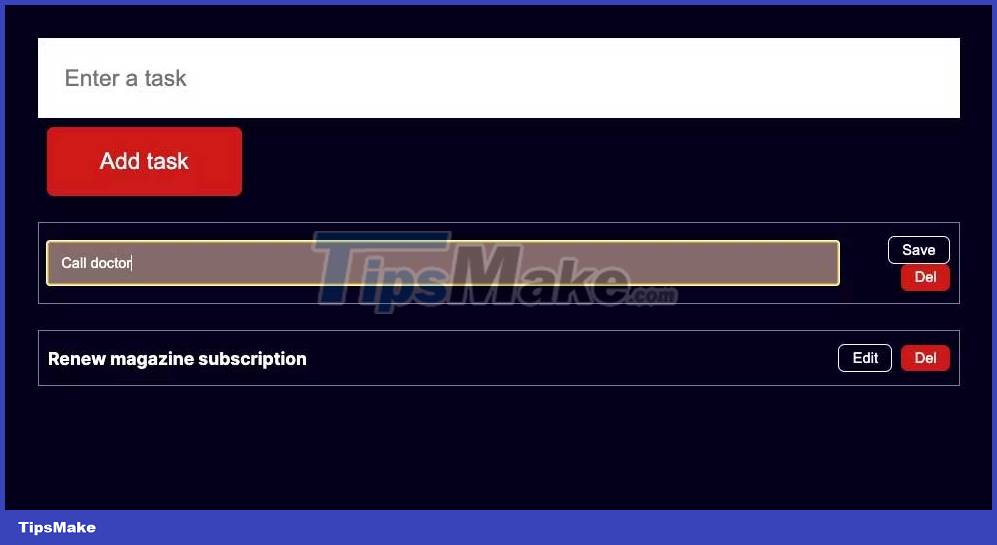
npm i && npm run devIf all is well, the UI should appear in your browser:

Deploy logic
The Context API provides a way to manage and share state data across components without manual prop drilling.
Step 1: Create and export context
Create a folder src/app/context to save context files and keep the project folder well organized. In this directory, create a file todo.context.jsx that contains all the context logic for this application.
Import the createContext function from the react library and call it, storing the result in a variable:
import { createContext} from "react"; const TodoContext = createContext();Next, create a hook useTodoContext that returns the TodoContext as an available form.
export const useTodoContext = () => useContext(TodoContext);Step 2: Create and manage states
To perform CRUD (create, read, update, delete) of your application, you need to create states and manage them with the Provider component .
const TodoContextProvider = ({ children }) => { const [task, setTask] = useState(""); const [tasks, setTasks] = useState([]); return {children}; }; export default TodoContextProvider;Just before the return statement , create a handleTodoInput function that runs when the user types are in to-do . This function then updates the task state .
const handleTodoInput = (input) => setTask(input);Add a createTask function that runs when the user submits an app to-do . This function updates the status of tasks and assigns a random ID to the new task.
const createTask = (e) => { e.preventDefault(); setTasks([ { id: Math.trunc(Math.random() * 1000 + 1), task, }, .tasks, ]); };Create an updateTask function that maps through a list of tasks and update the task containing an ID that matches the ID of the task that was clicked.
const updateTask = (id, updateText) => setTasks(tasks.map((t) => (t.id === id ? { .t, task: updateText } : t)));Create a deleteTask function that updates the list of tasks so that it includes all tasks that contain IDs that do not match the parameters provided.
const deleteTask = (id) => setTasks(tasks.filter((t) => t.id !== id));Step 3: Add a state and handler for the provider
Now that you've created the states and written the code to manage them, you need to make the state and handler functions available to the Provider . You can provide them as an object, using the value property of the Provider component .
return ( {children} );Step 4: Context scope
The created Provider must contain a top-level component to make the context available to the entire application. For this to work, edit src/app/page.jsx and include the Todos component with the TodoContextProvider :
; ;Step 5: Use Context in Components
Edit the file src/app/components/Todos.jsx and destructure tasks , task , handleTodoInput , and createTask via a call to the useTodoContext function.
const { task, tasks, handleTodoInput, createTask } = useTodoContext();Now, update the form element to handle the submit event and change it to the main input field:
createTask(e)}> handleTodoInput(e.target.value)} /> Step 6: Show task in UI
You can now use the app to create and add a task to the tasks list . To update the display, you need to map over existing tasks and display them in the UI. First, create src/app/components/Todo.jsx containing a todo item.
In src/app/components/Todo.jsx , edit or delete a task by calling the updateTask and deleteTask functions created in the file src/app/context/todo.context.jsx .
import React, { useState } from "react"; import { useTodoContext } from "./context/todo.context"; const Todo = ({ task }) => { const { updateTask, deleteTask } = useTodoContext(); // isEdit state tracks when a task is in edit mode const [isEdit, setIsEdit] = useState(false); return ({isEdit ? ( updateTask(task.id, e.target.value)} /> ) : ( )}
| {task.task} |
|---|
); }; export default Todo;To show src/app/components/Todo.jsx for each task , drill down into the src/app/components/Todos.jsx file and conditionally map over tasks right after the header tag closes .
{tasks && ( {tasks.map((task, i) => ( ))} )}Test the application in the browser and confirm it gives the expected results.
Hope the article is useful to you.
Was this article helpful?
Your feedback helps us improve.
Related Articles
 How to manage state in React using Jotai6 minutes read
 How to build CRUD REST API using class-based viewer in Django REST framework7 minutes read
 How to Create a CRUD App with Django's Class Based Viewers12 minutes read
 Best React Usages in 20235 minutes read
 How to build a login screen with React and Bootstrap4 minutes read
 6 best free tutorials to learn about React and create web applications9 minutes read
Reader Comments 0
Sign in with email or Google to join the discussion.