Table of Contents
It doesn't take too much time and money to build a very effective burglar whistle to protect your home and help you rest assured. This article explains the key facts and context behind anti-theft horn.
Currently, the theft situation happens quite often. As long as you neglect, lose your guard a little, the thief will "visit" your house immediately. Not only are they "clean-up", but they are sometimes dangerous to our lives if detected.
The old tools had a ". Better prevention than cure " sentence so we should still prevent it before it happens to be the best. But even if you have locked all the doors, you can hardly be reassured by the thieves' sophisticated tricks. For added peace of mind, you can add an extremely effective anti-theft whistle with simple materials and circuit knowledge taught at the school to protect your home.
Mechanism of action of a homemade trap.

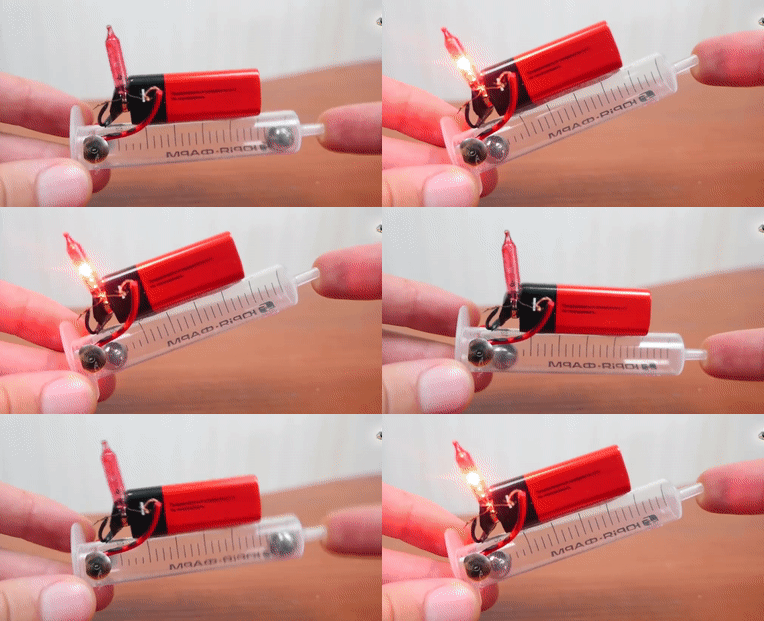
When you connect a pin of the battery to the top of the pin, the other pin is connected to the buzzer, 2 excess wires of the horn and the battery is connected to each other, forming an open circuit (because 2 pins do not touch each other).
When the iron ball touches the nail it turns the open circuit into a closed circuit, which helps the circuit work.
With this mechanism, you can change the horn into a light, forming a glowing trap.
Resources
- 01 plastic cylinder (you can buy it at any drug store)
- 01 9V square battery

- 01 small electric horn (taken in the doorbell or children's toys)
- 02 pins
- 01 iron ball (taken in the eraser)
Doing
Step 1

Put the iron ball into the empty syringe. Using a pin to fix the end of the cylinder, the ends of the nail should not touch each other.
Step 2

Apply glue, attach the battery that connects the wire to the 2 fixed poles on the cylinder body.
Step 3

Connect one wire to a pin, the other is left untouched.
Step 4
Connect one end of the siren to the end of the remaining pin. Then connect 2 excess wires of the battery and whistle together.
Step 5
Stuck in the door and go to sleep peacefully.
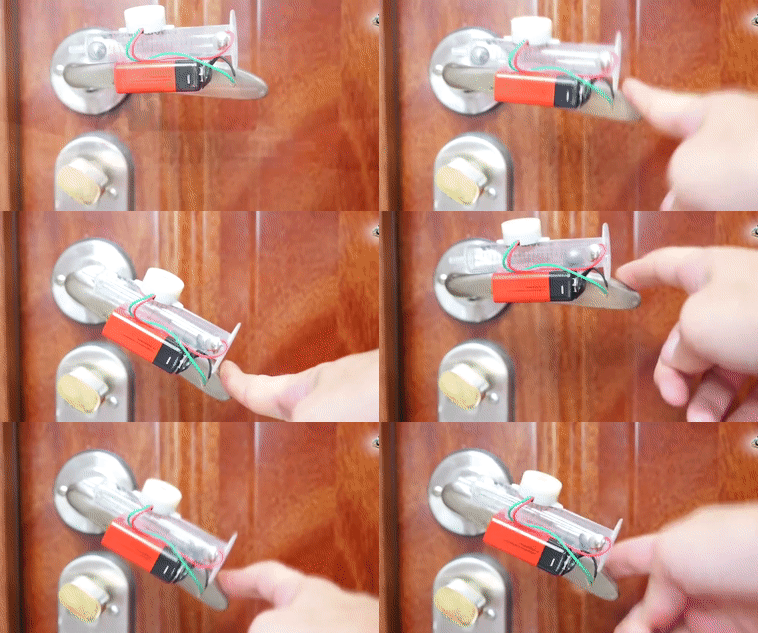
See the video below to better understand how to build this anti-theft whistle.
FAQ
What is anti-theft horn?
It doesn't take too much time and money to build a very effective burglar whistle to protect your home and help you rest assured.
What makes anti-theft horn notable?
This article explains the key facts and context behind anti-theft horn.
What are the key facts about anti-theft horn?
Step 4 Connect one end of the siren to the end of the remaining pin.
Related Articles
 8 Smart Anti-theft Ways That You Can Homemade at Home5 minutes read
 Marvel at the House with Newspaper That Has Been Around for Nearly4 minutes read
 Top of the Best Versatile Mops for Sisters: House Mop 3607 minutes read
 How to Make Super Simple Mini Fan Radiator Fan3 minutes read
 iPhone Theft: Complete Guide3 minutes read
 Making Homemade Mango Ice Cream in 4 Simple Ways, No Machine5 minutes read
Reader Comments 0
Sign in with email or Google to join the discussion.