Table of Contents
Touch typing means using all fingers by position and returning them to a home row, so you can type without searching for every key. The fastest way to learn is to prioritize accuracy, practice short sessions consistently, and increase speed only after the correct finger movements feel automatic.
Start with posture and the home row
- Sit with your back supported and shoulders relaxed.
- Keep elbows close to your body and bent at a comfortable angle.
- Place the keyboard so your wrists stay mostly straight rather than bent upward.
- Keep feet supported and place the top of the screen near eye level.
- Rest your fingers lightly; do not press harder than the keyboard requires.
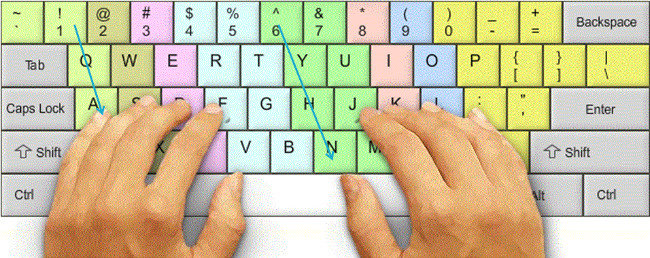
Place the left fingers on A S D F and the right fingers on J K L ;. The raised marks on F and J help your index fingers find the home row without looking. Thumbs rest near the space bar.
Which finger types each key?
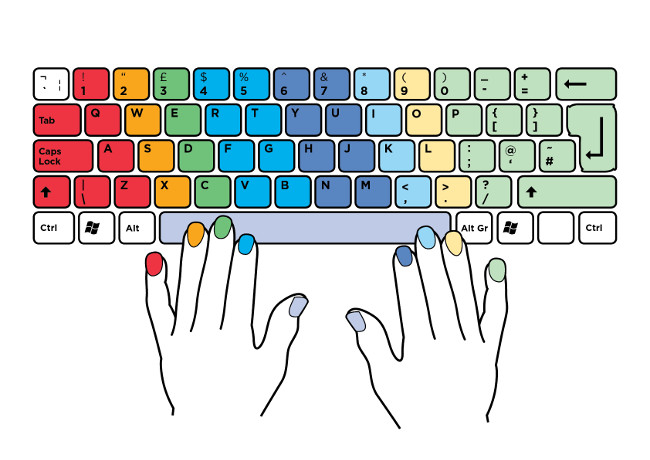
| Finger | Main letter keys on a QWERTY keyboard |
|---|---|
| Left little | Q, A, Z |
| Left ring | W, S, X |
| Left middle | E, D, C |
| Left index | R, F, V, T, G, B |
| Right index | Y, H, N, U, J, M |
| Right middle | I, K, comma |
| Right ring | O, L, period |
| Right little | P, semicolon, slash and nearby punctuation |
| Thumbs | Space bar |
Number, symbol, Shift, Enter, Backspace, and modifier-key assignments vary slightly by teaching method and keyboard layout. Follow one course consistently until the basic letter positions are secure.
A four-stage practice plan
Stage 1: Home-row control
Practice short combinations such as asdf jkl;, then simple words made from home-row letters. Keep your eyes on the screen and use the bumps on F and J to reset your hands.
Stage 2: Add the top and bottom rows
Learn two or three keys at a time. Mix new keys with familiar home-row letters, then type common words. Return each finger to its home position after reaching.
Stage 3: Sentences and punctuation
Move to ordinary sentences, capitalization, commas, periods, apostrophes, and numbers. Practice the language and keyboard layout you actually use. For Vietnamese, choose one input method such as Telex or VNI and keep it consistent while building accuracy.
Stage 4: Timed work
Take one- or two-minute tests after warm-up. Record words per minute and accuracy, but do not chase speed by allowing repeated errors. If accuracy drops below your target, slow down and isolate the difficult keys.
A useful 20-minute daily session
- 3 minutes: home-row and weak-key warm-up.
- 7 minutes: a structured lesson with new keys.
- 5 minutes: real words and sentences.
- 3 minutes: practice your most frequent error combinations.
- 2 minutes: one timed test and a note of speed and accuracy.
Short daily sessions are better than one long weekly session. Stop and adjust your setup if you feel pain, numbness, or tingling; typing practice should not be an endurance test.
How to improve without building bad habits
- Cover the hands or use a blank-keyboard view instead of repeatedly looking down.
- Use the assigned finger even when another finger feels faster at first.
- Type slowly enough to recognize an error as it happens.
- Practice difficult letter pairs and whole words, not random speed tests alone.
- Use light keystrokes and relax your hands between drills.
- Measure progress weekly; daily scores fluctuate with fatigue and text difficulty.
Free practice options
A structured course is helpful for beginners, while a customizable trainer is useful for weak keys and a plain speed test measures progress. See this comparison of websites for practicing touch typing and choose one primary course rather than switching tools every session.
Common problems
| Problem | Fix |
|---|---|
| You keep looking at the keyboard | Use the F and J bumps and practice very slowly with hands covered |
| Speed rises but accuracy falls | Reduce pace and repeat the error pattern correctly |
| One hand does most of the work | Return to finger-specific drills |
| Wrists or shoulders hurt | Stop, change posture and keyboard height, and seek advice if symptoms persist |
| Progress has stalled | Practice real text and target the three most frequent errors |
What progress should you expect?
There is no reliable promise that everyone will become proficient in two or four weeks. Progress depends on starting speed, practice quality, keyboard layout, language, and consistency. A better goal is measurable improvement: fewer glances at the keyboard, higher accuracy, and a gradual increase in comfortable words per minute.
A mechanical keyboard is not required. A stable, comfortable keyboard with a familiar layout is enough. Children can learn touch typing as well, but lessons should be short, age-appropriate, and focused on correct movement rather than competition.
Related Articles
 Top Websites for Practicing 10-Finger Typing and Improving Keyboard Speed11 minutes read
 How to Practicing Fast Keyboard Typing, Effective 10-finger Typing7 minutes read
 Tux Typing - Free Typing Practice Tool for Kids: Main Insights6 minutes read
 Software for Practicing 10-Finger Typing and Increasing Typing Speed11 minutes read
 How to Use 10 Finger BreakOut Free Typing Game to Practice 10-Finger Typing on Your PC7 minutes read
 Training Services for Quick Typing of 10 Fingers on the Browser10 minutes read
Reader Comments 0
Sign in with email or Google to join the discussion.