Table of Contents
Understanding Tutorials requires more than a headline. The overview below breaks down the key facts, changes, and user impact.
Tutorials Overview
Yast2 -i mysql mysql-client mysql-community-server apache2 apache2-mod_php5 php5-mysql php5-mcrypt php5-mbstring php5-gd
Then create a MySQL startup path (so that MySQL automatically activates when the system starts) and use MySQL server:
Chkconfig --add mysql /etc/init. D/mysql start
To increase security for MySQL installation, use the following command:
Mysql_secure_installation
After that, the system will ask you some information as follows:
Then continue to create the boot path for Apache and activate:
Chkconfig --add apache2 /etc/init. D/apache2 start
And install phpMyAdmin as follows:
Zypper install http://download. Opensuse. Org/repositories/server:/php:/applications/openSUSE_11.3/noarch/phpMyAdmin-3.3.4-1.1. Noarch. Rpm
Check if the installation of phpMyAdmin is successful by typing http://server1. Example. Com/phpMyAdmin/ or http://192.168.0.100/phpMyAdmin/ into the browser.
Install PureFTPd with MySQL support OpenSUSE PureFTPd packages support multiple backend standards, such as MySQL, PostgreSQL, LDAP.:
Yast2 -i pure-ftpd
Then we create the ftp group (ftpgroup) and the user (ftpuser) used to point all virtual user accounts there. Replace the 2001 group and account with any other parameters on your system:
Groupadd -g 2001 ftpgroup useradd -u 2001 -s / bin / false -d / bin / null -c "pureftpd user" -g ftpgroup ftpuser
Create MySQL database for PureFTPd Here, we will create a database called pureftpd and a pureftpd MySQL account, the PureFTPd daemon will use to connect to the pureftpd database:
Mysql -u root -p CREATE DATABASE pureftpd; GRANT SELECT, INSERT, UPDATE, DELETE, CREATE, DROP ON pureftpd. * TO 'pureftpd' @ 'localhost' IDENTIFIED BY 'ftpdpass'; GRANT SELECT, INSERT, UPDATE, DELETE, CREATE, DROP ON pureftpd. * TO 'pureftpd'@'localhost. Localdomain' IDENTIFIED BY 'ftpdpass'; FLUSH PRIVILEGES;
Remember to replace ftpdpass with MySQL password for pureftpd account. And we continue to create more necessary database tables:
Pureftpd USE; CREATE TABLE ftpd ( User varchar (16) NOT NULL default '', status enum ('0', '1') NOT NULL default '0', Password varchar (64) NOT NULL default '', Uid varchar (11) NOT NULL default '-1', Gid varchar (11) NOT NULL default '-1', Dir varchar (128) NOT NULL default '', ULBandwidth smallint (5) NOT NULL default '0', DLBandwidth smallint (5) NOT NULL default '0', comment tinytext NOT NULL, ipaccess varchar (15) NOT NULL default '*', QuotaSize smallint (5) NOT NULL default '0', QuotaFiles int (11) NOT NULL default 0, PRIMARY KEY (User), UNIQUE KEY User (User) ) TYPE = MyISAM; quit;
With the quit command on, we have exited MySQL and returned to the main Linux control panel. Visit phpMyAdmin via http://server1. Example. Com/phpMyAdmin/ (or use the IP address instead of server1. Example. Com) with your browser and log in with the pureftpd name. Set up PureFTPd Edit the /etc/pure-ftpd/pure-ftpd. Conf configuration file and notice the ChrootEveryone, AnonymousOnly, MySQLConfigFile and CreateHomeDir lines that are activated as shown below:
Vi /etc/pure-ftpd/pure-ftpd. Conf [.] ChrootEveryone yes [.] AnonymousOnly no [.] MySQLConfigFile /etc/pure-ftpd/pureftpd-mysql. Conf [.] CreateHomeDir yes [.]
The ChrootEveryone setting parameter will make PureFTPd 'chroot' all virtual user accounts in the root directory, so these accounts cannot be 'active' outside of the authorized root directory. The CreateHomeDir LINE will specify PureFTPd to create the corresponding root directory each time the account is logged in (if that directory is not already available), then AnonymousOnly must be set to a full value because otherwise only the anonymous FTP account will be allowed to access. Then, we need to create or edit (if available) the /etc/pure-ftpd/pureftpd-mysql. Conf file to look like this:
Vi /etc/pure-ftpd/pureftpd-mysql. Conf MYSQLSocket /var/run/mysql/mysql. Sock #MYSQLServer localhost #MYSQLPort 3306 MYSQLUser pureftpd MYSQLPassword ftpdpass MYSQLDatabase pureftpd #MYSQLCrypt md5, cleartext, crypt () or password () - md5 is VERY RECOMMENDABLE uppon cleartext MYSQLCrypt md5 MYSQLGetPW SELECT Password FROM ftpd WHERE User = "L" AND status = "1" AND (ipaccess = "*" OR ipaccess LIKE "R") MYSQLGetUID SELECT Uid FROM ftpd WHERE User = "L" AND status = "1" AND (ipaccess = "*" OR ipaccess LIKE "R") MYSQLGetGID SELECT Gid FROM ftpd WHERE User = "L" AND status = "1" AND (ipaccess = "*" OR ipaccess LIKE "R") MYSQLGetDir SELECT Dir FROM ftpd WHERE User = "L" AND status = "1" AND (ipaccess = "*" OR ipaccess LIKE "R") MySQLGetBandwidthUL SELECT ULBandwidth FROM ftpd WHERE User = "L" AND status = "1" AND (ipaccess = "*" OR ipaccess LIKE "R") MySQLGetBandwidthDL SELECT DLBandwidth FROM ftpd WHERE User = "L" AND status = "1" AND (ipaccess = "*" OR ipaccess LIKE "R") MySQLGetQTASZ SELECT QuotaSize FROM ftpd WHERE User = "L" AND status = "1" AND (ipaccess = "*" OR ipaccess LIKE "R") MySQLGetQTAFS SELECT QuotaFiles FROM ftpd WHERE User = "L" AND status = "1" AND (ipaccess = "*" OR ipaccess LIKE "R")
Make sure you have replaced the ftpdpass string with the pureftpd MySQL account in the MYSQLPassword LINE! And note that we use md5 as a MYSQLCrypt method, which means we will store all user passwords into MD5 strings in the database - much more secure than text messages. Often. Create a path for activation for PureFTPd and start it:
Chkconfig --add pure-ftpd /etc/init. D/pure-ftpd start
Fixed database and test To accomplish this process we need to do it on a MySQL shell:
Mysql -u root -p Pureftpd USE;
And create the exampleuser user account with status 1 (ie ftp account is active), password is secret (will be encrypted and stored with MySQL MD5 function), UID and GID 2001 parameters ( userid and groupid of the create group above), the root directory / home / www. Ampleample. Com, the upload and download bandwidth limits are about 100 KB / sec, the permitted quota capacity is 50 MB:
INSERT INTO `ftpd` (` User`, `status`,` Password`, `Uid`,` Gid`, `Dir`,` ULBandwidth`, `DLBandwidth`,` comment`, `ipaccess`,` QuotaSize`, `QuotaFiles`) VALUES ('exampleuser', '1', MD5 ('secret'), '2001', '2001', '/home/www. Example. Com', '100', '100', '', '*', '50', '0'); quit;
Next, open the FTP client program (eg WS_FTP or SmartFTP on Windows, gFTP on Linux) at the client and connect with the parameter hostname server1. Example. Com (or IP address), the account name is exampleuser and secret password. If you type the following command:
Ls -l / home
You will see the directory / home / www. Example. Com (the root directory of the exampleuser account) is automatically created, managed by ftpuser and ftpgroup:
Server1: ~ # ls -l / home total 8 drwxr-xr-x 6 administrator users 4096 Jul 19 17:26 administrator drwx ------ 2 ftpuser ftpgroup 4096 Sep 13 20:57 www. Example. Com server1: ~ #
Database system administration This management is much simpler and easier if the support tool has a graphical interface, here we will use phpMyAdmin ( http://server1. Example. Com/phpMyAdmin/ or http:// /192.168.0.100/phpMyAdmin/ ) to start the process of managing the pureftpd database:

Here we will learn about ftpd database table with the following parameters: - User: the name of the virtual PureFTPd account (here is exampleuser) - status with 2 values - 0 or 1. Where 1 is the active state, 0 means inactive and the user cannot login. - Password: login password of the account, here all are encrypted and stored as MD5 string:
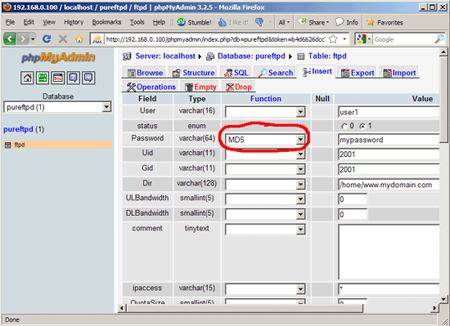
- UID: userid parameter of the ftp account created above (eg 2001) - GID: groupid number of ftp account group created above (here is 2001) - Dir: The root directory of the PureFTPd account is virtual (here / home / www. Example. Com ). If this folder is not available, it will be created when the user account is logged into the system for the first time via the FTP protocol, and those virtual accounts will be 'detained' within the root directory. This - ULBandwidth: bandwidth - bandwidth to upload virtual accounts in KB / sec. In which value 0 means unlimited - DLBandwidth: the download bandwidth of the account, also calculated in KB / sec, with zero value is unlimited - comment: users fill in the comment information - ipaccess: the value of IP addresses allowed to connect to this FTP account, special value * means accepting any IP address - QuotaSize: Storage capacity calculated in MB (unlike ULBandwidth and DLBandwidth in KB) that virtual user accounts use to store data on FTP server. Zero value means unlimited. - QuotaFiles: the number of files that virtual accounts are allowed to store on an FTP server. Zero value means unlimited
FTP Anonymous account If you want to create an 'anonymous' FTP account - anonymous (meaning anyone can access this account without a password), you need 1 user and group account called ftp. By default, both are automatically created when you install the pure-ftpd package. However, ftp's default root directory is / srv / ftp, but here we will create an anonymous ftp directory in / home / ftp. Besides, you can still use the directory / srv / ftp for anonymous ftp accounts - if you want. If you want to use the / home / ftp root, open the file / etc / passwd and change the parameters related to the root directory of the user ftp from / srv / ftp to / home / ftp:
Vi / etc / passwd [.] #ftp: x: 40: 49: FTP account: / srv / ftp: / bin / bash ftp: x: 40: 49: FTP account: / home / ftp: / bin / bash [.]
And transfer / srv / ftp to / home (no need to do this if you want to use / srv / ftp):
Mv / srv / ftp / home
After that, we continue to create / home / ftp / incoming directory to allow anonymous user accounts to upload data, and to assign 311 value to / home / ftp / incoming directory, purpose for people Use uploads that cannot see or download data from that directory. The / home / ftp directory will be granted 555 permission for users to review and download the file:
Chown ftp: nobody / home / ftp cd / home / ftp mkdir incoming chown ftp: nobody incoming / chmod 311 incoming / incoming cd./ chmod 555 ftp /
Instead, if you still want to use / srv / ftp, just replace / home / ftp with / srv / ftp on the command LINE. And with all the above processes, the Anonymous account can log in, download data directly from / home / ftp, but the upload process will be limited to / home / ftp / incoming (once the data If downloaded to / home / ftp / incoming directory will not be accessible or downloaded here, if you want to download or access, the administrator must move or copy them to / home / ftp). The next step we need to do is adjust the PureFTPd configuration file for an anonymous ftp account. Open the /etc/pure-ftpd/pure-ftpd. Conf file and fix the following:
Vi /etc/pure-ftpd/pure-ftpd. Conf [.] NoAnonymous no [.] AntiWarez no [.] AnonymousBandwidth 8 [.] AnonymousCantUpload no [.]
Finally, restart PureFTPd:
/etc/init. D/pure-ftpd restart
By completing these processes, you have successfully created virtual hosts with PureFTPd and MySQL (including Quota and bandwidth management) on the OpenSUSE platform 11.3. Good luck!
FAQ
What does Guide to Creating Virtual Hosting with Pureftpd and Mysql: Tutorials explain?
Understanding Tutorials requires more than a headline.
Who is most affected by Tutorials?
The overview below breaks down the key facts, changes, and user impact.
What are the key takeaways from this topic?
Tutorials Overview Yast2 -i mysql mysql-client mysql-community-server apache2 apache2-mod_php5 php5-mysql php5-mcrypt php5-mbstring php5-gd Then create a MySQL startup path (so that MySQL automatically activates when the system starts) and use MySQL server.
Related Articles
 Install Ispconfig 3 Proftpd for Debian: Install Proftpd7 minutes read
 The Pros and Cons of VPS Web Hosting7 minutes read
 Backup and Restore Mysql with Mysql-zrm on Debian Sarge24 minutes read
 What Is Hosting? Hosting Used to Do? Features, Uses, and Key6 minutes read
 Integrating Clamav with Pureftpd in centos 5.4: Integrated3 minutes read
 Best Web Hosting Providers: 8 Options Compared17 minutes read
Reader Comments 0
Sign in with email or Google to join the discussion.