Configure security with Cloudpath Networks XpressConnect
Network administration - Enterprise mode of WPA / WPA2 encryption, along with 802.1X authentication, can protect your wireless network with multiple usernames and passwords instead of a PSK or an unsecured password .
However, this mode requires users to make many configuration changes. Client devices must be configured with the server and login details to connect to the network. This is a problem that is difficult for both users and administrators.
Product : XpressConnect of Cloudpath Networks
Advantages : Smart interface, customizable capabilities, complete documentation provided
Disadvantages : Lack of support for EAP-TLS (client side certificates)
Cloudpath Networks has a plan to design a program that makes the process of configuring and connecting to 802.1X networks as easy, fast and secure as possible. Its XpressConnect product allows administrators to create a wizard to automatically configure client devices. The company said its products could reduce the costs associated with WPA-Enterprise, WPA2-Enterprise, or 802.1X networks, while still improving the user experience.
Here we will take a look at whether Cloudpath Networks is successful and can provide what it promises.
As mentioned above, XpressConnect allows administrators to create a wizard so that users can run on their computers (Windows, Mac OS, or Ubuntu Linux computers) or iPhone to automate the configuration. Set up encryption and authenticate PEAP or TTLS for the network. It is also possible to include other network-related settings that can help users connect. Both wireless authentication and 802.1X wired authentication are supported, in addition to WEP, including WPA / WPA2-PSK and unprotected access.
Administrators log into Cloudpath Administrative Console to create and download the XpressConnect interface. They can define network details and customize the wizard interface through the web interface. Administrators can then download the final wizard packaged for Web server or for standalone installation, such as on a CD or USB flash drive. MSI installers can be created and GPO-based deployments are also supported.
Finally, users can run the wizard on their computer or iPhone and this wizard automatically calculates the settings, network configuration and connection to it. This allows users with less experience to connect without the 'one-to-one' support from the help desk or IT group.
An ideal setting is to have an unprotected SSID or a guest VLAN with a locked portal to redirect (redirect) the user to the web installer, where the XpressConnect wizard can configure the user to have an SSID safe. private and full VLAN.
Create the XpressConnect wizard
When you, the administrator, log into Cloudpath Administrative Console (see Figure 1), you will be greeted with a tutorial about how XpressConnect works and a link to download the quick user guide (Quick Start Guide.

Figure 1
Let's start the process by defining network details. The first is Visual Settings. Here you can change the default logo, image, text and other things displayed in the wizard. It is then possible to define related network settings.
This is not a fast-executing task, it is a comprehensive process of 12 steps. This process includes many different settings and has many network problems as well as address configuration - a good thing.
Let's start with the basics, SSID (network name) and encryption / authentication type. Guest devices can even use third-party 802.1X products. You can also specify which operating system will support. In addition, it is possible to address to avoid conflicts between SSIDs by putting your network top on the client's priority list, setting up a specific SSID to manually connect, or delete the network profile for a certain SSID.
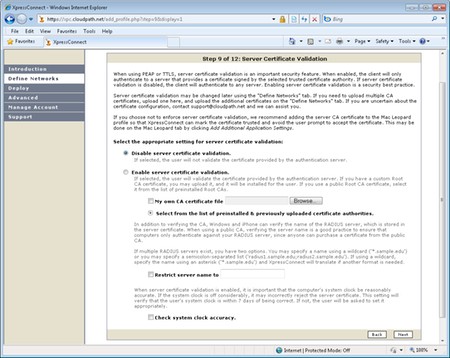
You can make the wizard enable certificate validation by selecting the server's Certificate Authority (CA) or uploading yourself. See Figure 2. You can define the server name, which you ensure they only connect to your RADIUS server. You even have a wizard to check the user's system clock, which, if incorrect, can cause problems with certificate validation.

Figure 2
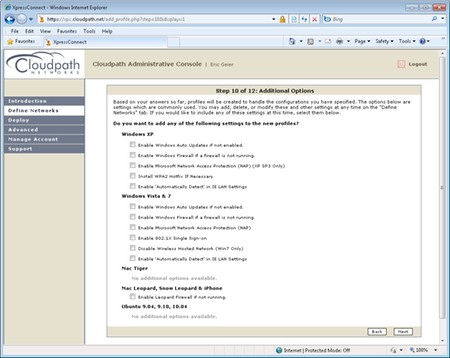
An additional bonus that you can accumulate and enable on the wizard if needed, Windows Auto Updates, Firewall, NAP, etc. See Figure 3. With Windows 7, you can even disable Wireless Hosted Networks, this is The part can pose a security risk to your network.

Figure 3
When the XpressConnect wizard allows your users to connect, it can open their web browser with the URL you choose. You can also put a return shortcut on their desktop when they want to undo the changes to the wizard.
We implemented and created a test network here in the office and found that the settings are well documented. Each option is expanded to see more information about it. Settings and options themselves only show how complex XpressConnect is.
Use the XpressConnect wizard to configure the client
Next we will test the wizard to test the user experience. First, download a standalone installation package, unzip it and place the files on a CD. Then go to Windows 7 and Windows XP computers.
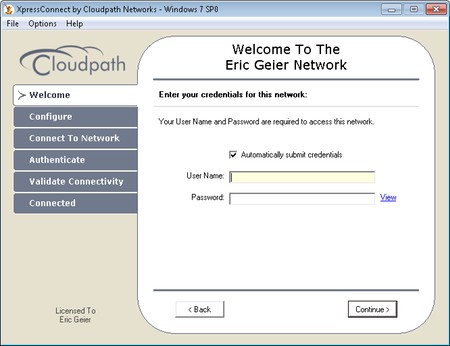
When inserting the CD, the XpressConnect wizard will automatically appear. See Figure 4. We enter the username and password for our 802.1X test network and click Continue. The program has been active and the message indicates that the connection was successful. It even allows you to see exactly what changes are made to your computer and give us an option to create a desktop shortcut. It takes no more than a minute to connect.

Figure 4
We also tested the method of deploying Web server. Download an HTML package, extract it and upload the files to the web server. When you access the URL, it will download a Java Applet or ActiveX program, something similar to the XpressConnect wizard when done in a standalone method. In the implementation we had no problems, the system worked like the previous method.
Conclude
It can be said that XpressConnect is a solid product. Cloudpath Networks has done what it promised. Its smart interface can reduce the time and cost of supporting 802.1X networks. In addition, it allows users to use it in a friendly way. In addition, XpressConnect has excellent customization and documentation capabilities.
The only problem is that the software does not support EAP-TLS. XpressConnect only works with PEAP and TTLS settings, regarding 802.1X authentication. However, this is one of the most popular implementations today.
You should read it
- Secure WiFi in enterprise environment from basic steps
- Israel launches the world's first cybersecurity network
- The best network configuration management tools and software
- Test on computer network with answer P9
- Learn about Personal Area Network (PAN)
- The basic steps in dealing with network security issues that you need to understand
 Remote workstation security in Windows Server 2008 R2
 Kaspersky's free support security utilities
 Solutions to help businesses confidently delete data
 Release the free tool to kill ZBot malware
 Google secures 2-level user accounts
 3D map - the future of online passwords