Table of Contents
Use this guide to understand Android theme variation on the theme of beauty and monsters movies and the factors that affect it. The information is organized to make the topic easier to apply in practice.
The themes mentioned in the article:
I. Theme Bookshelf of Belle
II. Purple rose theme
III. Rose theme of Prince Adam
IV. Gaston Theme
I. Theme Bookshelf of Belle

Prepare:
- Download Belle's Bookshelf bookshelf (Belle's Bookshelf)
- Icon Whicons package
- 1Weather widget
- KWGT Pro application
- A file manager application on your phone to move the Belle Music Widget Preset File into Folder Widget.
Request:
Your device should use Nova Launcher to be able to use this Theme.
1. Set Theme book prices and weather widgets
- Keep the background image on the device's main screen until options appear.
- Select Wallpapers> Pick Image .
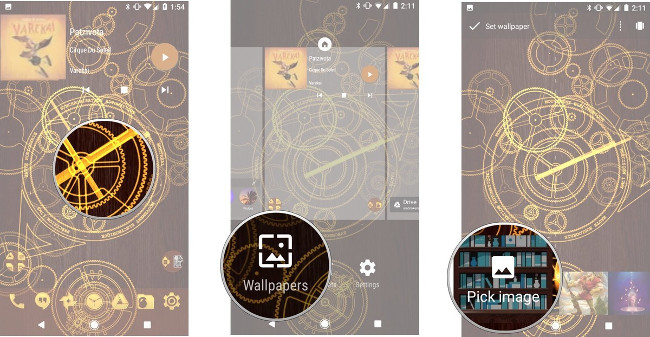
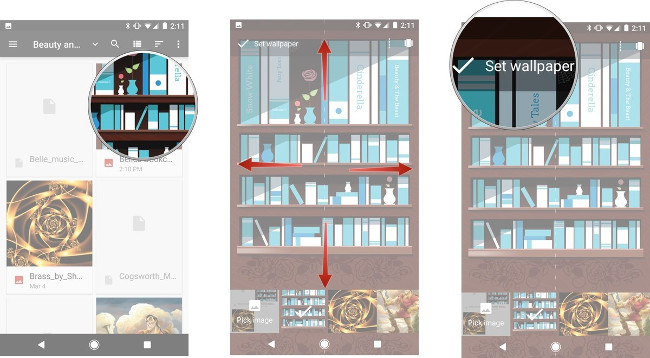
- Then select Belle's bookshelf image that you downloaded above.
- Adjust the background image to be balanced, paying attention not to cut the top of the bookshelf.
- Select Set Wallpaper .
- Go to Nova Settings> Look & Feel> Icon Themes .
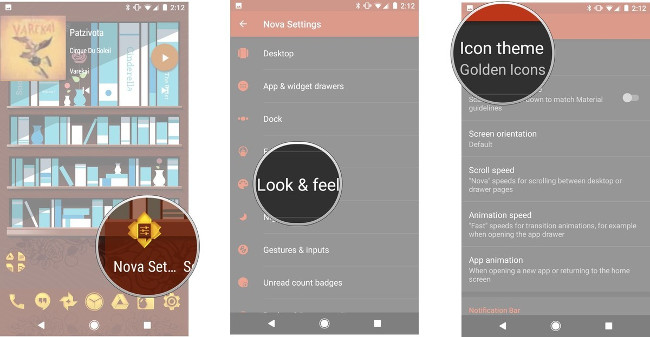
- Choose Whicons .
- Go back to the main screen and then hold the App Drawer Icon until the options appear.
- Select Edit .
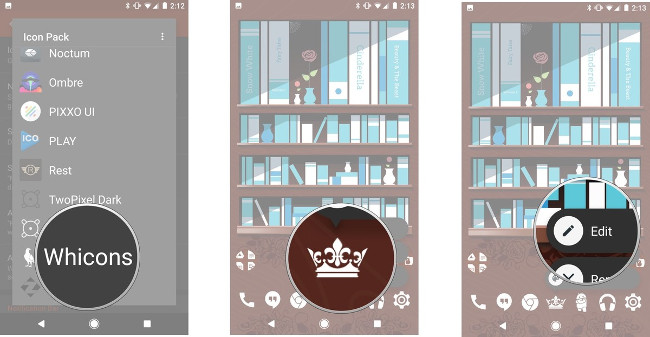
- Click the icon box to change the icon.
- Choose Whicons .
- Select the G Symbol, then select Google Play Books And then select the icon with the open book (as shown in the picture).
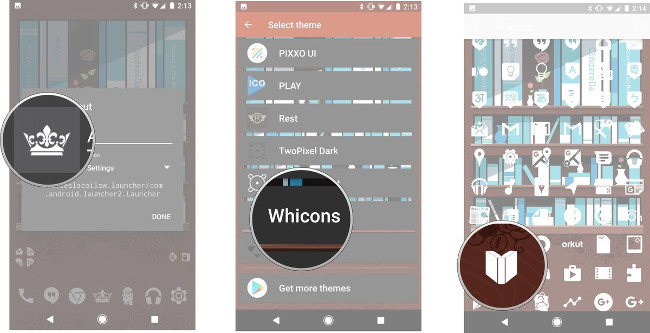
- Click Done To confirm the changes.
- Then keep the wallpaper on the device's main screen until options appear.
- Select Widgets .
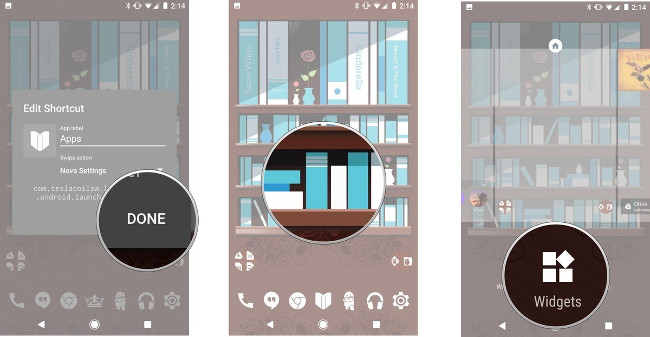
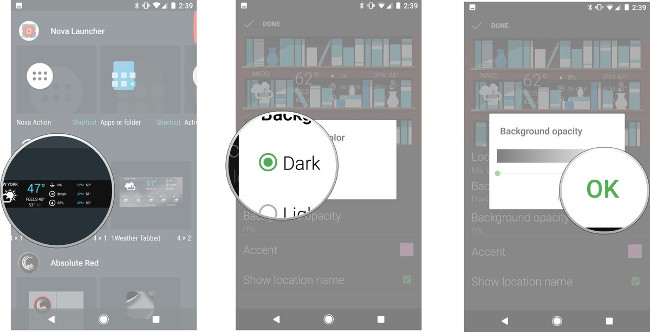
- Hold and drag the 1Weather Compact Widget to the bottom of the bottom bookshelf on the bookshelf wallpaper.
- In the Configuration Window, change the Background To black by selecting Dark .
- Drag the Backgrround opacity to 0% .
- Change the Accent Color to white.
- Click Done.
- Then open Nova Settings.
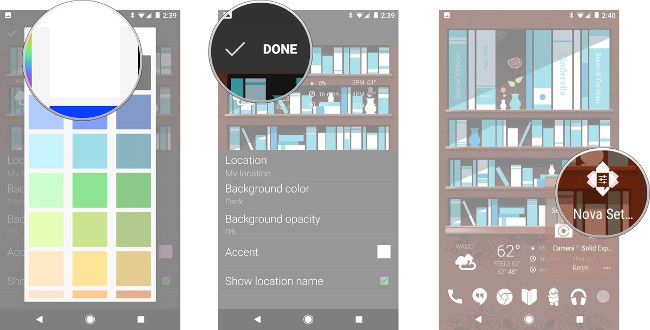
- Go to Desktop .
- Click the Color indicator Item.
- Select blue (as shown in the picture).
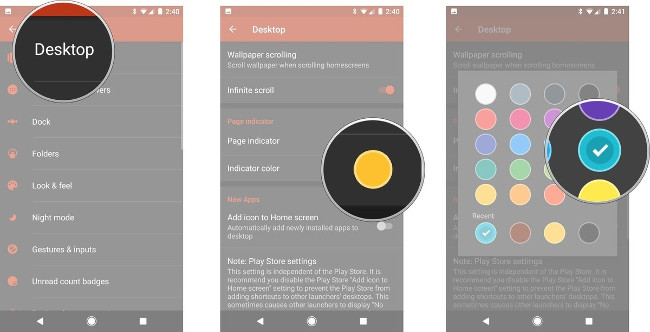
- Return to Nova Settings .
- Select Folders .
- Select Background .
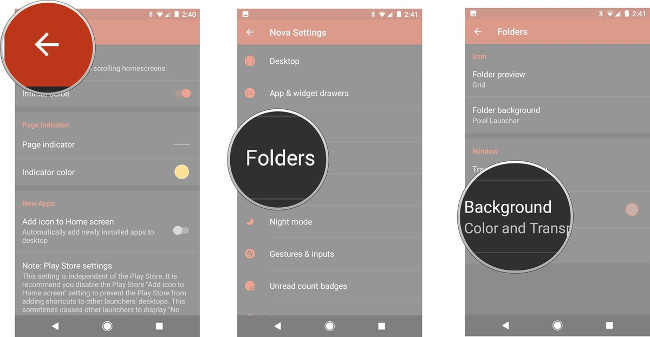
- Click the custom icon (there are 3 black dots).
- Change to color # a66e2100 (type to change).
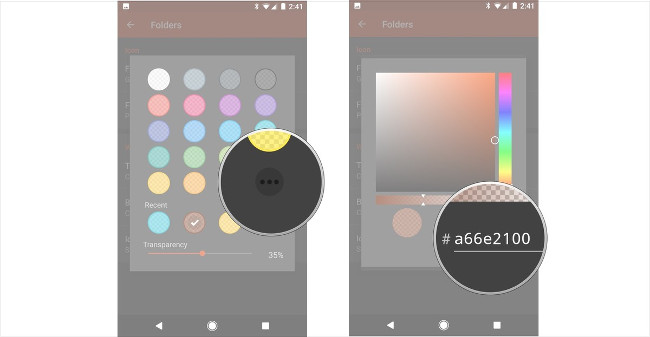
- Click OK .
- Return to the lock screen.
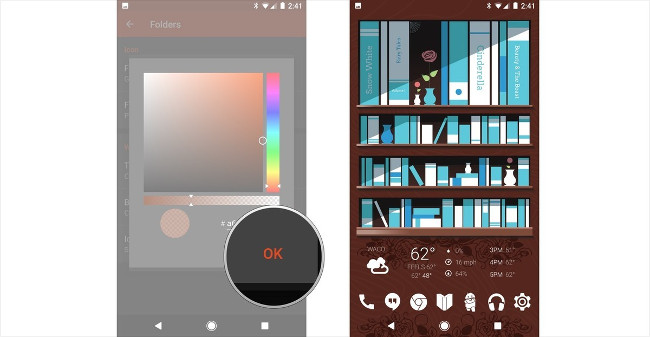
So now we have Belle's book-shaped theme.
2. Set the Belle's Music Widget
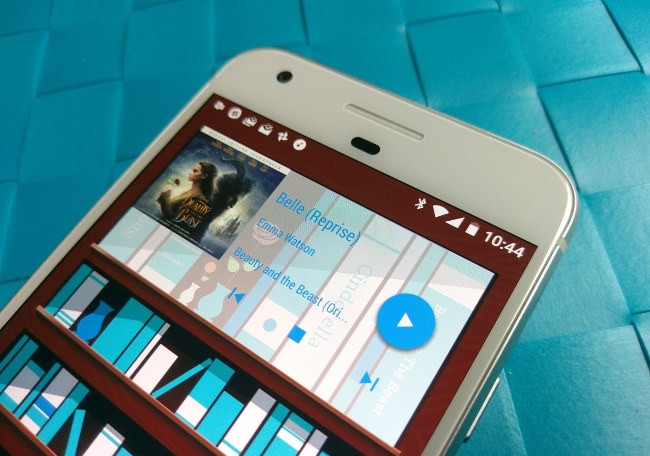
To set a Music widget to fit the bookshelf position at the top of the background image. First we need to download File Belle Music Widget Preset to the device and transfer the File to the Widgets folder on your device using the file manager application. Then we do the following:
- Keep the background image on the device's main screen until options appear.
- Select Widgets .
- Hold and drag the 4x2 KWGT Widget to the top shelf of the bookshelf wallpaper.
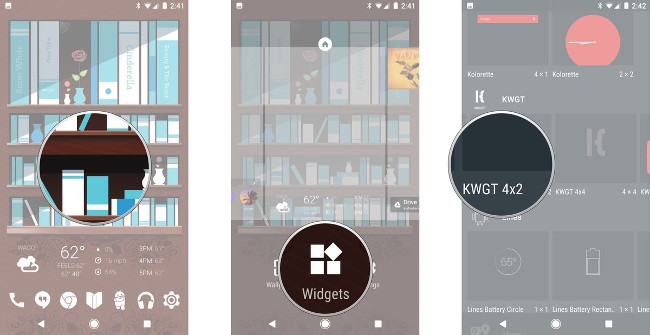
- Press and hold Widget Until the Menu Appears.
- Select Resize And adjust how the Widget covers the entire bookshelf.
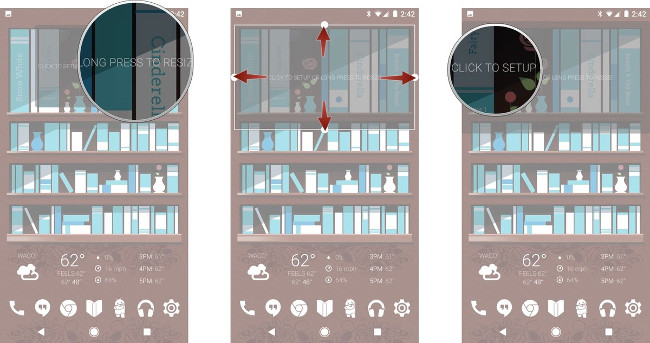
- Then click Widget To adjust the settings of that Widget.
- Select Tab Exported At the top of the screen.
- Click Belle Music Widget .
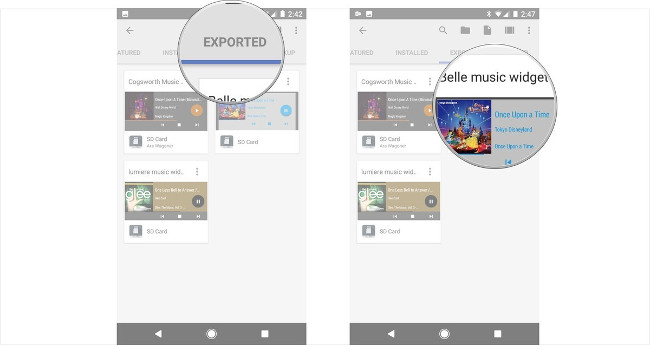
- Click the Save Icon to have a floppy disk image to save.
- Return to the main screen.
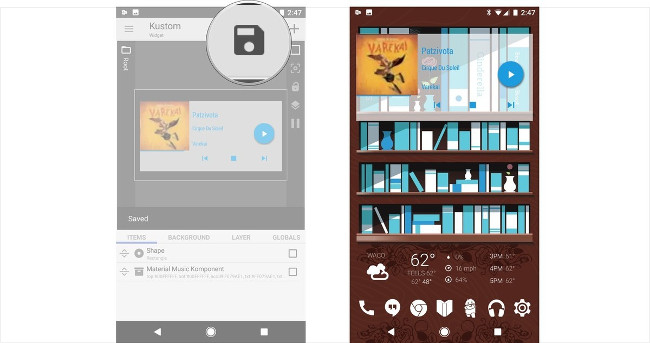
Now we have the Preset Widget to play music at the bookshelf at the top, the next thing to do is to adjust the widget to be more beautiful. Here are 3 adjustments you need to make:
Adjust the white background of the widget to match the book price:
- Click the word display on the Widget To open the KWGT edit.
- Select the Shape Tab at the bottom to edit.
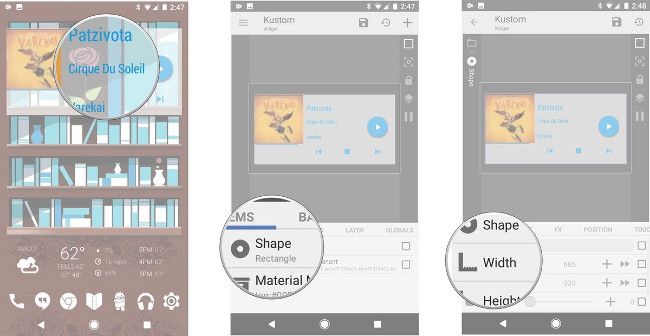
- There will be options for you to adjust: Width (Width) , Height (Height) , YOffset (scroll up and down) , XOffset (left and right scroll) . You should adjust so that the white background of the widget matches the bookshelf. Then click the Save Icon to have a floppy disk image to save.
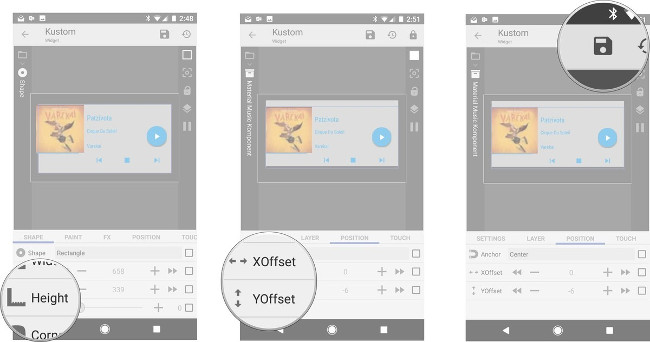
Adjust the display part of the music to match the widget's white background:
- Click the word display on the widget to open the KWGT edit.
- Select the Material Music Component Tab on the bottom to edit.
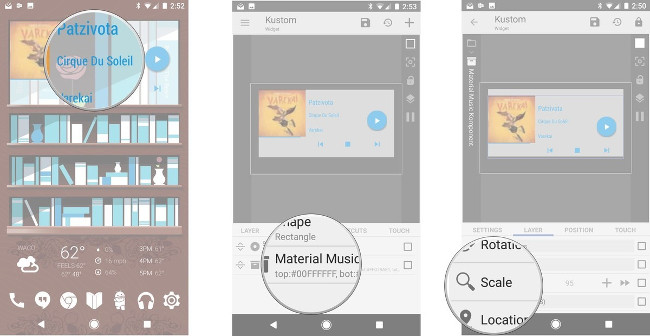
- Here there will be options for you to adjust: Scale (Size) , YOffset (scroll up and down) , XOffset (left and right scroll) . You should adjust so that the display part of the music is close to the upper left corner of the bookshelf. Then click the Save Icon to have a floppy disk image to save.
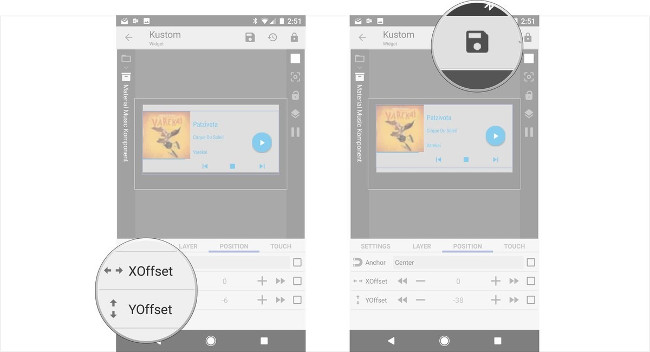
Adjust Widget shortcuts:
After you have edited your Widget as well, please adjust the Widget shortcut to no longer activate the KWGT edit item of the Widget when clicking on the display text on it.
- Click the word display on the widget to open the KWGT edit.
- Select the Touch Tab on the toolbar.
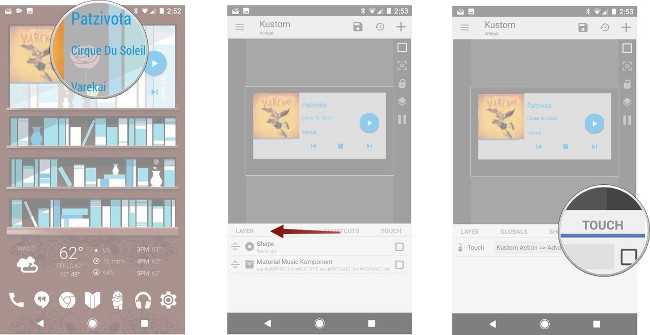
- Select Custom Action> Advanced Editor .
- Select None . Then click the Save Icon to have a floppy disk image to save.
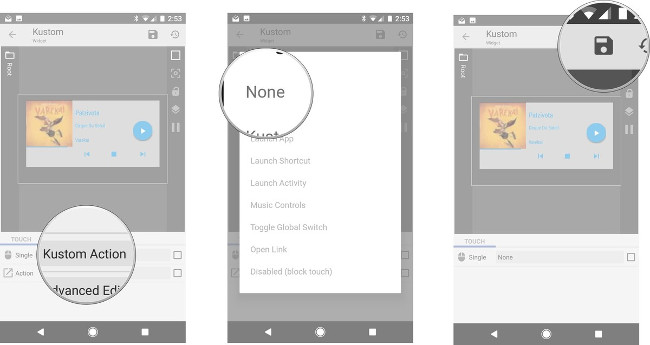
When needed to re-open the KWGT edit item, just go to the KWGT app and open it.
II. Purple rose theme
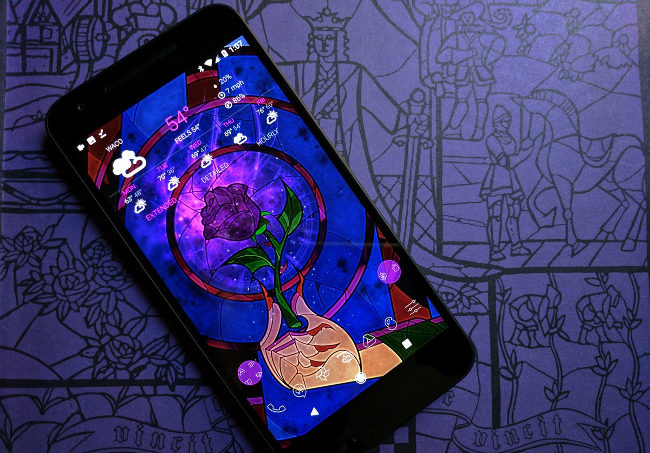
Prepare:
- Download Rose Flowers (The Rose She Offered)
- Pack Icon Lines Icon Pack
- 1Weather widget
Request:
Your device should use Nova Launcher to be able to use this Theme.
How to create Purple Rose Theme
- Keep the background image on the device's main screen until options appear.
- Select Wallpapers> Pick Image .
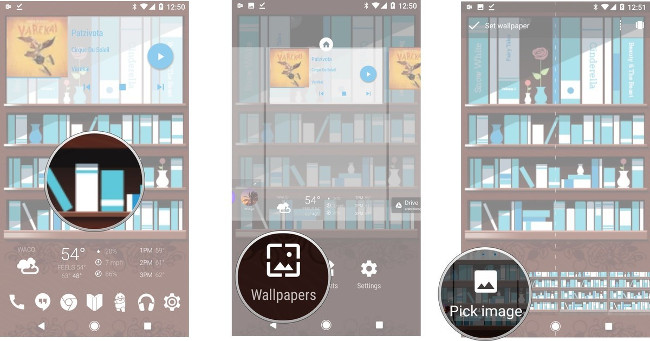
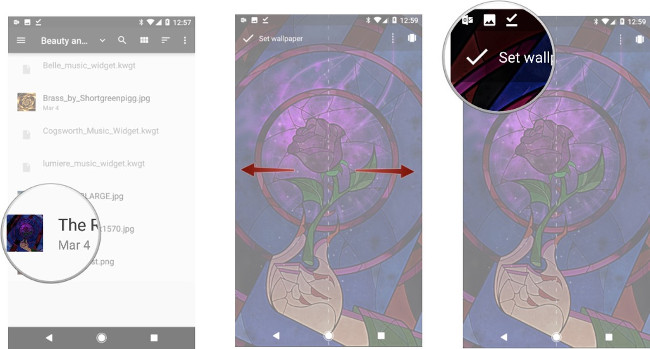
- Then select the purple rose background image that you downloaded above.
- Adjust the background image so that the rose must be balanced in the middle of the screen.
- Select Set Wallpaper .
- Go to Nova Settings> Look & Feel> Icon Themes .
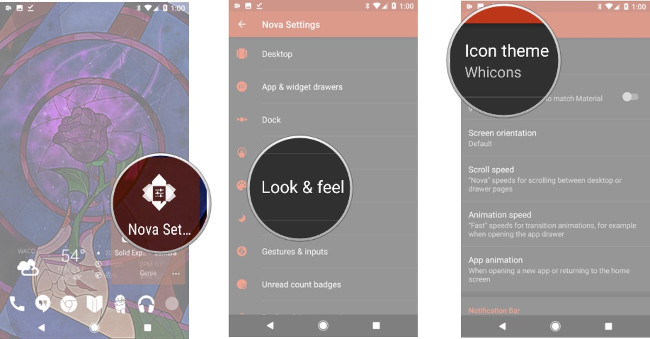
- Select Lines .
- Go back to the main screen and then hold the App Drawer Icon until the options appear.
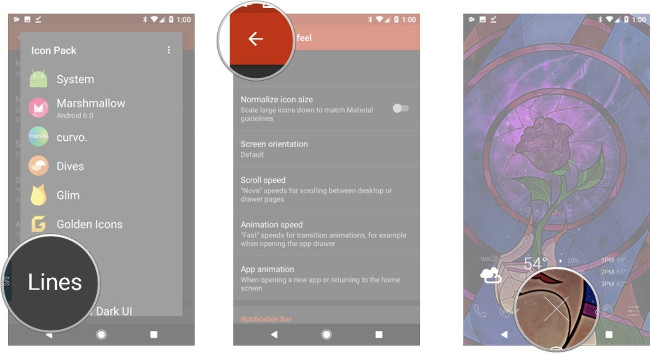
- Select Edit .
- Click the icon box to change the icon.
- Select Lines.
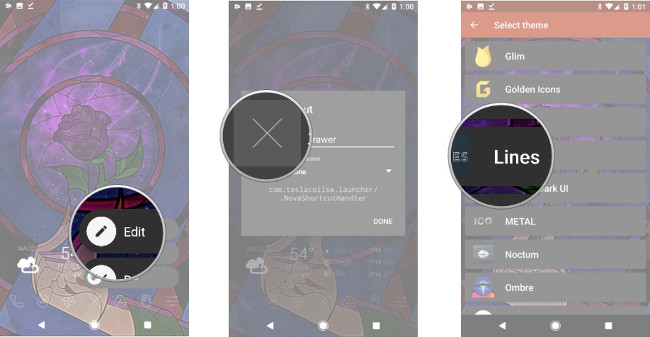
- Select the Disney symbol D (as shown in the picture)
- Click Done To confirm the changes.
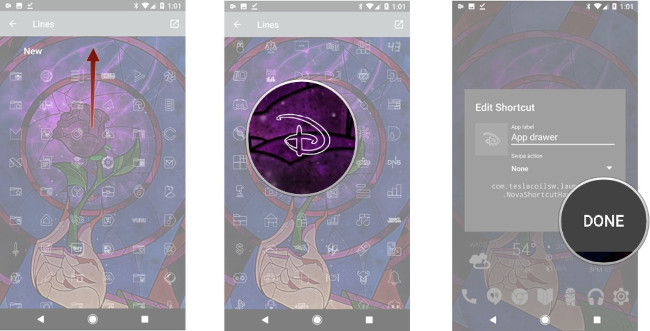
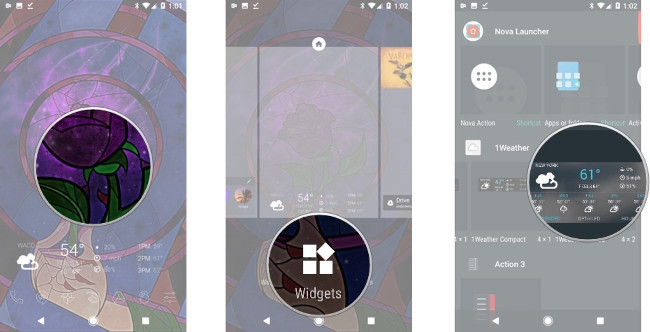
- Then keep the wallpaper on the device's main screen until options appear.
- Select Widgets .
- Hold and drag the 1Weather Tabbed Widget to the top of the device's screen.
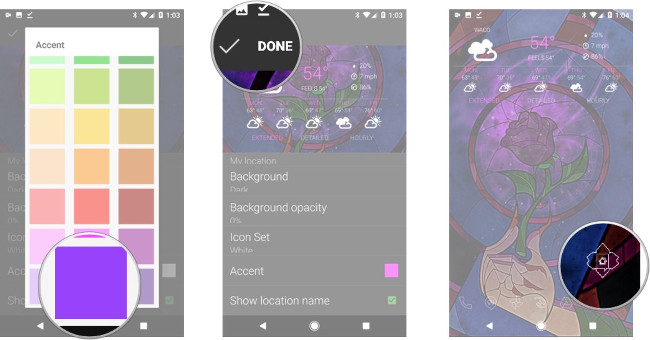
- In the Configuration Window, change the Background To black by selecting Dark .
- Drag the Backgrround opacity to 0% .
- Change the Icon Set Color to White .
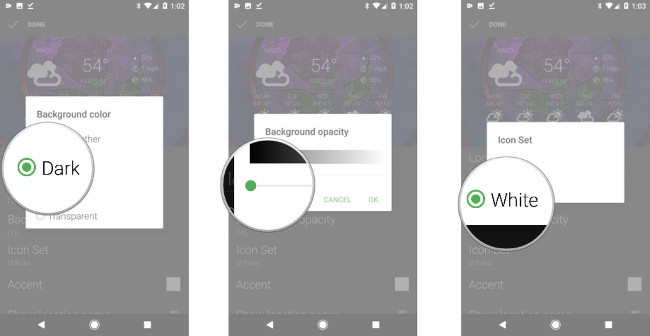
- Change the Accent Color to Purple (as shown in the picture).
- Click Done .
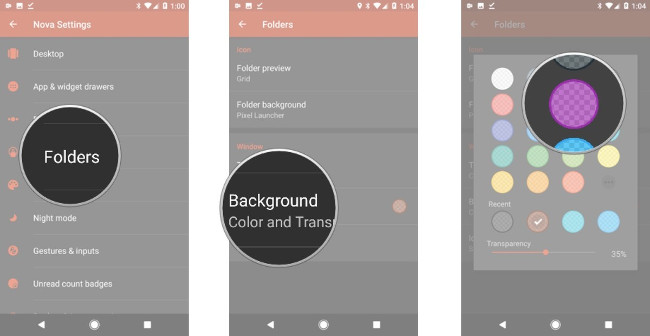
- Then open Nova Settings .
- Select Folders> Background .
- Choose purple (as shown in the picture).
- Return to Nova Settings .
- Go to Desktop .
- Click the Color indicator Item.
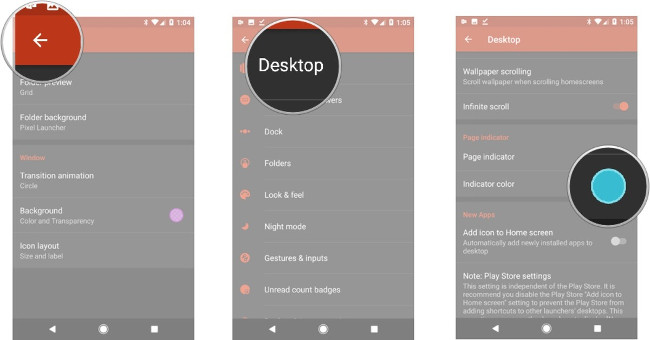
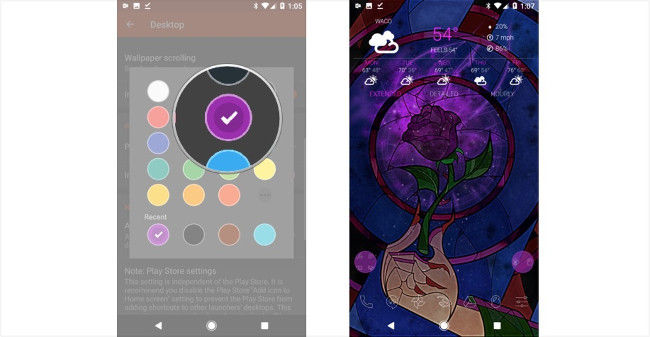
- Choose Purple (as shown in the picture).
- Return to the main screen.
III. Rose theme of Prince Adam
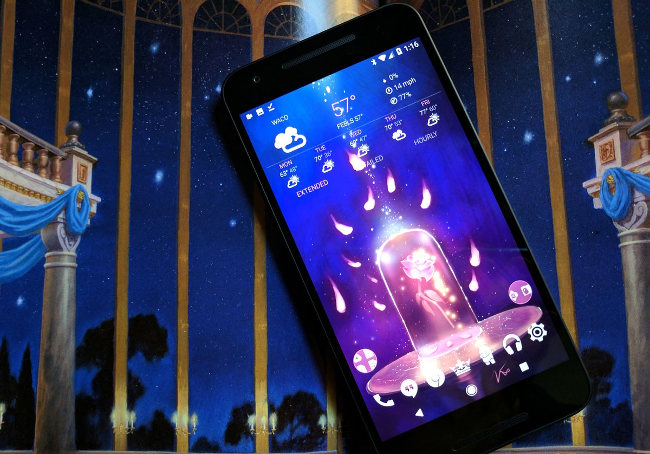
Prepare:
- Download rose wallpaper of Prince Adam (Enchanted Rose)
- Icon Whicons package
- 1Weather widget
Request:
Your device should use Nova Launcher to be able to use this Theme.
How to create a Rose Theme by Prince Adam
- Keep the background image on the device's main screen until options appear.
- Select Wallpapers> Pick Image.
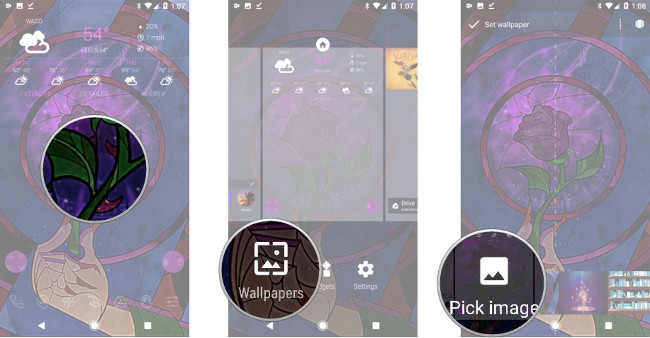
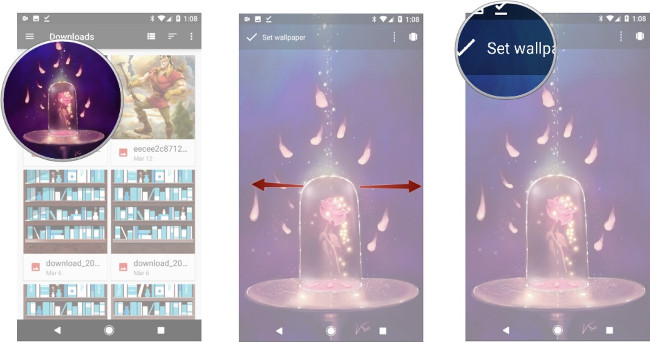
- Then select the purple rose background image that you downloaded above.
- Adjust background image.
- Select Set Wallpaper .
- Go to Nova Settings> Look & Feel> Icon Themes .
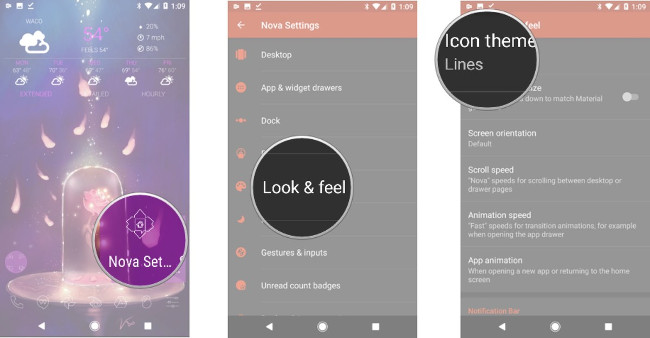
- Choose Whicons .
- Go back to the main screen and then hold the App Drawer icon until the options appear.
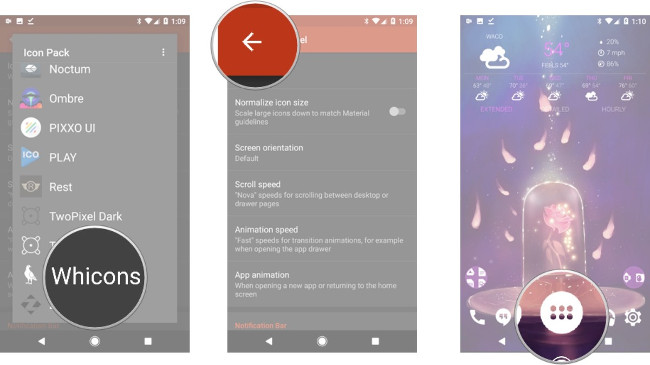
- Select Edit .
- Click the icon box to change the icon.
- Choose Whicons .
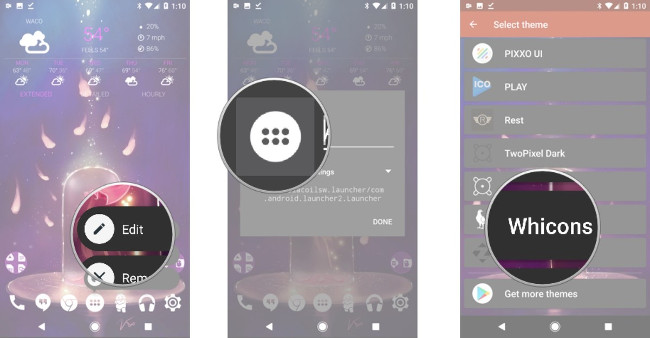
- Select the K Symbol and select the crown shape (as shown in the picture).
- Click Done To confirm the changes.
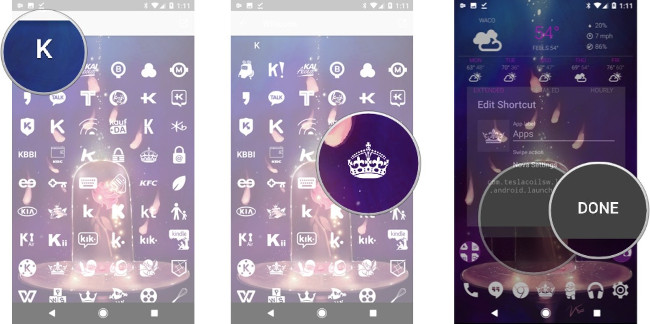
- Then keep the wallpaper on the device's main screen until options appear.
- Select Widgets .
- Hold and drag the 1Weather Tabbed Widget to the top of the device's screen.
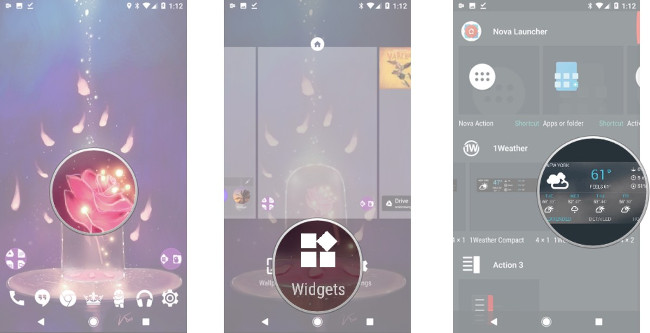
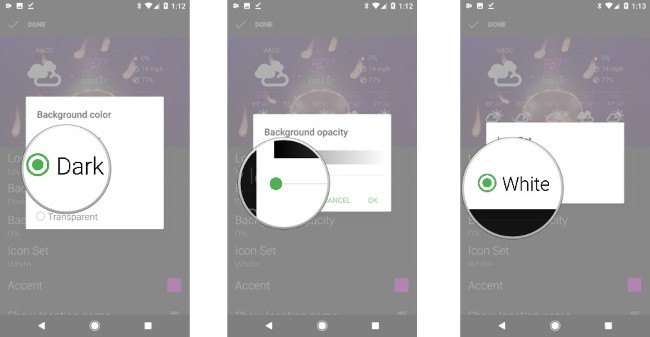
- In the Configuration Window, change the Background To black by selecting Dark .
- Drag the Backgrround opacity to 0% .
- Change the Icon Set Color to White .
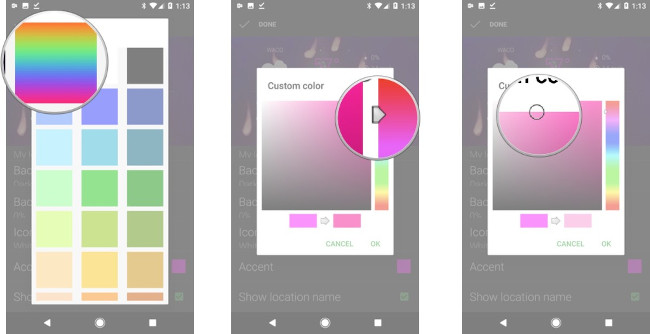
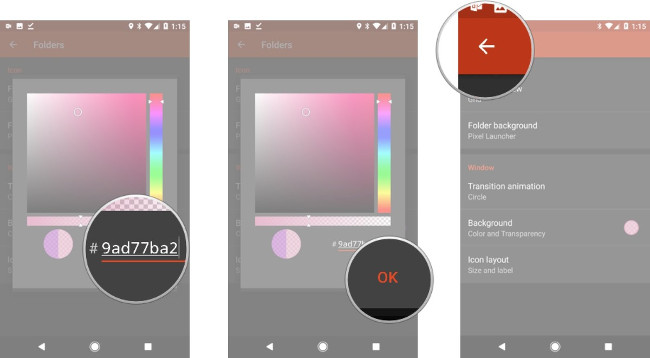
- Change the Accent Color to Custom (as shown in the picture).
- Drag the arrow bar to the right of the palette and the circle inside the palette to the position shown in the image.
- Click OK .
- Click Done .
- Return to Nova Settings .
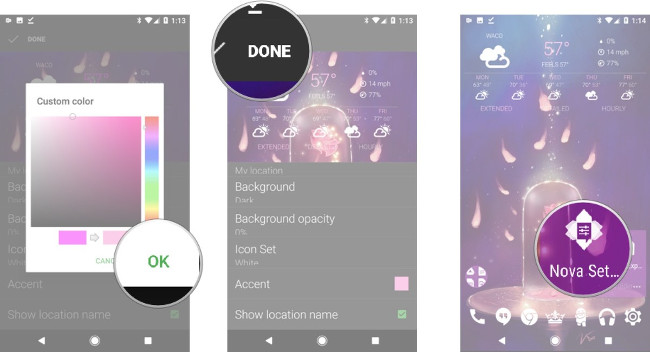
- Select Folders .
- Select Background .
- Click the custom icon (there are 3 black dots).
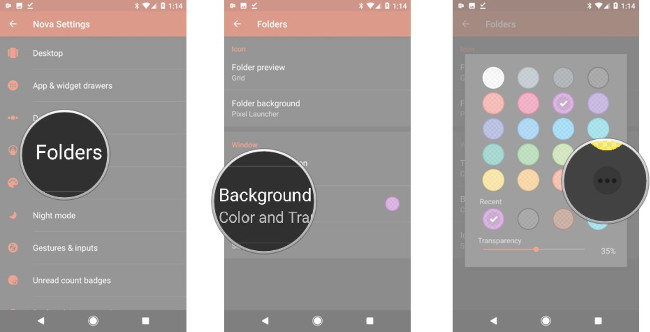
- Change to # 9ad77ba2 Color (type to change).
- Click OK .
- Return to Nova Settings .
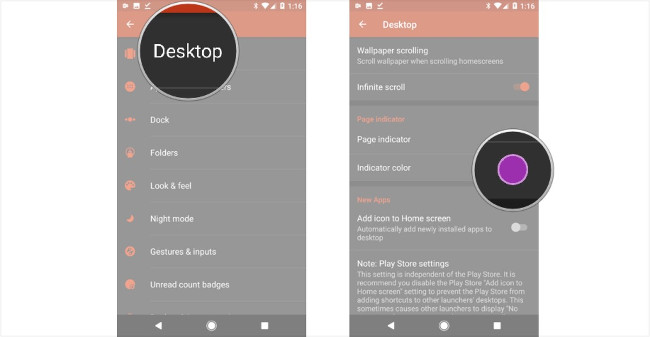
- Go to Desktop .
- Click the Color indicator Item.
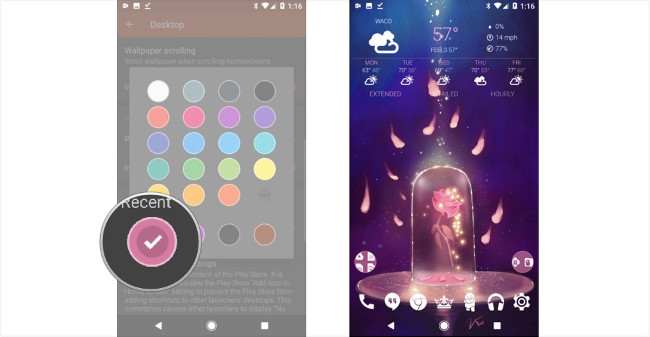
- Click the Recent Color (as shown in the picture) to use the same color just above the Folders Section.
- Return to the main screen.
IV. Gaston Theme
Prepare:
- Download Gaston wallpaper (Gaston's Profile)
- Absolute Red Icon Icon Pack
Request:
Your device should use Nova Launcher to be able to use this Theme.
How to create Gaston Theme
- Keep the background image on the device's main screen until options appear.
- Select Wallpapers> Pick Image .
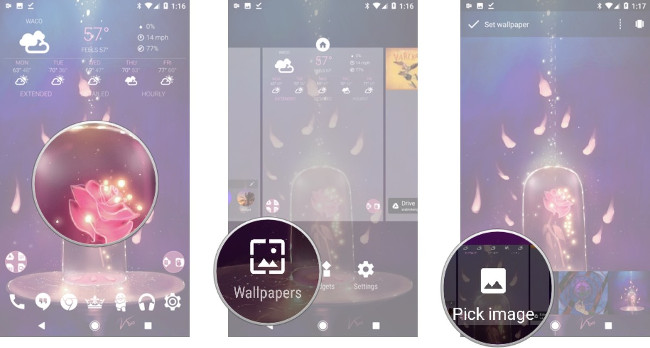
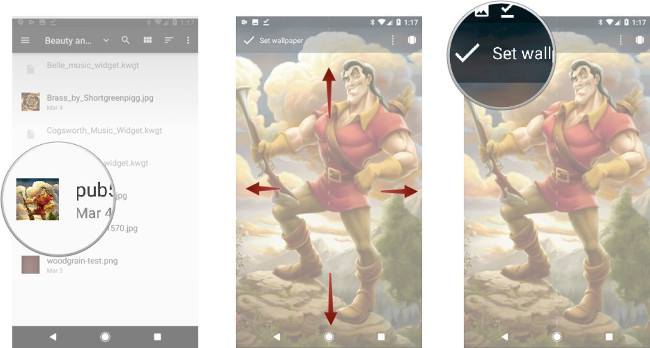
- Then select Gaston background image that you downloaded above.
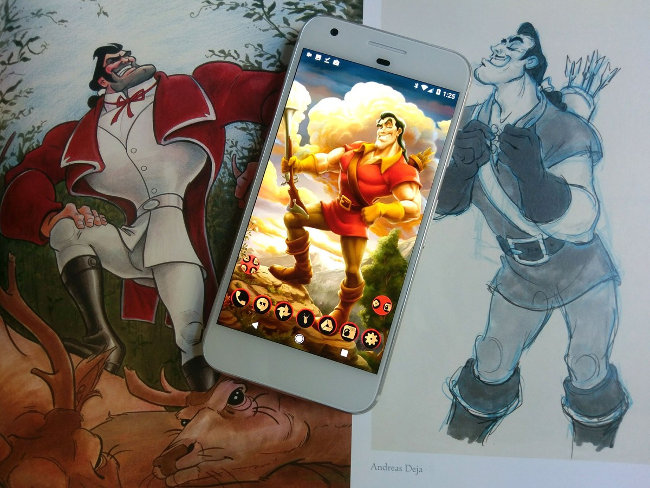
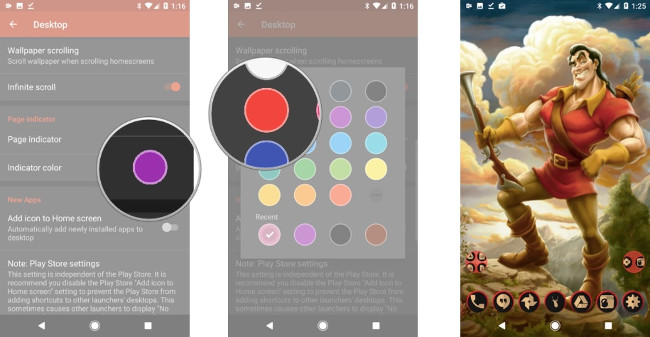
- Adjust the background image as shown in the picture.
- Select Set Wallpaper .
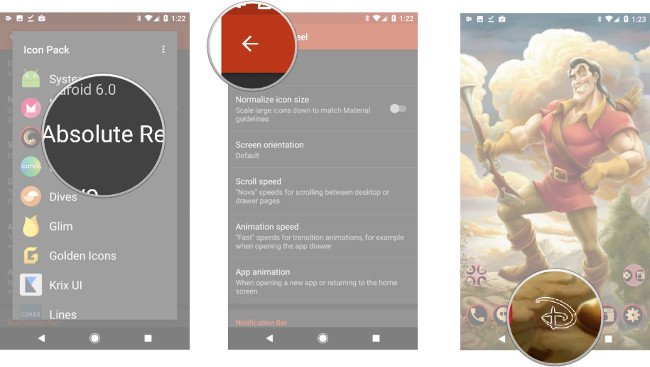
- Go to Nova Settings> Look & Feel> Icon Themes .
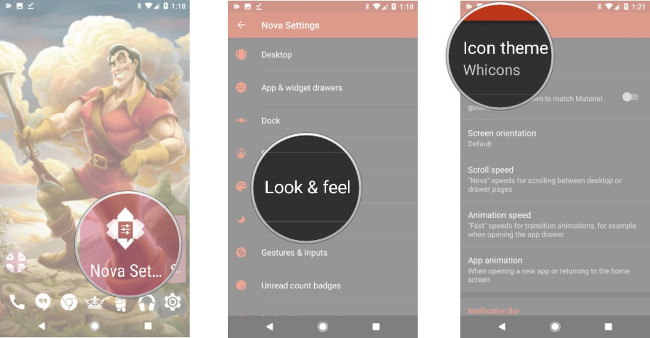
- Choose Absolute Red .
- Go back to the main screen and then hold the App Drawer Icon until the options appear.
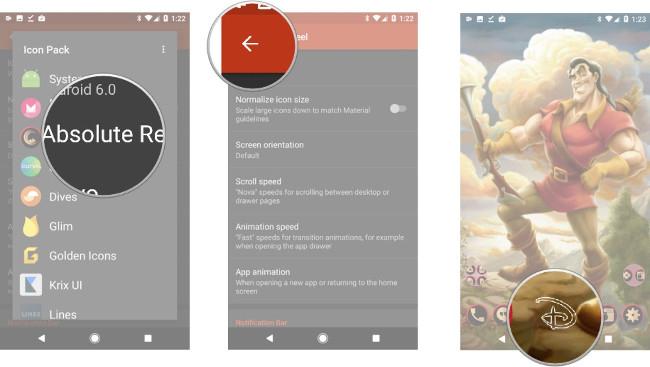
- Select Edit .
- Click the icon box to change the icon.
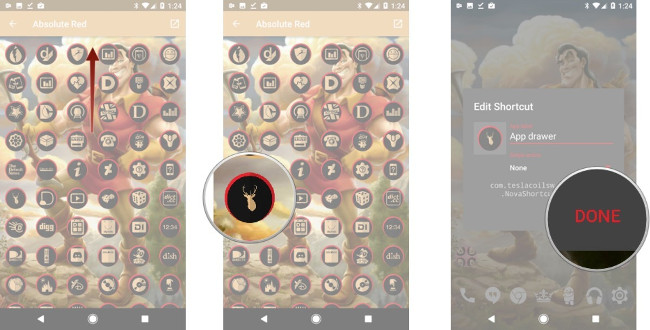
- Choose Absolute Red .
- Select the letter D Icon and select the deer head image (as shown in the picture).
- Click Done To confirm the changes.
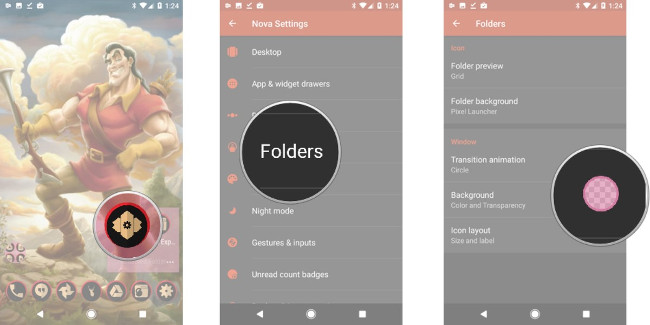
- Open Nova Settings .
- Select Folders .
- Select Background .
- Choose red (as shown in the picture).
- Return to Nova Settings .
- Go to Desktop .
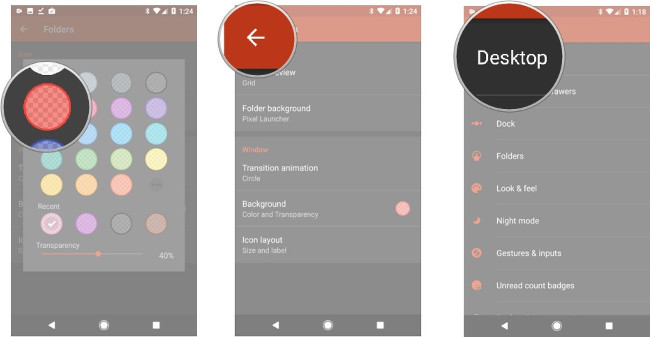
- Click the Color indicator Item.
- Change to red (as shown in the picture)
- Return to the main screen.
V. Lumiere Theme
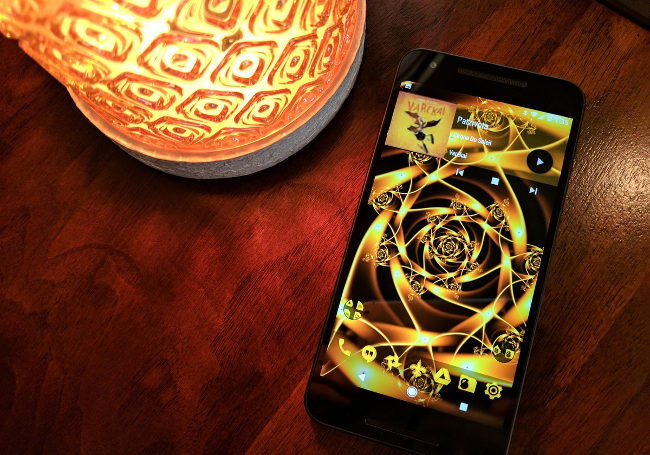
Prepare:
- Download Brass Wallpaper photo background
- Golden Icons Icons Pack
- 1Weather widget
- KWGT Pro application
- File Lumiere Music Widget Preset
- A File manager application on the phone to move the Lumiere Music Widget Preset File into Folder Widget.
Request:
Your device should use Nova Launcher to be able to use this Theme.
How to create Lumiere Theme
- Keep the background image on the device's main screen until options appear.
- Select Wallpapers> Pick Image .
FAQ
What is the main benefit of Android theme variation on the theme of beauty and monsters movies?
The main benefit is a clearer understanding of the topic and a practical way to apply the information covered in this guide.
What should I check before using Android theme variation on the theme of beauty and monsters movies?
Confirm compatibility, review the required settings, protect important data, and use the latest supported version whenever possible.
What should I do if the result is different?
Repeat the steps carefully, verify permissions and version differences, and consult the product's official support documentation for changes not shown in the article.
Related Articles
 Top 15 Most Popular Blockbusters in the World Are Expected in 201717 minutes read
 How to Activate Dark Theme on YouTube for Android5 minutes read
 Change Theme 10: How to Use the Theme on Windows 1013 minutes read
 How to Install Cuong Tieu Ngu Theme for Android5 minutes read
 What Ancient Monsters Can Kill Megalodon Super Shark?6 minutes read
 Dark Theme Mode for YouTube Application Has Been Updated on Android for All Users3 minutes read
Reader Comments 0
Sign in with email or Google to join the discussion.