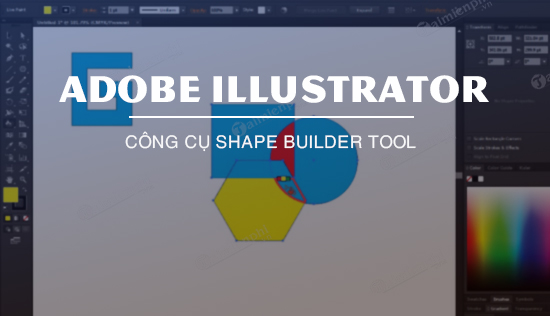
The Shape Builder tool in Illustrator
The Shape Builder tool in Illustrator is used to adjust lines and shapes. In this article, TipsMake will introduce you to the Shape Builder tool in Illustrator.
Table of Contents
In a previous article, TipsMake guided you on how to change the default background color in Illustrator . Let's continue with this article to learn about the Shape Builder tool in Illustrator.
Get familiar with the Shape Builder tool in Illustrator.
The Shape Builder tool in Illustrator allows users to create complex objects by merging and deleting simpler objects, selecting edges and areas of objects to be merged or deleted to create new objects. Alternatively, users can also break up overlapping objects to create new ones.
The style properties of the object are passed on after merging. By default, the Shape Builder tool is in Merge mode; however, you can switch to Erase mode if desired using the Alt key (on Windows) or Option key (on Mac).
1. Create an object using the Shape Builder tool.
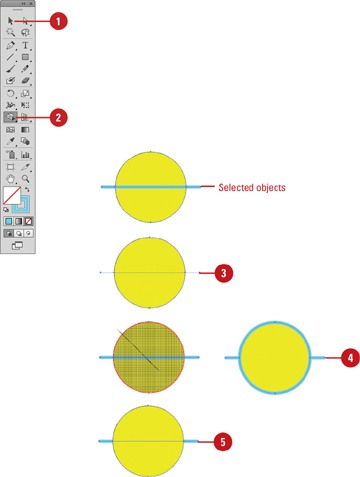
Step 1: Click the Selection toolin the Tools panel, then select the paths you want to merge to create a single object or shape.
Step 2: Click on the Shape Builder toolin the tool panel. By default, the Merge mode is selected.
Step 3: To break or extract a region from an object or shape, click to select the chosen region.
Step 4: To merge the paths, drag the paths along the area.
Two merged areas will form a new shape. Attributes from the merged area are applied to the merged shapes or the combined shapes.
Tip: Press and hold the Shift key while dragging across the paths to display a rectangular area and quickly merge multiple paths.
Step 5: To delete the paths, press the Alt key (on Windows) or Option key (on Mac) and click on the area or edge you want to delete.
2. Configure the Shape Builder tool options.
Step 1: Double-click the Shape Builder tool in the Tools panel.
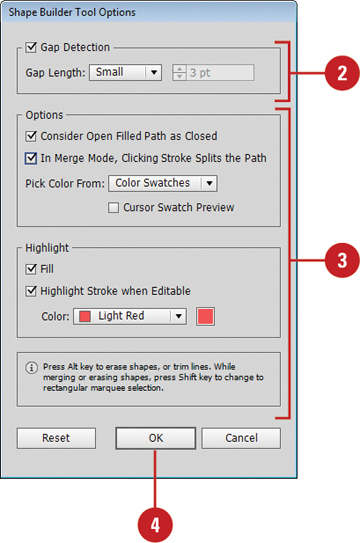
Step 2: To detect and display the distance between objects, check the Gap Detection box , then select Gap Length or Small (3 points), Medium (6 points), or Large (12 points), or you can check the Custom box and choose the length of the points.
Note: Ensure the distance value is close to the actual distance; otherwise, Illustrator will not be able to detect it.
Step 3: Customize Options and Highlight settings:
- Consider Open Filled Path as Closed: This option allows you to create an invisible edge for the open path used to create the area.
- In Merge Mode, Clicking Stroke Splits the Path: Select this option to split the parent path into two, with the first edge splitting when you click on the specified split location.
- Pick Color From: Choose Color Swatches or Artwork as the color source for the objects. If you choose Color Swatches, remember to check the Cursor Swatch Preview box to preview and select colors.
- Fill: Select to highlight the merged area in gray or hover over the selected path.
- Highlight Stroke When Editable: Highlight the stroke using your chosen color.
Step 4: Click OK.
The article above, by TipsMake, has just introduced you to how to use the Shape Builder tool in Illustrator. Additionally, if you have any questions or need clarification, please leave your comments in the section below the article.
If you want to change the default background color in Illustrator to make it less boring, you can also use different available colors to set the background color for the software's interface. See our guide on how to change the default background color in Illustrator .
Was this article helpful?
Your feedback helps us improve.
Related Articles
 Learn about Stroke in Illustrator10 minutes read
 Draw and edit curves with the Curvature tool in Illustrator.5 minutes read
 Common Adobe Illustrator shortcuts9 minutes read
 Top most effective and easy-to-use AI tools for creating websites.9 minutes read
 Adobe Illustrator 2021.26.0 - download Adobe Illustrator 2021.26.0 here3 minutes read
 Instructions for completely removing the 3D Builder application on Windows 105 minutes read
Reader Comments 0
Sign in with email or Google to join the discussion.