Table of Contents
Consistent Free Fire results come from choosing fights that improve your position, not from avoiding every opponent or chasing every elimination. Land with a backup plan, assemble a functional loadout quickly, rotate before the zone forces you into open ground, and use information before committing to a fight.
1. Choose a landing spot from the flight path
A named location is not permanently “safe” or “hot.” Its risk changes with the aircraft route and the number of visible parachutes. Mark a preferred spot and a nearby alternative before jumping, then look around during descent.

- New players: land near, rather than directly inside, the busiest high-loot compound.
- Squads: land close enough to trade damage but not on the same single weapon.
- Late landing: divert if another player will reach the roof or doorway first.
- Edge drop: begin moving earlier when the first safe zone appears far away.
The goal of the first minute is one usable close- or medium-range weapon, ammunition, armor, healing, and information about nearby enemies. Perfect attachments can wait.
2. Balance survival with useful fights
Hiding until the final zone can produce a high placement but leave you without upgraded gear, information, or confidence when a fight becomes unavoidable. Take engagements when you have an advantage: better cover, first sight of the enemy, teammate support, or a safe route if the fight goes badly.
Disengage when the blue zone is closing, a third team arrives, ammunition is low, or the opponent controls stronger terrain. An unfinished fight is preferable to being trapped outside the safe zone.
3. Use high ground without becoming predictable

A hill, tower, or upper floor can improve visibility and reduce the body area exposed to opponents below. It can also silhouette you against the sky or leave only one exit. Scan behind and below the position, avoid repeated peeks from the same window, and move after shooting.
- Use hard cover such as rocks and walls; bushes conceal but do not stop bullets.
- Hold a ridge from slightly behind its crest instead of standing fully on top.
- Check whether the next zone lets you leave without descending through open ground.
- In squads, watch different approaches rather than placing every player on one angle.
4. Rotate before the zone becomes an emergency
Open the map after the first fights and estimate the distance, terrain, bridges, and likely enemy routes. An early rotation gives time to scout; a late one forces you to sprint through positions already held by other teams.
Vehicles save time but announce the squad and can become a poor place to stop. Leave the vehicle behind cover, not in the center of the destination. On foot, move from tree to rock to building and pause briefly to listen before crossing an exposed area.
5. Treat airdrops as enemy signals
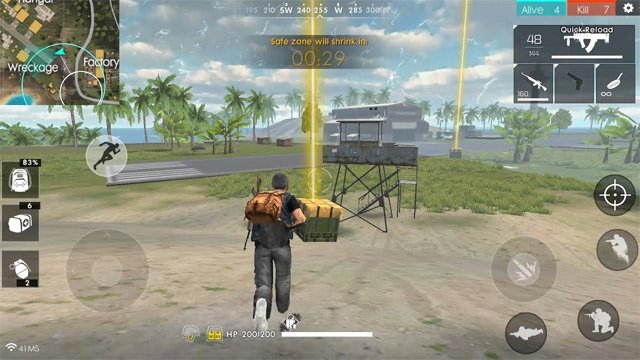
Airdrops contain valuable equipment, which makes them predictable points of attention. Do not run directly to a crate as soon as it lands.
- Observe nearby hills, windows, trees, and vehicles.
- Listen for shots and check whether another player is already looting.
- Choose hard cover and an exit route before approaching.
- Let one teammate loot while others hold separate angles.
- Take priority items, move away, and arrange the inventory from cover.
If the crate is in open ground or outside the next safe zone, leaving it alone can be the stronger decision. Eliminating an opponent near the crate does not prove that the area is clear; a third party may be waiting for both players.
6. Build a loadout for more than one distance
| Primary role | Useful partner |
|---|---|
| Sniper or marksman rifle | SMG, shotgun, or controllable AR |
| Close-range shotgun | AR or marksman rifle |
| Medium-range AR | SMG, shotgun, or long-range option |
Carry ammunition for the weapons actually equipped and leave room for healing, Gloo Walls, and throwables. TipsMake's guide to Free Fire sniper and marksman rifles explains long-range positioning in more detail.
7. Play the final zones differently
Late in the match, information becomes more valuable than extra loot. Move only when the zone, a stronger position, or an identified threat requires it. Count remaining players, remember the last gunfire direction, and avoid firing at a distant target if the shot reveals you to a closer unseen opponent.
- Enter the safe side of cover before healing or reorganizing.
- Keep Gloo Walls ready for an unexpected open-zone shift.
- In a squad, revive only when cover and timing make it realistic.
- Let enemies fight when intervening would expose your position; attack when one side is weak and the route is safe.
- Do not stay at the exact edge if the next shrink could trap you behind an obstacle.
8. Coordinate a squad with short calls
Use concise information: enemy direction, distance or landmark, number of players, and action. “Two enemies, northwest, behind the blue house; hold” is more useful than repeated shouting. Mark the map, share spare ammunition, and move so teammates can trade damage without clustering for one grenade.
For team play, see how to add friends and invite them in Free Fire. TipsMake also tracks Free Fire version changes that may alter maps, weapons, characters, and tactical items.
Related Articles
 Top 5 Most Popular Emotes in Free Fire5 minutes read
 minutes readLatest Free Fire Code April 20213 minutes read
 Instructions to Receive the Burning Leo Package in Free Fire5 minutes read
 How to Use Sniper Rifles in Garena Free Fire5 minutes read
 Garena Will Launch Free Fire Max - Graphically Enhanced3 minutes read
Reader Comments 0
Sign in with email or Google to join the discussion.